
Well hello everyone, and apologies for being quiet for so long – it’s been a hectic time what with getting house renovations done and getting projects over the line. But now let’s just run through a quick recap of something I did for a customer recently, that involved migrating Pinned Items – both from the Taskbar and the Windows 10 Start Menu – into a new set of user profiles.
Requirements
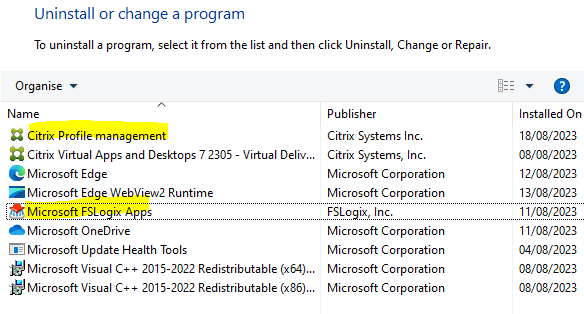
The customer I was working with was moving from file-based Citrix UPM to a container-based solution (FSLogix in this instance, but like I’ve mentioned a few times, I now think UPM container is a genuine competitor in this space). Their requirements wanted a new profile for each user (because when moving profile solutions, it can be desirable to cut out a lot of the accumulated cruft within them), so straight migration of the existing profiles wasn’t necessary or desired. What they did want to come across, though, were the user’s Pinned Items – any application or web shortcuts that they’d pinned to either the Taskbar or the Start Menu.
They also wanted a non-intrusive “flip-switch” method of migration – so nothing required on the administrative side besides possibly adding the users to a group. It was also intended that the same devices should be used, so the migration would take place without provisioning different machines – FSLogix and UPM would need to be installed on the machines side by side until migration had finished, at which point UPM could be removed.
The obvious idea to allow “flip” migration would be to add the users to a group or groups as migration was required, so this is the approach we took.
Implementation
User config
Obviously each user needs somewhere to save their settings and import them. Home drive is the obvious place for this. Our users have an H: drive so whenever H: is referenced from now onwards change it as appropriate.
Installation
Now make sure both Citrix UPM and FSLogix were installed on the target devices and configured via policies.
Active Directory groups
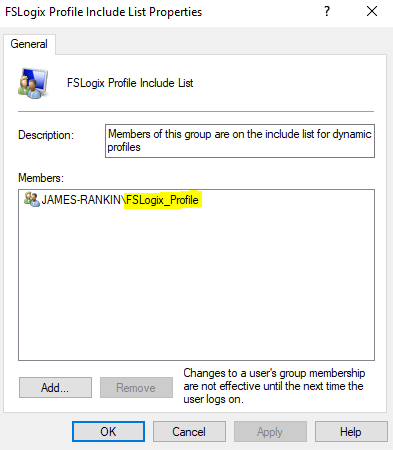
Next we configure some AD groups to drive this for us. We have created an “FSLogix_Profile” group and also a “Migration” group. The first will control whether FSLogix is used for profile management, the second will call the migration processes.
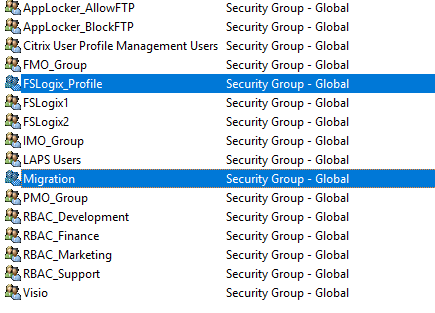
Now, at this point I needed to check whether the users had the command prompt and Registry tools disabled via GPO, as you will need to be able to use these to complete the migration (PowerShell finds it very difficult to export to a .reg file). If you don’t have these policies enabled, then you can forget about creating a third group as shown below, but if you do have these policies enabled, you’d need to create an additional group called Pre-migration or something like that.
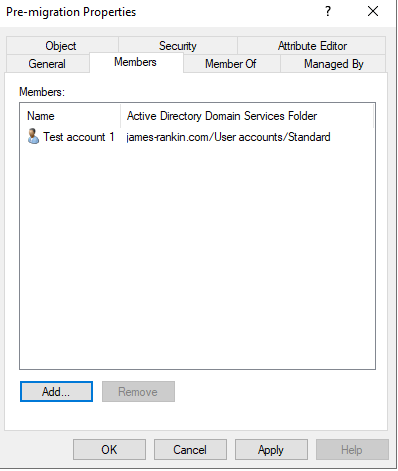
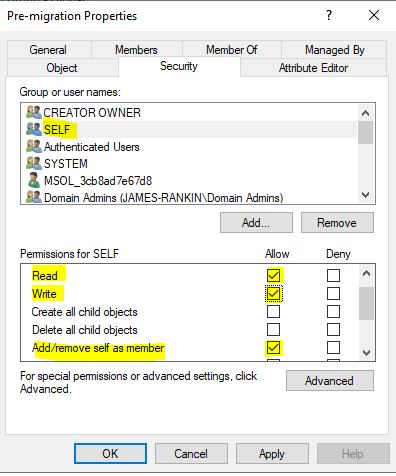
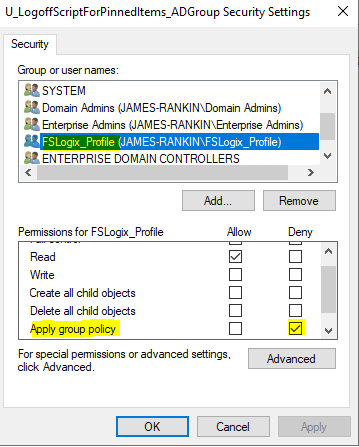
Important – both the Pre-migration and Migration groups need to be set to allow users to remove themselves from these groups, as part of the migration process will be to clean up after them. Ensure that the following security setting is enabled on both of the Pre-migration and Migration AD groups (go to Properties | Security and change the settings for Self to those below)
UPM and FSLogix configuration
Next, we made sure that UPM and FSLogix could never get into a “fight” with each other, as this would more than likely have comprehensively broken the user profiles. We do this by adding the FSLogix_Profile group as an Excluded Group in the UPM policy, and the FSLogix_Profile group is also the only member of the local “FSLogix Profile Include List” group on the device. Therefore a user can only use FSLogix when in the group, and if in this group, UPM will never manage the profile. These settings are enforced via policies.
Note – make sure you bake in the FSLogix groups into a master image, if you are using one, I have seen this cause issues.

Group Policy Objects
After this, we need to configure some GPOs.
If you have the command prompt and Registry tools disabled, then you need to create an additional GPO that enables both of these settings. If you don’t have them disabled, you can skip the creation of the GPO in the step below and move on to the ones that do the logoff and logon scripts.
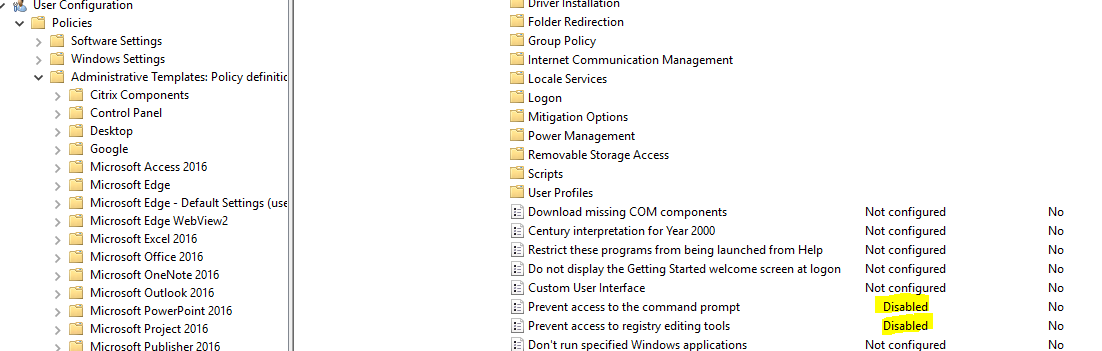
Note that these are some of the awful “double-negative” GPO settings – to enable access you need to disable them.
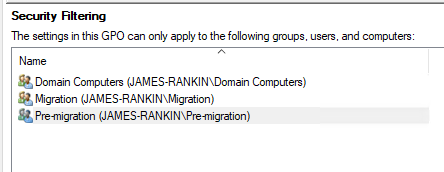
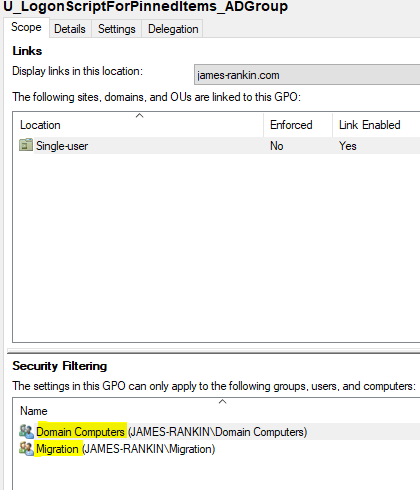
Make sure that the above GPO is security filtered to the following groups – Domain Computers, Pre-migration and Migration.
Also make sure (obviously) that the GPO that enables the functionality sits above the one that disables them in the order of precedence.
This will ensure that users can only get the lowered security settings when they are ready for migration or actively being migrated.
Next, create a Logoff Script GPO, apply it to Authenticated Users as normal, but apply a delegation privilege so that the FSLogix_Profile AD group cannot apply it. This will save the user’s settings as required but once they are migrated will cease to perform the export.
The logoff script should be a PowerShell script with the content as below (change H: as required for your environment):-
# Empties directory in case user has run this script before and has removed items, to ensure that it does not become cumulative
remove-item H:\PinnedItems -Force -Recurse

# Creates save directory in home drive (change as appropriate) and sets as Hidden
md H:\PinnedItems\Custom
attrib +h H:\PinnedItems

# Exports Registry and filesystem for Taskbar Pinned Items into home drive folder
regedit /e /y "H:\PinnedItems\Taskband.reg" HKEY_CURRENT_USER\Software\Microsoft\Windows\CurrentVersion\Explorer\Taskband
copy-item -Path "$ENV:APPDATA\Microsoft\Internet Explorer\Quick Launch\User Pinned\Taskbar\*" -Destination "H:\PinnedItems" -Recurse

# Exports custom Pinned Items
copy-item -Path "$ENV:APPDATA\Microsoft\Windows\Start Menu\Programs\*.lnk" -Destination "H:\PinnedItems\Custom"

# Exports copy of Start Menu Pinned Items into home drive folder
Export-StartLayout -Path H:\PinnedItems\LayoutModification.xml
Note that we used regedit from the command line rather than reg export because in some situations the reg export command will throw an error.
Also, note that we have to export the shortcut files from the user’s Programs folder – this is in case the user has pinned items directly from an Explorer window rather than the Start Menu, which copy a shortcut to their profile first before creating the entry.
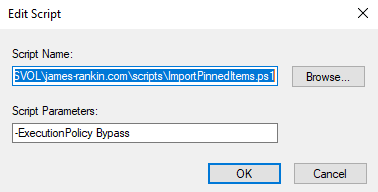
Finally, ensure that the logoff script is set to run with the -ExecutionPolicy Bypass parameter

Now create another GPO, this time a Logon Script policy. Filter it so it only applies to the Domain Computers group and the Migration AD group.
Set the content of the logon script as below:-
# Copy LayoutModification file into user profile for processing
copy-Item -Path "H:\PinnedItems\LayoutModification.xml" -Destination "$ENV:LOCALAPPDATA\Microsoft\Windows\Shell" -Force

# Import Taskbar Pinned Items Registry and filesystem entries
reg import H:\PinnedItems\Taskband.reg
md "$ENV:APPDATA\Microsoft\Internet Explorer\Quick Launch\User Pinned\Taskbar"
copy-item -Path "H:\PinnedItems\*.lnk" -Destination "$ENV:APPDATA\Microsoft\Internet Explorer\Quick Launch\User Pinned\Taskbar" -Force

# Removes user from migration and pre-migration groups so that it does not run again
net group "Migration" $ENV:USERNAME /delete /domain
net group "Pre-migration" $ENV:USERNAME /delete /domain

# Clears home drive area
remove-item H:\PinnedItems -Force -Recurse
Really, this trick shouldn’t work – note we are putting the LayoutModification file into the user profile rather than the default profile? Well, it does work in my lab and with the customer – so I’m suitably impressed.
Also, as with the logoff script, the logon script needs to be set to ExecutionPolicy -Bypass
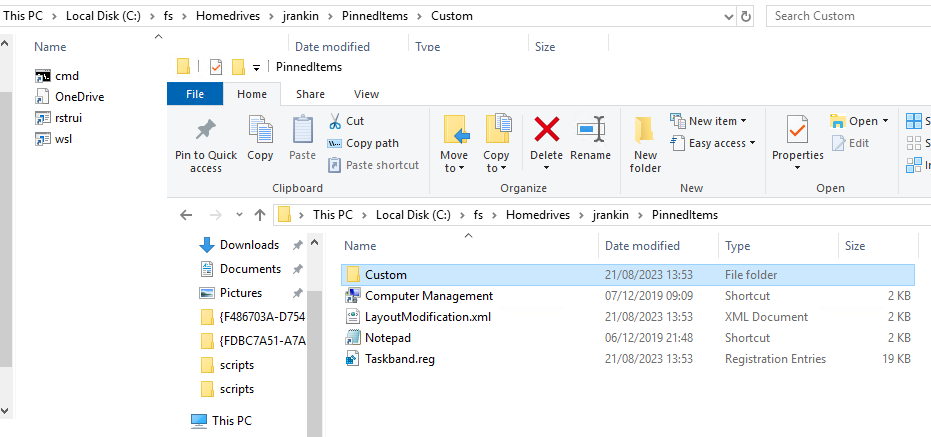
There’s one more GP setting to add – you can add this to the Logon Script GPO if you want to consolidate a bit. The “Custom” items we saved into the home drive – you cannot import these in the logon script when you are creating a new profile, as they get put in too early and the default profile overwrites them. The solution is to use a Group Policy Preferences File item (User Config | Preferences | Windows Settings | Files) to copy them in from the network, as this CSE runs later in the logon it executes after the profile has already initialized. One thing to remember though – use the full UNC path to the settings store, not the H: or other drive letter (see image below)

Final checks
A couple of other things to note:-
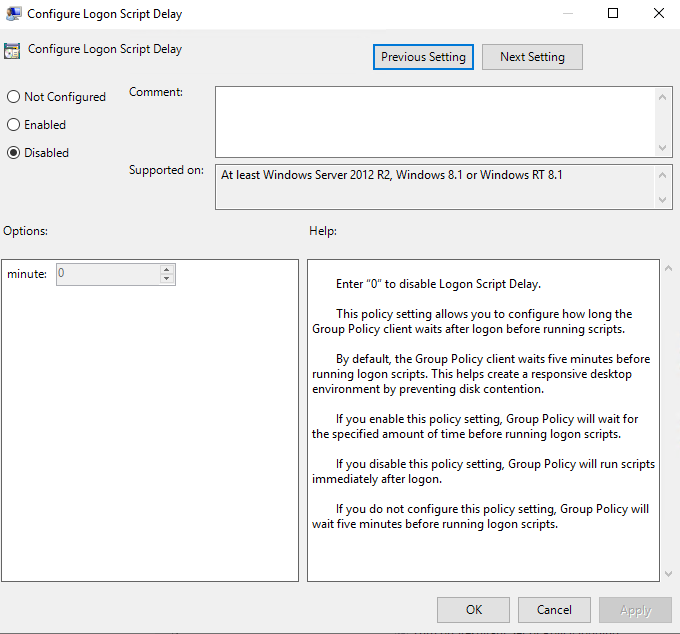
As we are using a logon script to drive this, you need to make sure that the LogonScriptDelay is set to 0 or Disabled (found in Computer Config | Admin Templates | System | Group Policy)
Also be very careful if using custom Start Layout files/policies or other XML files to set your branding. I found that having these applied could produce inconsistent results.
Testing
So, how do we trigger all of this?
Ahead of migration, add target users to the Pre-migration group. This will remove the restrictions on the registry tools and command prompt, allowing their settings to be saved into the location configured. Obviously because this increases their threat profile slightly, it is sensible to do it a short while prior to actual migration.
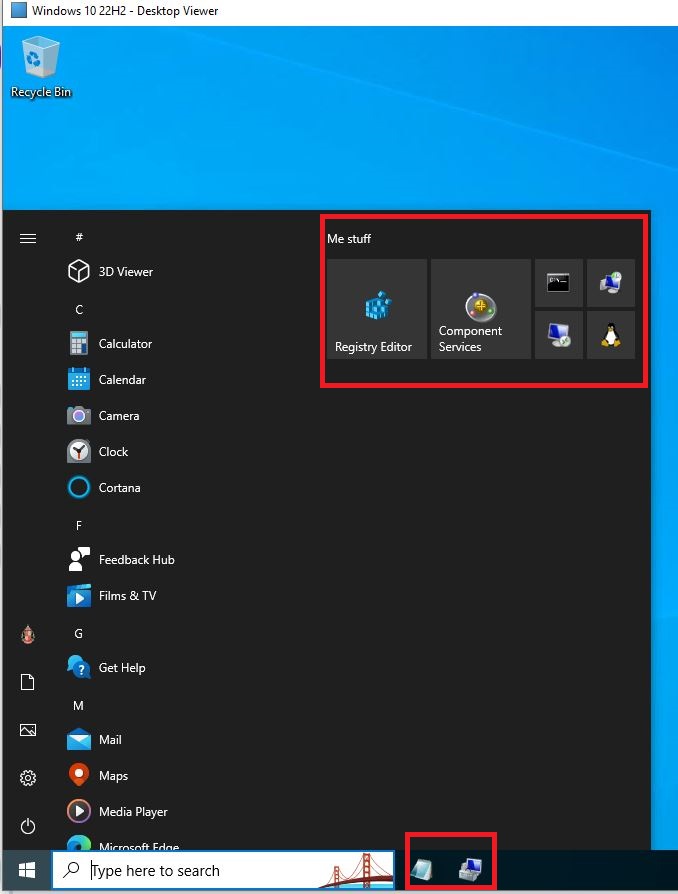
You can see above the Start Menu and Taskbar Pinned Items we have configured, and below you can see them saved into the home drive.
Next we add the user to the Migration and FSLogix_Profile AD groups, which will switch from UPM to FSLogix and also run the logon script. On next logon the user will receive a new FSLogix profile but the script and policy will run to import the Pinned items into it.
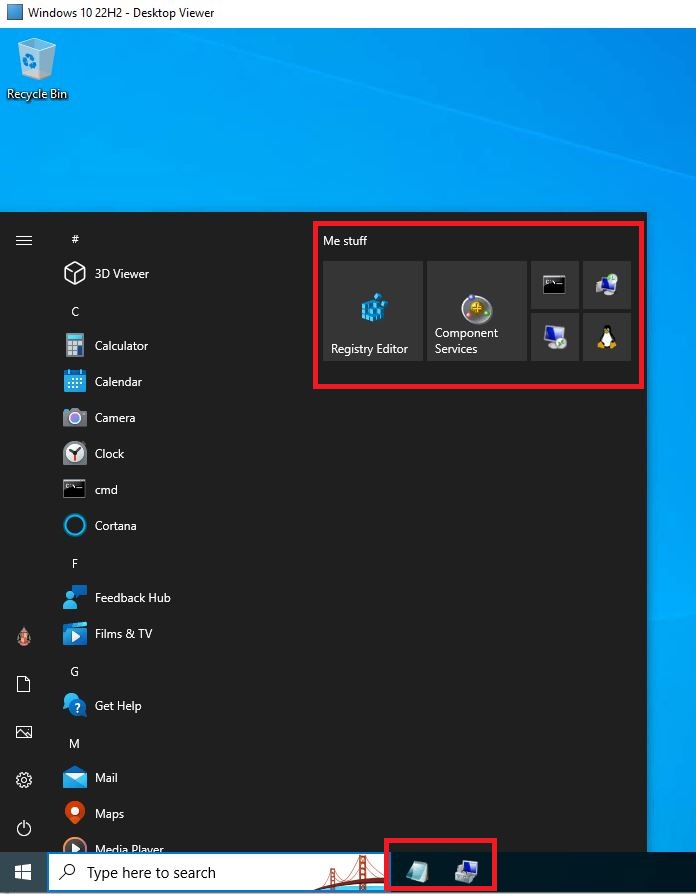
There we go – a brand new profile, but with all the Pinned Items imported. Cool!
Caveats
The one caveat I did find with this (although your testing may well bring more) was if the user has pinned web items from a Chromium-based browser onto the Taskbar or Start Menu. The items come over fine and work fine, but you will lose the icons. This is because the browser stores the icon in a temp location – in the case of Microsoft Edge, it is this path (the files have a .ico extension) :-
%LOCALAPPDATA%\Microsoft\Edge\User Data\Default\Pinned Sites\MSEdge._pin_adnlfjpnmiaohpidplnoimahfh
(I believe the final folder name is randomized)
If you wanted to bring these across as well, you could simply extend the script and/or the GPP File item to cover this path also.
Summary
So there’s an (admittedly fairly convoluted) way to bring Pinned Items across into new profiles on the same devices, should you require it.
My schedule has freed up a bit lately, as I am now doing much less work, so hopefully more blog items, videos and articles to come. Stay tuned!