
Need a quick and easy 2FA setup for Windows and RDP logons? This might help…
So I recently had a challenge where I needed to add 2FA (specifically, using the Microsoft Authenticator service) to a Windows 10 logon for a particular set of users. Rather naively, I assumed that you would be able to do this simply using the Microsoft Authenticator service directly, but I was surprised to find that this functionality wasn’t offered. The way Microsoft recommend to do it was by using Windows Hello, but within a few minutes of reading the literature around it, it was clear that there was a *lot* of work required to get Windows Hello up and running – and it wasn’t exactly fully foolproof either.
There’s a lot of requests to extend the Microsoft Authenticator service onto Windows console logons and RDP logons, and since MS have sunset the on-premises MFA server this is only increasing. Microsoft seem hell-bent on pushing through the passwordless, biometric concept of Windows Hello, and while this is something that no doubt will gain much traction in the future, legacy systems with passwords and MFA aren’t going away anytime soon. So, in the absence of Authenticator being integrated with Windows 10, it started to look like I was on the hunt for a (preferably free or low-cost!) third-party provider.
Duo are one of the leaders in this category, but given that their free version only extends to ten users, it didn’t fit my needs. Enter Leee Jeffries to tell me about ManageEngine’s AD Self Service Plus product, which is free for up to fifty users (and, if I’m not mistaken, seems to be owned by Zoho). This looked really promising, so off I set to see how easy it was to get up and running.
Installing the software
First I set out to install my AD SelfService Plus software

The default port for the web service is 8888 – if you wish to use a different port, you can enter it at this point

The installation will then proceed

Once the installation is finished, you can launch the console from the desktop shortcut, and you can also install it as a Windows service if you wish (from the Start menu shortcuts)

If you do install the software as a service, the server will need to be rebooted before it activates. Also, it is recommended to run the service as a domain account rather than LocalSystem, especially if it is going to be doing remote deployments of the client software from the console.
As the console runs in a browser, you may need to turn off IE Enhanced Security Configuration if you are intending to access it from the server desktop.
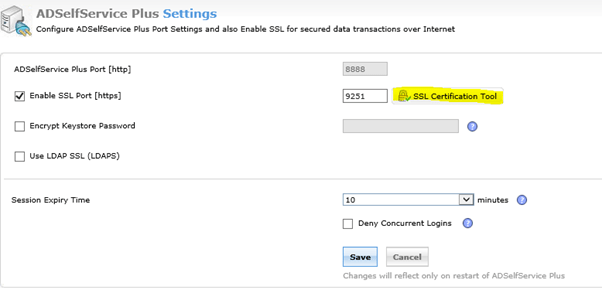
Setting up SSL
The AD SelfService Plus software uses a Tomcat instance so in order for it to work properly, you will need to install an SSL certificate.
There are a number of articles on the ManageEngine site about configuring certificates, however in order to install a self-signed certificate from my own CA I had to follow this process.
Log on to the console as admin (the default password is also admin)

Go to Admin | Product Settings | Connection
Check “Enable SSL port” and click Save

You can change the default port from 9251 if you wish. After doing this, restart the AD SelfService Plus service.
Log back in to the console as admin again (this time you will probably get a security warning, as the certificate was not issued by a trusted CA)
Return to Admin | Product Settings | Connection.
Click SSL Certification Tool button.
Fill in the required fields for generating the Certificate Signing Request (CSR)

This will generate two files – a file called SelfService.csr at \webapps\adssp\Certificates and a file called SelfService.keystore at \jre\bin (both paths relative to the software install directory).
Log on to your Certificate Authority (https://servername/certsrv) and submit the CSR
Request a Certificate | Advanced Certificate request | Submit a certificate request by using a base-64-encoded CMC or PKCS #10 file, or submit a renewal request by using a base-64-encoded PKCS #7 file.
Copy the contents of the SelfService.csr file into the Saved Request box
Select Web Server from the options for Certificate Template

Click Submit and then click Yes
Click Download Certificate to download the certificate in .cer format
Click Download Certificate Chain to download the certificate in .p7b format
Place both the files at \jre\bin

Open an elevated command prompt
Change directory to \jre\bin
Run the following commands
keytool -import -alias tomcat -trustcacerts -file certnew.p7b -keystore selfservice.keystore
(password is the password you specified when generating the CSR)
Type ‘y’ or ‘Yes’ afterwards and press Enter
.\keytool -importkeystore -srckeystore selfservice.keystore -destkeystore selfservice.keystore -deststoretype pkcs12
(password is the password you specified when generating the CSR)
keytool -import -alias tomcat -keystore ..\lib\security\cacerts -file certnew.cer
(password is changeit)
Type ‘y’ or ‘Yes’ afterwards and press Enter
Copy the SelfService.Keystore file from \jre\bin to \conf
Back up the server.xml file
Edit server.xml (you may need to run Notepad elevated to do this)
Replace both instances of keystoreFile value with ./conf/SelfService.keystore
Replace both instances of keystorePass value with the password you specified when generating the CSR
Delete the property keystoreType=”PKCS12″
Restart the AD SelfService Plus service
Log back on to the console. You should now see that your SSL certificate is trusted

Firewall configuration
Set up a Windows Firewall rule to allow inbound traffic on TCP port 9251

Configuring the policy
Next we need to configure a policy for our endpoint MFA
Log on to the console
Click on Configuration | Policy Configuration
You can either create a new policy or edit the default one (which will be named after the domain)
Select the OUs or Groups that the policy will apply to by clicking the Select OUs/Groups button. I have chosen to apply the policy to an AD group

Click on Save Policy
Switch to the Multi-factor Authentication submenu on the left
Select the policy from the drop-down list and configure your authentication method (we are choosing Microsoft Authenticator)
Click on Enable Microsoft Authenticator

Switch to the Authenticator Settings tab
Choose the policy you are working on
Enable Endpoint MFA and select the second authentication type. Also, select whether you want users to be enable to log in without 2FA if the AD SelfService Plus system is down

Next, click on Access URL and make sure you have switched to HTTPS with the right port number (9251 by default). It is imperative that this change is made before software is deployed to any target endpoints otherwise it will continue to try and connect on the old port.

Click on Save and then Save Settings
Deploy the client software to endpoints
Next we need to install the client software on the target endpoints where we wish to enable MFA. Whilst this software has an MSI download available which you can use to push the software via SCCM or a similar tool, with the free version, you must do the deployment via the console itself.
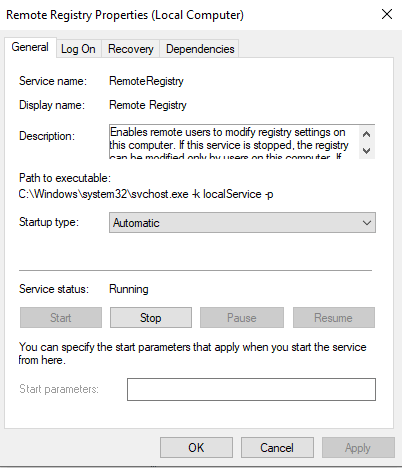
The endpoint requires two pre-requisites before deployment:-
- Enable the Remote Registry service (either locally or via GPO)
2. Ensure that the target machine can be contacted via Windows File and Print Sharing exception in Windows Firewall (this can be done either locally or via a GPO), as the deployment process connects via the admin$ share

Open the console
Click on Configuration | Administrative Tools | GINA/Mac/Linux (Ctrl-Alt-Del)
Click on GINA/Mac/Linux installation
In New Installation, locate the target machines you wish to deploy the software to

Click Install
Once the install is successful, the console will report success. Checking the target endpoint’s logon screen will now show an additional option as below

Clicking on the new option should successfully show the AD SelfService Plus options as configured in your password policy. If it fails, then remediate the error and try again (certificate issues should present themselves at this point, along with any other communications problems). The below image is similar to what you should see if it is successful (dependent on how the policy is configured)

Enrolling users
Next you need to enrol the users so that they are set up for the second factor authentication (Microsoft Authenticator in this case). There are various methods within the console that you can force enrolment. For purposes of this demo we are simply going to log the user in to the AD SelfService Plus console where they will be prompted to enrol.

Once the user enters the PIN after they have scanned the QR code, they will be successfully enrolled.

Verifying
Now it’s simply a case of logging on as the enrolled user and using the Microsoft Authenticator app for a second level of verification.
When the user logs on, they should be presented with this screen

They then have to provide the PIN code from Microsoft Authenticator before they can successfully log on. Congratulations, you now have 2FA configured for your Windows network logons (and free for up to 50 users).
Summary
Obviously if you’re in the Citrix world then there are already a bunch of options available for MFA that are very closely integrated, so this would probably only be on your radar if you needed the free version. For non-Citrix customers though, this could be very useful, particularly for limited-scope deployments like I was looking at.
There is also a huge amount of other functionality available within the AD SelfService Plus software that may prove invaluable from both a security and management perspective, so further exploring the possibilities may well be very fruitful.
![]()
Hi,
great – will MfA with PushToken also work ?
Not sure…..lots of features in the software, sure you could give it a try 😉
Lots of good information. I am individual user and only want to add 2 Factor authentication (something where I enter my password + enter a one time passcode or something else) to log into my laptop. I don’t want to use Windows Hello as it is not complete secure and I don’t want to go passwordless. Any suggestions on what could be the easiest way to get this accomplished? Thanks
I guess you’d have to sign up to a paid cloud service unfortunately. Duo may be one of use, although not sure if they support single-user pricing.
Yes they do, for up to 10 user Sign On is free
Just install the MultiOTP Credential Provider. This works totally offline and only takes a few minutes to configure. For a network there is a server option with AD sync etc too! Totally Free.
What happens if a user is offline? Such as a user working from home on weekends?.
There is a setting to bypass the MFA if the server is unavailable.
Which basically renders the product pointless. All a bad actor needs to do to disable your entire MFA solution is keep the computer from connecting to the internet?
Most laptops are used offline for several days ( where domain controller does not verify user account’s current state, current password)
These logins happen with user’s catched credentials. (Even if Admin disables user in AD, still user can login offline & can work on local data ).
Which solution (MFA) can be useful if Admin wants to block any such user from Login locally to his laptop while offline ?
If I wanted to block logging in locally while offline, I would change the number of cached passwords to store to 0 via GPO.
What’s the cost after 50 free users?
Not sure, but IIRC it was fairly cheap. You should be able to ask for a quote easily enough.
Hello, I have a query, I have installed ADSELFSERVICE, on a few computers it works correctly on some computers when the user enters it does not show the window to authenticate, but on all computers if RDP is done if the MFA works correctly.
Duo is great, has offline mode as well so you still get MFA.
It ranges in price at a few tiers:
6/user/mo
7/user/month
9/user/month
Bought in batches of 25 or more I think.
They are very flexible, if you get above your user count it still works, they’ll just reach out to true up after 30 days
Or – You could just disable password logon credentials provider with a powershell script and enable weblogin combined with Phone signin for free. to use the Microsoft authenticator app for login internet access is needed so the pre reqs for using weblogin is the same. native solution, no 3rd party app to install or manage. OR even better, use a security key for offline secure auth.
@Hasse
Web sign-in only works for Azure AD joined devices as I understand it.
So outside of just setting up the server and the GINA agent, enrolling users / setting up their MFA, Im definitely not seeing how to force a server to only do MFA login.
Ive reread this many times as well as the ManageEngine support articles, and must be missing something!
I agree, I don’t see how this forces MFA. Does anyone have an answer to this?
I think this product can only do MFA for password resets and changes. I need something that can do Windows login MFA.
No, it does Windows logon MFA, that’s what the article was demonstrating.
I understand that MFA Server was deprecated in 2019 and that the current method to authenticate via MFA to Windows 2016/2019 via Azure MFA, NPS and ADFS is to much work for small configurations?
Amazing that a third party tool is needed for such a fundamental function.
It is always possible to setup 2fa using one of the authenticator apps, then using the QR code to seed a programmable token (such as safeid/diamond). From this point on the hardware token will act as a self-contained drop-in replacement for the authenticator app (ideal if you don’t want to be dependant on a mobile phone to generate your OTP).
Great article James! If this is the easiest method for MFA for Windows login I can’t imagine the other solutions that are more complicated. This is a lot of work and Microsoft really needs to build this into their server operating systems or sell an add on product that is seamless. This is similar to Fail2Ban that is part of any Linux operating system but Microsoft doesn’t use it on their systems. I use a free third party app for this and it works great. Microsoft needs to step up their security and make it easy to implement.
Microsoft will never build it in to their operating systems. They want everyone to move to Azure so they can create monthly revenue streams. It’s currently possible in Azure.
Great article! I’m just stuck on my side with a cert error at logon. I turned of RestrictBadCert in the registry but I am using a GeoTrust cert and it applied successfully so that’s strange. By the way, Splashtop auto login completely bypasses the MFA.
Does its function for RDAPPS connections
The same method followed to use any other microsoft compatible authenticator app (e.g. Google Authenticator, SafeID authenticator etc).
So the MFA endpoint is no longer free. You have to pay for the addon $ 395 per year. Thanks for the guide, but unfortunately outdated.