
Creating a custom default profile is a good way to streamline a Windows 10 deployment. How do you achieve this?
Note:- this article refers to the default profile creation process on Windows 10 version 1803, fully patched as of 05/07/2018. Further servicing updates (Windows patches) or feature updates (OS upgrades) will possibly invalidate this, although I will strive to keep this article as up-to-date as humanly possible.
The best way to set up a custom default user profile is to run from Audit Mode. This is a special mode of Windows that is invoked during the build process. The original purpose of it was for corporations to complete installation tasks before shipping them to users who could then complete the installation in the usual fashion. In Audit Mode, the device is logged on as the local Administrator account (which will be disabled afterwards) and allows changes to be made to the device prior to sysprep. However, if sysprep is run with the /copyprofile switch, the local user profile will then be copied into the default user profile and then become the default profile for the image.
Be aware that you can only run Audit Mode a specified number of times if you reach the stage of running sysprep when you’re finished – four times will be your limit, unless you use the /skiprearm switch. I find it easy simply to take a VM snapshot of the reference image prior to running sysprep and restoring if necessary.
In order to invoke Audit Mode, start a Windows 10 build and wait until you reach the point shown in the image below, then press Ctrl Shift and F3.

The machine will then boot into Audit Mode, where it will automatically log on as the built-in Administrator account.
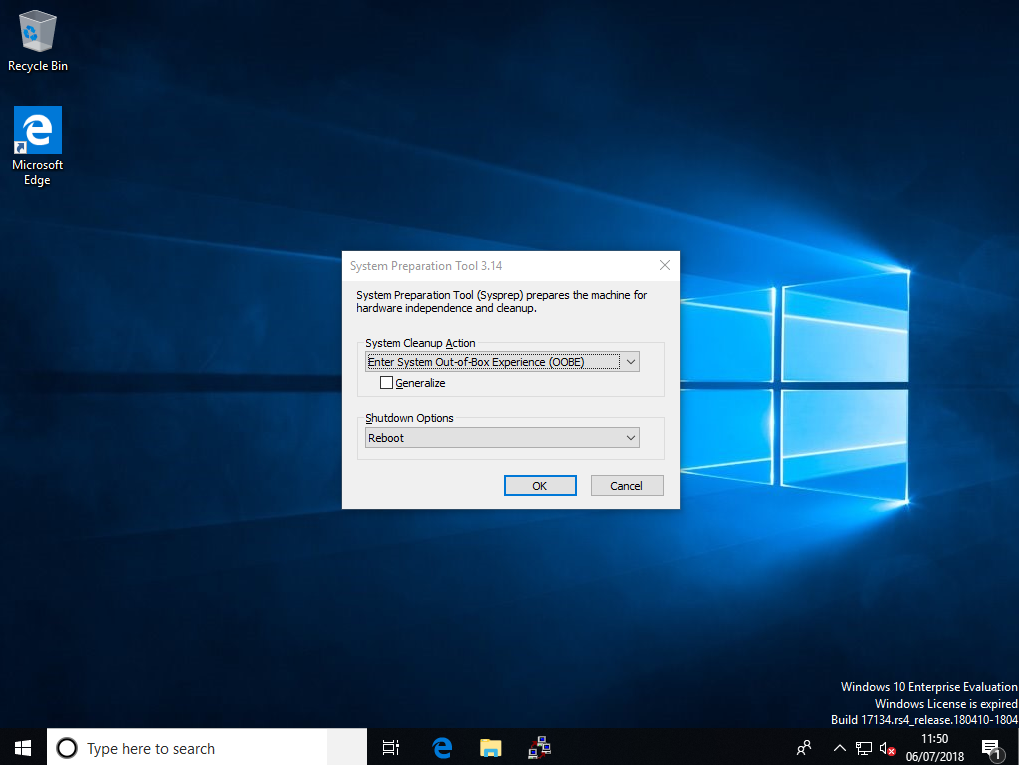
Click on Cancel on the sysprep dialog box. Now, you can set about making any changes you want on a device or user level. Normally at this point I remove UWP apps as specified in this article. However, as this post is merely about the user perspective, here are some of the things I tend to do here:-
- Set background and branding
- Set Explorer to show file extensions
- Set File Explorer to open at “my PC” instead of “Quick Access”
- Set the Start Tiles as required
- Set desktop icons as required (add My Computer and Control Panel)
- Set Taskbar Pinned Items as required
- Set browser homepage and search options

After this, we just need to do a quick bit of tidying up. Simply run this command to grab a copy of the Start Tiles layout to deploy to new users. Run it from an elevated PowerShell session
Export-StartLayout -Path $ENV:LOCALAPPDATA\Microsoft\Windows\Shell\LayoutModification.xml
Once you’ve got this done, you need to create an answer file for sysprep to read to tell it what to do. You can either create one using Windows tools, or simply steal the pre-canned one I have prepared here 🙂 If you’re just interested in running with the pre-determined version, skip ahead to the section marked “Pre-canned answer file”
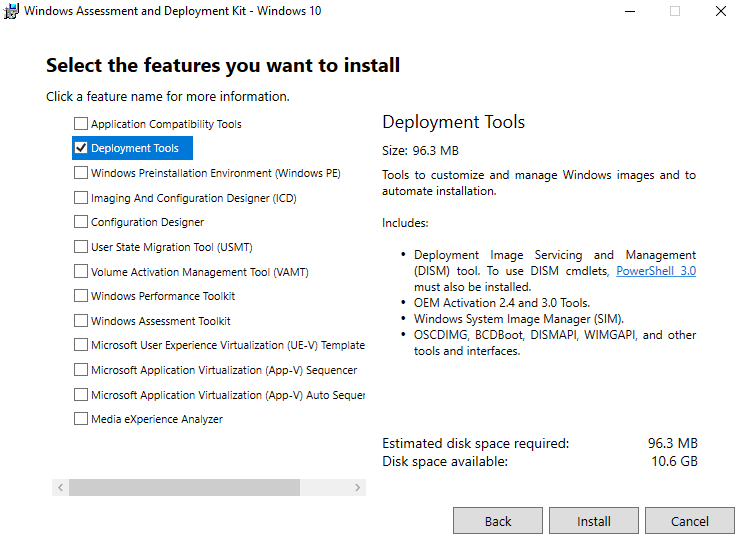
If you want to do this manually, download and install the Windows ADK, the 1803 version is currently available from this link. Next, install the Deployment Tools option from the ADK only.
Make sure you’ve got your Windows 10 source files available. You will need read/write access to the source files for Windows , so take a copy of the install.wim file from the \sources folder and put it somewhere you can access it with Read/Write permissions.
Once this has completed, run Windows System Image Manager from the Start Menu. From the File menu, choose New Answer File. Click on Yes and locate the install.wim file from your Windows image. Click on Yes to create a catalog file.
Now, we can go to work to customize the answer file as required. Under Components in the bottom left pane, select the folder that starts with amd64_Microsoft-Windows_Shell-Setup (or x86_Microsoft-Windows_Shell-Setup if you’re on a 32-bit platform), select it and choose Add Setting to Pass 4 specialize

Next you will see this is now added to the Answer File section in the middle pane. Expand this out and set the CopyProfile flag on the right-hand pane to True
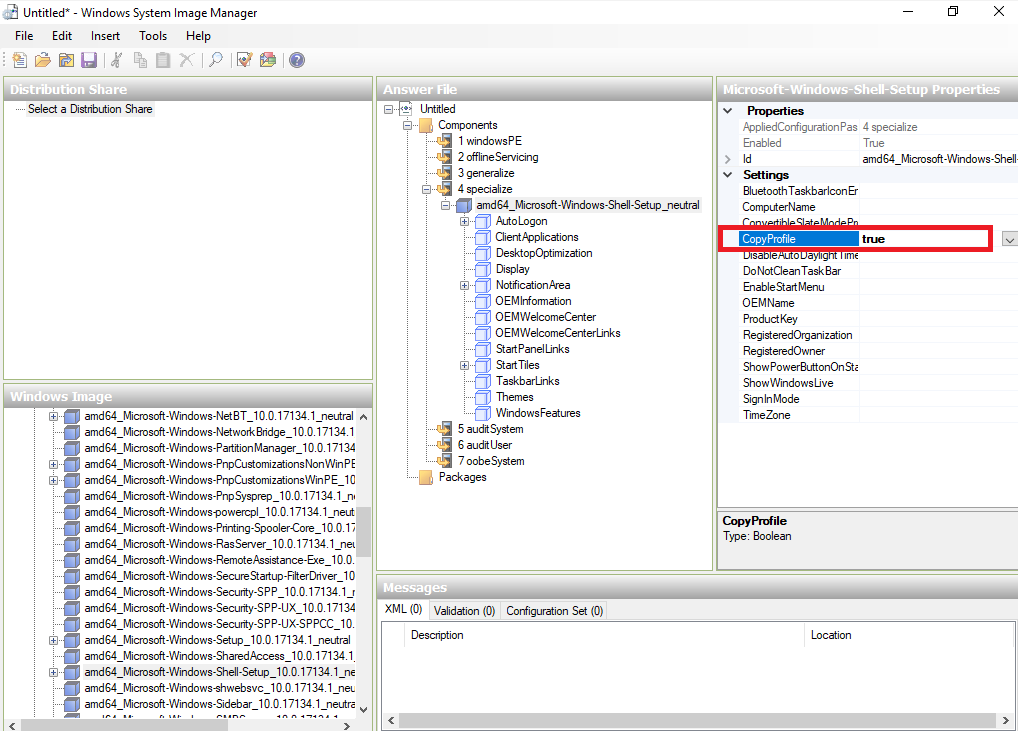
You can set any of the other options within the answer file as you wish, but this one is the only one we actually need. Once finished, validate the answer file by using Tools | Validate answer file, then save it somewhere as an .xml file. In this case, we are just saving to c:\unattend.xml.
You can then open the file up in a text editor if required and check it.
Pre-canned answer file
If you want to avoid all this mess, here’s a pre-made answer file I use on a regular basis 🙂 Items highlighted in bold you may need to check to match your environment, but otherwise you should just be able to copy and paste into an text file and use it with impunity!
<?xml version=”1.0″ encoding=”utf-8″?><unattend xmlns=”urn:schemas-microsoft-com:unattend”>
<settings pass=”specialize”>
<component name=”Microsoft-Windows-Shell-Setup” processorArchitecture=”amd64” publicKeyToken=”31bf3856ad364e35″ language=”neutral” versionScope=”nonSxS” xmlns:wcm=”http://schemas.microsoft.com/WMIConfig/2002/State” xmlns:xsi=”http://www.w3.org/2001/XMLSchema-instance”>
<CopyProfile>true</CopyProfile>
</component>
</settings>
<cpi:offlineImage cpi:source=”wim:D:/sources/install.wim#Windows 10 Enterprise” xmlns:cpi=”urn:schemas-microsoft-com:cpi” />
</unattend>
Watch out – these lines may wrap.
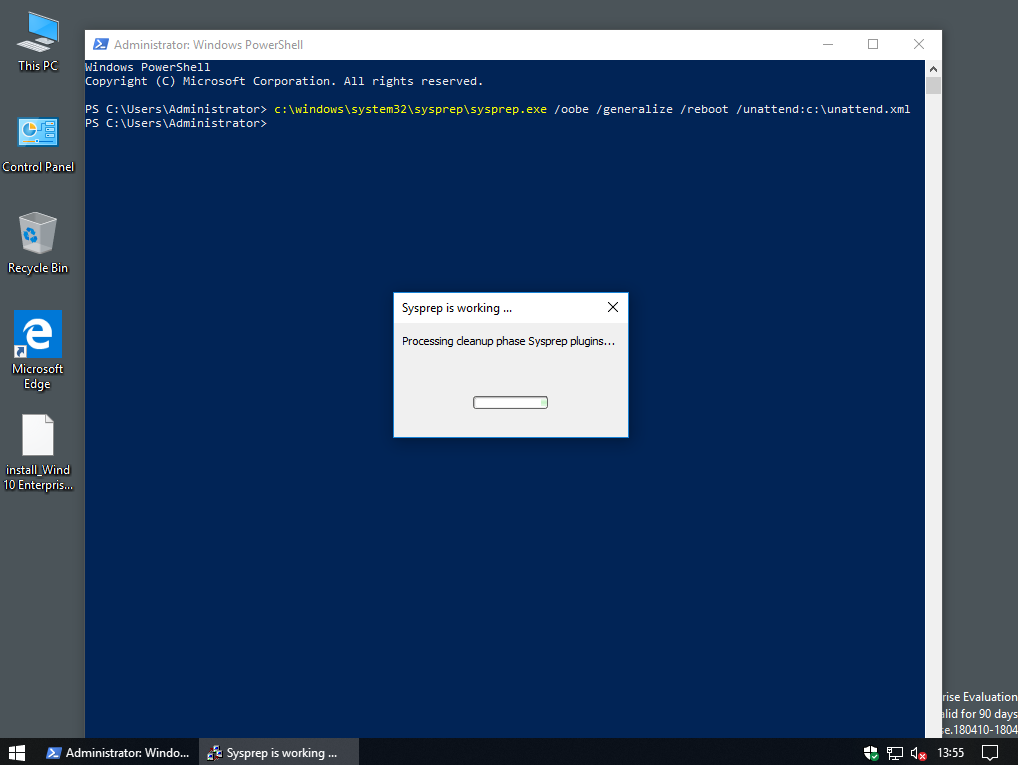
So once you’ve created your answer file, either manually or using the one above, you now need to run sysprep. Open up an elevated command prompt and run this command
c:\windows\system32\sysprep\sysprep.exe /oobe /generalize /shutdown /unattend:c:\unattend.xml
Naturally, replacing the correct path to your own answer file.
An interesting aside – sometimes I get an error here that directs me to the sysprep log (setupact.log), and I commonly find this happens when I have been removing UWP apps at this stage. If you have removed a provisioned app that still exists in the user profile, sysprep will fail. You need to make sure any provisioned apps removed using Remove-AppxProvisionedPackage have also been removed from the active user account using Remove-AppxPackage. Also it is possible to get an error here if the Windows Media Player Network Sharing Service is running.
Once this is run, sysprep will do its stuff and then shut down the image
The system is now shut down and ready for image deployment with your custom default profile baked-in, but what I usually find is that the default profile will be a bit bloated and contain some references that are not necessary (like PowerShell command history, for instance). To get around this, I run the following script either during imaging or post-imaging just to ensure that the default profile is fully tidied up and as streamlined as possible. There are batch commands in here but they will run from PowerShell without issue, it does however need to run elevated.
takeown /f c:\users\default\appdata\local\Microsoft\WindowsApps /r /a /d Y
icacls c:\users\default\appdata\local\Microsoft\WindowsApps /grant Administrators:F /T /C /L
get-childitem C:\Users\Default\AppData\LocalLow -force | foreach ($_) {remove-item $_.fullname -force -recurse -confirm:$false}
get-childitem C:\Users\Default\AppData\Local\Microsoft\Windows -exclude “Shell”,”WinX” -Force | foreach ($_) {remove-item $_.fullname -force -recurse -confirm:$false}
get-childitem C:\Users\Default\AppData\Local\Microsoft -exclude “Windows” -Force | foreach ($_) {remove-item $_.fullname -force -recurse -confirm:$false}
get-childitem C:\Users\Default\AppData\Local -exclude “Microsoft” -Force | foreach ($_) {remove-item $_.fullname -force -recurse -confirm:$false}
get-childitem C:\Users\Default\AppData\Roaming\Microsoft\Windows -exclude “Start Menu”,”SendTo” -Force | foreach ($_) {remove-item $_.fullname -force -recurse -confirm:$false}
get-childitem C:\Users\Default\AppData\Roaming\Microsoft -exclude “Windows” -Force | foreach ($_) {remove-item $_.fullname -force -recurse -confirm:$false}
get-childitem C:\Users\Default\AppData\Roaming -exclude “Microsoft” -Force | foreach ($_) {remove-item $_.fullname -force -recurse -confirm:$false}
Get-ChildItem c:\users\default -Filter “*.log*” -Force | Remove-Item -Force
Get-ChildItem c:\users\default -Filter “*.blf*” -Force | Remove-Item -Force
Get-ChildItem c:\users\default -Filter “*.REGTRANS-MS” -Force | Remove-Item -Force
This script will strim your default profile from around 125MB to about 4MB. Now, you are ready to deploy the image fully using your default profile that you have customized!
Summary
Setting up the default profile is an easy way to make general customizations, improve logon times, and make the whole user experience a lot more slick. It also cuts down on the amount of baseline policies that are required for the user environment, as they can be baked in. Ideally, this process should be repeated for each new iteration of Windows 10 feature releases.
You can also, if you wanted to, centralize the deployment of your default profile by copying the profile you created into a folder in the NETLOGON share and calling this folder Default User.v6 (for Windows 10 1703 and above, prior Windows 10 versions use the suffix .v5). In this situation, you could make changes in one location and have them reflected everywhere (assuming that DC connectivity is available for the client).
![]()
thanks.
Very good tutorial, but a question I need to implement an application but the same I have to open it with a specific application, how can I create a scrit to make it maxivo
Awesome write up. I tried to use your canned unattend.xml file and found when copy and pasting it out I notice the ” s look weird. I had to back them all out and retype them and then everything started working.
Ah, that has happened to me a few times, thanks for pointing it out.
Hi James, excellent piece here as I’m trying to get my head around building a custom win 10 pro image for the organisation. Does it make any sense on having applications installed while CTRL SHIFT F3 as I would need to pin them to start for all users?
Thanks again,
Albert
Hi Albert
In that case I’d say yes, I’ve seen people install Office at that stage to pin those icons.
Nice tutorial!
We are stuck in the phase where the sysprepped image starts again and the “specialize” phase is executed.
The displayed error is “Windows could not parse or process the unattend answer file for pass [specialize]. The settings specified in the answer file cannot be applied. The error was detected while processing settings for component [Microsoft-Windows-Shell-Setup].”
C:\windows\Panther\UnattendGC\setupact.log shows “Error [Shell Unattend] CopyProfileDirectory from C:\Users\Administrator failed (0x80070070) ”
I even tried with clean install in audit mode (no modifications or cutomizations) and still the same result.
We use a very simple unattend.xml like the one in this tutorial.
What could be wrong?
Hi Sven
Have you checked the permissions on the source administrator profile directory? Is the formatting OK in the unattend.xml file (if you’ve copied it from somewhere, the characters may have come across badly)? There are generally only a few tags at that particular section. Is CopyProfile definitely set to True?
I didn’t change the permissions on the source administrator profile. I’ve used Ctrl-Shift-F3 for Audit mode and from there the “sysprep /oobe /generalize /shutdown /unattend:c:\unattend.xml” command.
Otherwise no special actions or customizations.
The unattend.xml is generated with the deployment tools as discribed in the tutorial and is very simple:
true
Very strange then, I’d possibly try with a pre-canned XML file to see if you get the same behaviour (although be careful with the character types if you’re using mine)
Strange, I took your pre-canned XML and it works!
I see no difference with my XML except the order of the attributes in the line “”
Thanks a lot!
I saw this somewhere else, I’d double check your file, you may be using the wrong character set.
“Your unattend.xml is in the UTF-8 with BOM but the Windows setup needs UTF-8 WITHOUT BOM”
Hi James, Thanks so much for taking the time to put this article together.
I’ve been trying to build my own image, I’ve installed MS Office and some other software then ran decrapifierv1803 and it all goes well. Created the answer file and ran sysprep without any faults BUT when i start up again, it loads the drivers … takes quite a while, prompts me with regional settings then Fails.
” Why did my PC restart ? Theres a problem thats keeping us from getting your PC ready….”
Ive managed to pull out the logs but i have no idea what i should be looking for, any ideas ?
Hmmm….not happened to me. Only thing different is the use of decrapifier, have you tried running a different optimization tool like the Citrix or VMware ones?
Hi James
I can’t seem to customize the taskbar without activating Windows. We use AD activation for win10 Enterprise and as machine is not domain joined i can’t get past this.
How do you get around this?
Hi Rob
This only seems to happen to me if I restart Windows from Audit Mode and return to the same mode. First boot, it allows me to customize fine despite not being activated.
Hi James,
We wanna use mandatory profiles for our RDSH server 2016 environment, does this work the same way with windows 10 & server 2016? The old-fashioned way of creating mandatory profiles just doesn’t seem to work anymore for server 2016..
thanks!
It should, just there are some subtle differences – Server 2016 uses the TileDataLayer database still for Start Tiles, so if you’re messing with that, you might have to adapt slightly. But otherwise should be pretty much the same.
Obviously the missing bit is renaming it to .man when you’re finished 🙂
I am utilizing the copy profile option and I have a pause in my MDT TS. I am noticing the profile to be around 300-400MB after making my modifications and resuming the TS to capture the .WIM. This unfortunately results in a large default profile (in addition to OneDrive not working properly). I have tried using the profile cleanup script however it put a question mark on the default profile size which I’m assuming will be the same for every user that logs in. Any ideas on the question mark issue? It’s almost like it corrupts things. Thanks!
Hmmm, I’ve seen that question mark before, it usually means the permissions are inconsistent and SYSTEM can’t read it. Not sure that my cleanup script put the ACL in for SYSTEM, that might be something to check?
Not sure what you mean specifically. If you can advise it would be greatly appreciated as I would love to use your script. Anything I can do to trim this profile down. It’s currently at 514mb. The only things I’ve done are remove modern apps and setting some local GP options. Not sure why it’s so high in size. Thank you
Greetings.
Thanks for the write up but I have a Dell 5490 that I’m installing Win10 Enterprise from a thumb drive. I follow the directions but I’m not finding an install.wim but see a boot.wim in the thumb drive. Where should I find the install.wim?
It should be in the “sources” subfolder when the ISO is extracted?
I used a ISO to USB software and I didn’t see it but then again I booted off that USB stick. After you finish the build in audit mode, if I reboot it goes back to audit mode. How do I get it to continue setting up the unit?
Did you run sysprep when finished?
Thanks for this great procedure James and your related videos for a similar process with 1703.
However, I have a few issues with cleaning up the Provisioned Apps as most of them apart form 2 or 3 produce an error and won’t remove. If I leave these installed and then SysPrep the machine, my Default profile is 175mb. I then ran the script to be-bloat the profile which reduces it down to under 2MB. This issue i then get is that when the profile is copies, the User.dat file does not get copied across which it normally does if I don’t de-bloat the profile?
The ntuser.dat is usually a Hidden System file, is the de-bloat script changing the attributes so it can’t be copied?
I checked all that and have even added specifics permission for logged on user but still won’t copy. I’m tryign again on a different PC as when you see the profiles in the Advanced System Propertis, it is showing the Default Profile size as ‘?’. It only did this after the de-bloat script ran.
I will confirm the results from my other PC before end of the week.
Hello James, For the command to export the start tiles layout “Export-StartLayout -Path $ENV:LOCALAPPDATA\Microsoft\Windows\Shell\LayoutModification.xml”, is there anything else we need to do, to make sure the new users get the saved tiles? Thank you for your time.
Nope, as long as the exported file is present on every machine it is required on then this will work.
It worked for us. Thank you James!
I thought the copy profile option “breaks” the V1803 and higher for Windows 10?
Did something change?
Not that I’ve noticed, what was it supposed to break?
From what I’ve noticed, when a regular user logs in and they attempt to look at Display settings or any other settings, it takes a long time for the box to appear. When an Admin or related account logs in, there is no issue. I’ve read on other forums that it “breaks” when Copy Profile is used.
Working OK here on Windows 10 and Server 2016 instances where we’ve used CopyProfile. YMMV
I use Windows Server 2012
I also struggled with this issue and argued problems in the sysprep/copyprofile process or system configuration. It took me some time to find out. Apparently, somebody only got this problem – because on special circumstances. But it’s easy to come into or create this problem on a system which was set up by sysprep/copyprofile:
1) On such a running system logon with the Username “Administrator” (Domain-Admin or BuiltIn-Administrator activated). After that you have and can see a userprofile “c:\users\administrator”.
2) Now create a new user account and logon with (or with a domainuser). It tooks a very long time perhaps to get in. And ifyou go into settings or launch the edge browser – it opens but doesn’t work.
3) Solution: Run “systempropertiesadvanced”. Advanced System Properties will open. There, click on the Settings button in the User Profiles section. Delete the Profile “Administrator” .
4) Try things again. May be you are surprized. No problems anymore.
5) Workaround to avoid this Problem: Create an empty directory c:\users\administrator
6) Test all things again
7) If you logon again with “Administrator”-User then a new profile administrator.xxxxxx will be createtd. Test things again. No problems anymore as seen before.
8) Reason of the problem (as far as I suppose): In Audit-Mode we work with the Adminstrator-profile c:\users\administrator. By sysprep & copyprofile and boot then in the early specialize-stage this will be (partly) transferred to Default-profile and the administrator-profile will be deleted! But unfortunately some configurations in the Default- and thus also the new User-Profile obviously link furtheron to c:\users\administrator (e.g. special system databases, you can see in the logs).
The difference is or may be: With no or an empty “administrator”-directory, the system doesnt find things and so just (re-)creates them in the new generatetd user profile. But if the administrator-directory exists and the access is denied and rejected, that seems to be an other kind of error in the setup process of the new user profile and so it comes to failures and problems.
You don’t get and have this problem on an already existing userprofile. E.g. the first user created at first setup. Only for any new createtd userprofile if an Administrator had logged on before and created its “Administrator” named profile-directory. Therfore a very strange case that can drive you crazy when it happens.
Hope this can help to somebody who experienced this already or in future.
Or perhaps, Microsoft would solve the reason sometime.
Thanks so much for leaving this comment. At least I know it’s not just me….
I have tried your ‘fix’ of deleting and creating an empty users/administrator folder, and it does work. I’m hoping I can figure out why the original problem happened, so I can create an image that doesn’t need a ‘fix’ after I apply it.
Learned anything new since January?
Any idea what causes the default profile to display a question mark for size in User Profiles under Advanced System Settings? Seems to be hit or miss in my lab on when that appears.
Probably permissions. Try taking ownership of the filesystem and make sure Everyone has RX perms. I think my script is a little screwy and needs a couple of perms-related updates 🙂
Great. Thanks much!
I do have a question regarding the Copy Profile. As I said, I found that it “breaks” in W10 Version 1803 and others say it doesn’t. Are people using the “Copy Profile” in the unattend.xml file that is on the server as part of the Task Sequence or the “copy profile” option that is under the properties of the “Computer”? You know, right-click Computer, click Properties, click Advanced System Settings, go under User Profiles\Settings and copy the profile that way.
I’m interested to see which one people are doing.
Silly question…does the Windows ADK get installed on the reference PC, or a separate/management PC , or does it even matter?
Thanks!!
It really doesn’t matter, we are just looking to generate that XML file from it.
Worked great! Thank you very much for the write-up.
Hi James, can you please explain how to clean up the c:\users\default-profile after run the sysprep? Do you mount the Windows image via ImageX? Thanks!
Any idea’s as to when the profile cleanup script is run why you get a ‘?’. Everyone has RX permissions on the ‘Default’ folder. Other than that, the guide was great!
I think the script is slightly erroneous and doesn’t set permissions quite right on the default profile. Hopefully I can update it soon…
Thanks!!! I felt like I got a handle on the process of trimming the cruft and capturing a nice, trim image in the Win7/8.1 days, then Win10 came along and really changed things.
I appreciate the overview. Many thanks! 🙂
Hello James!
There are a couple of things I am confused on as far as creating the mandatory profile. When you first press Control+Shift+F3 and enter audit mode during a new installation, the machine is not yet joined to the domain and also vmware tools are no installed so there is no NIC driver, therefore no network connection.
To install tools and join the PC to the domain, this will require a reboot.
How do you get back into audit mode after you reboot at this point or do you need to be in audit mode at this point?
Doesn’t the machine need to be joined to the domain for the mandatory profile creation?
Were you able to work out the permission issues on the default profile when running your cleanup script?
Hello James et all,
Appreciate the info and do some of the very same you do in regards to creating that custom default profile. I have also used DISM to mount and import App Associations (which MS is good at striping after sysprep).
I’ve used Copy Profile in the answer file since forever, but the 1803 and now the 1809 have actually felt like MS has done away or eroded some of what it can do over time.
The LayoutModification.xml should be allowed to be placed in the Default profile (Shell area) area before or even after sysprep (say like while mounting an image with DISM). However I have had no luck in that actually staying when the image to put to a new machine and then booted. That layoutmod.xml gets removed for some reason.
I was looking to see if it was possible to have the .XML file get pushed when the sysprep is going through its process.
Thanks for all the information and look forward to an update on your page or answers to some of the other questions in the comments.
Copy profile “breaks” the image being deployed.
What happens is that certain things. like settings, take forever to come up when logged in as a regular user and not an admin.
I use the Layout Mod and copy certain files to the default user profile and that seems to work.
Anyone have any experience getting default profiles copied where default app associations actually work under LTSC 2019 (build 1809)? I’m really thinking this is more of a MS thing than anything with my process – never had issues really with LTSC build 1607 or with Ent builds of 1703, 1709 or 1803. Note: We use LTSC for our classroom/lab systems, utilize an app to restore environment upon reboot, so essentially every student login profile is generated from the default profile. Right now, new user login will get ‘Default App reset notifications’. Even attempting to inject .xml into offline .wim after capture/sysprep still does not work.
This may sound like a silly question , is the Locally customized profile (in audit mode) copied from the Local Administrator Profile that will be disabled upon? In other words when you login to Audit Mode and make the customized changes will the settings from THAT account be copied to and new user profile account?
Yes that is correct. When you open up the custom default profile for sanitization you may have to remove references to Administrator.
Okay, so I used this article extensively for Profile customization… thank you! However, I found an easier way to create new DefaultProfiles than using CopyProfile. Download the tool called DefProf.exe from ForensiT.
Once downloaded, log on an account with Admin rights (not the profile you wish to copy)
– Open Command Prompt as Admin
– I placed DefProf.exe on the root of my C drive, so next we type: defprof.exe . My user profile is called Test thus typed: defprof.exe Test —you will be asked if you want to install/run the service, type ‘Y’
– Create a new user (Control Panel or Computer Management)
– Log onto that new user profile and you will see all the start menu items, taskbar items etc. that you setup for your ‘Test’ user as the defaultProfile for all NEW profiles logged into.
I noticed the brackets were removed from my above post, so for clarity:
so next we type: defprof.exe ‘user-profile-to-copy’ . My user profile is called Test thus typed: defprof.exe Test
If anyone prefers watching video’s this guy does a demo (a bit long winded for me tho): https://www.youtube.com/watch?v=OQccZvTz5Ac
Yes, I just used Defprof for Windows 11 22H2. And it works better than CopyProfile. The default profile with CopyProfile was breaking after joining domain and so finally decided to use Defprof during Audit mode and then generalized it. Make sure you add /NoAppx at the end of the defprof command.
thank you for the tutorial !
for some reason the pinned app’s didnt stay on the taskbar
and the start menu kept the saved items but didnt stay in the minimized size, as in the start menu kept its wide size
any ideas ?
For Pinned Apps you need to make sure you save the “User Pinned” folder into the profile, and also make sure that you keep the “Taskband” area of the Registry.
how do you save the user pinned folder?
keep the taskband of the registry in the custom wim file ? sorry first time setting this up.
And also, obviously, that the apps are installed 🙂
HI James,
thks for your article.
Everything works but we still have the message “preparing windows” every time a user tries to log in.
is it normal ?
When i create my default profile without following you article i haven’t got the “preparing windows” message but the “user policy” takes time.
How many seconds doesn’t it take to open a new windows 10 profile ?
i’m around 20 and 35 seconds.
it seems the first logon takes more time than the second one.
The problem is that we are using Citrix VDI non persistent machines so user will always login for the first time.
Go to my logon times article and see if the auto logon will help, if I understand you correctly.
Hi James,
I though i had this nailed once but i’m now runing into probelms which i’m not sure if i previosuly tested?
The Default Profile creation cny Copyprofiel and de-bloat script and permissions changes etx have made a dramatic effect to my Login times, specifically the Remove-Appx scripts. 1st Login and 2nd login times have dramatically reduced. However, logging into a 2nd PC as a new user does not have the expected results. Not only does the start menu not appear but other programs that are set to run on login just seem to fail on me. I’m sure it’s a permissions issue but i’ve re-created images following your articles and i just can’t seem to find the source of the issue.
With your knowledge of Profiles and windows 10 (i’m currently working with 1809), do you have any ideas on this?
Many thanks
I will try and have a look but i’m trying to get everything finished for an event next week, I might be able to get a look end of next week sometime.
Hi James,
Thanks for this blog. In the screenshot I see your Windows 10 is not activate. But how can one customise backgrounds color or taskbar settings like showing all icons. It’s disabled without activating first.
For that would I not need to activate Windows 10 first or is there another way?
Thanks
I normally just reboot it until it allows me to do so. Sometimes it blocks you from changing it, sometimes it doesn’t, IME
Thanks, so during the creating the reference image phase you never activate Windows?
No, most times when I enter Audit Mode I can customize it without issue. YMMV
Hi, I’m having success with creating one for Windows server 2019.
I boot into Audit mode via running Sysprep Audit mode and used your unattend.xml as below.
true
Can you please advise?
Thanks
John
is this cleanup script updated?
Not yet….working on a fuller one
James (Or anyone) – Do you know if this process still applied for Win10v1903?
Thanks!
Greetings
Unfortunately this does not work for me.
As soon as i run the Powershell
c:\windows\system32\sysprep\sysprep.exe /oobe /generalize /shutdown /unattend:c:\unattend.xml
I get an error message.
Even if i only install windows, go into edit mode and make no changes.
I am using 1903 though.
Any updates to the process?
What’s the error?
Great post, I had already trimmed my profile a bit but this was far better. I was hoping to fix another issue though and maybe you or others have seen it. When using copyprofile for each new user that logs on the first time no matter what I do I get 5 notifications about the default browser being reset to edge. I use the defaultappassociations xml and usually only specify for pdfs and nothing for the browser but even if I do specify the browser I get the same result. Anybody else hit that one before ? It still works but is an annoying popup for the end users and if I were to specify chrome or another browser in the future I doubt it would work
for explanation and fix see:
https://support.microsoft.com/en-us/help/4056823/performance-issue-with-custom-default-user-profile
When I followed this in my environment I found that any Group Policies I apply – don’t come through to the log in instance. Has anyone had this issue? I have my mandatory profile set up locally on the computers and set the profile path for the labs through GPO.
In case anyone else stumbles across my question, it was affecting a lot of people who had inplace upgraded between versions which leaves behind some registry keys. Deleting these two keys fixed practically all the issues I was encountering
DEFAULTUSER\Software\Microsoft\Windows\CurrentVersion\FileAssociations
DEFAULTUSER\Software\Microsoft\Windows\CurrentVersion\Explorer\FileExts
https://social.technet.microsoft.com/Forums/en-US/8492c521-55e3-4cef-8d8e-2613b9f43051/kb4517211-edge-app-reset-notification-for-new-users-in-win-10-1903?forum=win10itprogeneral
Hello James et al.,
I’ve been battling this one issue for awhile and I need to ask about it as I’ve tried so many things and still no results.
It’s happening on 1903 or 1909 Windows 10. First it was the Settings-Apps-Default Apps window crashing after selecting default video or music player (Windows Media Player). It would just cause the entire Default Apps window to crash. This is the brand new installs, outside the box, no changes what-so-ever. Then after posting this on Microsoft (link below) someone pretty much suggested me to generalize the image which I also started as that’s our usual process of optimizing images for Horizon anyways. Well, the issue is now back to what I had to deal with before on another pool where any new profile that logs in would get insane amount of Default App Reset notifications and then DEM wouldn’t be able to handle FTAs (Even 9.10 that actually has the real fix for preserving roaming FTAs) as they would keep on resetting.
If I can beat the Default App Reset error (also posted screenshot on the TechNet thread below) that would be amazing but for now it seems like I am just running in circles here…
Oh, also – I can’t see the reg entries from Jarrod’s post above. Keys aren’t there in Audit mode (prior to sysprep).
Any input is appreciated.
-Zack
https://social.technet.microsoft.com/Forums/en-US/772dc4b2-d074-49a8-856e-bf23f3c43d05/brand-new-install-of-1903-or-1909-immersive-control-panel-issues?forum=win10itprogeneral
Hi James
I’ve just followed your process for creating an image and a mandatory profile. I’ve made sure all the permissions are set as per your post but as soon as I create the mandatory profile and try to login using it, I get the “User Profile Service service failed the sign in. User profile cannot be loaded.” and then logs out. Any ideas on what might be wrong or what logs to check?
Log in as an admin and check the application event logs. Hopefully there should be something there that might give you a pointer. Administrators set as owner of the filesystem?
Hi James,
Fantastic article. But… I cannot get sysprep going…
Iam using 1803 Enterprise and the setupact.log gives me:
2020-02-17 08:50:40, Info [0x0f004a] SYSPRP WaitThread:Entering spawned waiting thread
2020-02-17 08:50:40, Info [sysprep.exe] UnattendFindAnswerFile: Looking at explicitly provided unattend file [c:\unattend.xml]…
2020-02-17 08:50:40, Error [sysprep.exe] UnattendFindAnswerFile: Unable to deserialize explicitly provided unattend file [c:\unattend.xml]; status = 0x80070246, hrResult = 0x0.
2020-02-17 08:50:40, Error [0x0f009e] SYSPRP SysprepSearchForUnattend: Failed while searching for unattend file; hr = 0x80070246
2020-02-17 08:50:40, Error [0x0f00a5] SYSPRP WinMain:Encountered error while searching for unattend file; hr = 0x80070246
2020-02-17 08:50:44, Info [0x0f004c] SYSPRP WaitThread:Exiting spawned waiting thread
2020-02-17 08:50:44, Info [0x0f0052] SYSPRP Shutting down SysPrep log
2020-02-17 08:50:44, Info [0x0f004d] SYSPRP The time is now 2020-02-17 08:50:44
That is with your canned unattend.xml file, it had a line wrap at the first 2 lines (they got stuck together) so I fixed that but it seems a bogus (run back to mama) error.
It does find the unattend.xml, the log changes if you change the name of the xml file, so where does it stumble…??
Hi James,
I found the culprits: when you copy the text for the xml file from above, it is translated to make up text, not ansi and all goes awry. Quotes are translated to question marks and quotes are not ansi anymore.
WSIM got me on the correct path.
It might be a good idea tot put a url to a working unattend in the article. Thus avoiding this issue.
Regards, Henno
If only I had read this, i could have saved myself hours of troubleshooting. Thank you!
Hi James,
I have 1 glitch left: the profile still causes to start the “first time sign-in animation” after logon using the new default profile, albeit a lot shorter then the standard profile.
Is there a active setup or runonce that it starts?
Regards, Henno
Can’t you disable that via GPO? Admin Templates | System | Logon I think….
Hello James
I think something changed with the Windows ADK released last year. As far as I know, no ADK was released with Windows 10 1909. The problem is when I capture the image using with MDT or ADK only the default profile reset. I mean that I lose all customization except for the start menu and pinned icons. But both are not part of the default profile
The copyprofile in the unattend.xml still works fine. To clarify what I mean if I log in in audit mode and run Syspre with the unattend.xml. Windows 10 shutdown, I restart Windows 10 (in my case a VM) go through the OOBE process, created a new user, Windows 10 logs with my customized profile just fine.
However, when I capture the image, customization will be lost. I spent some time figuring out the problem, but I haven’t found so far found the root cause. I do not run Sysprep in the capture phase again. I experienced this problem with Windows 10 1903 and Windows Server 2019.
A belated thanks for the article. It was a great resource for when I was building a Windows 10 image over a year ago. I was searching for information regarding what to keep and what can be deleted in the default user profile after copying it and this hit it right on the nose. Recently got extra time to look at my whole imaging process and I found a few tweaks in the script to make things smoother for me at least and hope this might be beneficial to others.
I added “Internet Explorer” to the exclusions for C:\Users\Default\AppData\Roaming\Microsoft since the two quick launch icons get repaired anyways on a sfc /scannow. I did not want others thinking the computer had important files corrupt or missing.
I was having the same issue as others with the administrator profile not being able to see the size of the default profile. I was worried about permissions being broken but could not find exactly where the problem was at. I added the following at the end of the script which equals a “replace all child object permissions with inheritable permissions entries from this object”.
icacls “C:\Users\Default\AppData\*” /q /c /t /reset
I believe all subfolders and files inherit permissions from the base Profile folder anyways and this just resets it.
What do you mean by windows sources? Where do you get this???
The Windows source files, the mounted ISO with the Windows installation files on them.
Hi James,
Please could I pick your brain ? Its to do with installing Win10H2.
I’ve used the Auto Answer file website to generate an AutoUnattend.xml file.
I’ve not really done any more than make it so you’re not having to answer questions during the installation, NOTHING more 🙂
My issue is that in the WinX folder in your profile folders (c:\users\user\appdata\local\microsoft\windows\winX there are 3 folders Group 1, Group 2 and Group 3 that should have shortcuts in that work with the right click context menu on the start button. Whilst I get the folders created – there are no shortcuts in these folders. (If I copy from another machine and reboot, BOOM the menu list comes back – when you right click on the start button)
Have you seen this before? Have I inadvertently not done something using System image mgr to create the autounattend file ? If I run a standard image where I’ve touched nothing – the right menu is there as expected. This is happening across multiple test pcs and in vmware – no right menu ?
PLEASE could you advise ?
I’ve never seen that happen before, unfortunately. You are right that the files in there populate the WinX menu (and they have to match a particular hash, as well). As a mitigation, could you set up a Group Policy Preference Files item just to copy them from a file share or something just in case they’re not present? Sorry for not being able to give more help, it sounds a bit bug-like if I’m honest.
Hi James,
really great guide, thank you.
One problem I have, though: How do I even run PowerShell scripts during imaging?
If I do it before doing the Sysprep in Audit mode, it’s useless as Default gets populated anew when running it.
If I do it after Sysprep, booting into Audit again, I’m either having to sysprep again or just shut down manually, which on next boot doesn’t open the region choice screen.
If I try running it from within the command line of my booted USB-drive (accessing it on C:), then it doesn’t seem to work.
(Command used was: C:\Windows\System32\WindowsPowerShell\v1.0\powershell.exe -command „E:\Einrichtung\DefaultCleanup.ps1“)
And if I create a local user first and run it there the image includes this user, which I don’t want.
I’ve also considered trying a batch file, but that’s much more complicated to do.
Are you talking about the script that I run to cleanup? I usually run it after Audit Mode so you need a local user. However nothing stopping you deleting the local user as part of a policy once it joins the domain.
Is it the Export-Layout command that baked the layout into the .wim or is it sysprepping using /unattend:c:\unattend.xml in the command directed at a prebuilt/saved answer file that saves the default layout and places it in the image for deployment?
I ask because I doubt it to be the case, but I want to make sure there isnt any metadata of sorts that gets baked into the answer file during sysprep. Or if when using dism to capture image, its baked in there and not dependent upon sysprepping to the answer file. Maybe its the combination. I just want to understand the mechanics on this one.
The export command just dumps it into an XML file that you can import from
Hi James is copying the customized default profile to the NETLOGON folder still viable? Or is that broken in newer feature updates of Windows 10? I ask this because I saw how you don’t recommend using Mandatory Profiles anymore in another article.
Yes, I believe it still works. Obviously it has certain caveats though, such as affecting all users in the domain, etc. It’s not a common method to use but still viable.
Hi,
If it’s not common but viable – what are the methods being employed in establishments such as schools where multiple users use multiple computers, where you want to reduce the first logon times?
The most common option would be using some sort of profile roaming, like FSLogix, so the user simply mounts an existing profile. Alternatively, you can do things like removing Active Setup entries, or create a lightweight default profile in the base image that could then be copied somehow to existing machines.
Watched your excellent article on youtube with the addition of the modification to Layout to include taskbar apps and created an unattend file. My question is that if I use the created wim file WITHOUT an autounattend file and go through all the various clicks to get going, (as in fact you do in the video), everything works! If I try to automate it with an autounattend file (NOT using copy profile twice!) nothing works, it’s as if it’s creating a NEW default profile! Has anyone else come across this?
A bit late in life, like myself, 75 yo pensioner.
Trying to setup a Windows 10 PC shared with 5-6 other pensioners in my sheltered housing scheme.
Due to our ages and disabilities, actual user may come and go, and of course I may not be able to update in future. So hope to document the process 🙂
I think I have to create a default profile then add to each user account?
Basically want to provide :
1. Links to on-line shopping [have setup on my own account] and email services – Gmail, Outlook
2. Use Firefox as the default browser [as have experience of this]
3. Create backups of each users data – using file history ?
Nice and simple under VMS but not a Windows Admin 🙂
Or is their an app that can do this for me ??
Thanks in advance.
1. The links you could simply copy in to the public areas. So either c:\users\public\desktop or C:\ProgramData\Microsoft\Windows\Start Menu\Programs – add shortcuts here and all users see them.
2. Set this up using a default associations file which you can apply via local GP.
3. Just turn on Shadow File Copy.