
I’ve written several times before about how I prefer to use CloudDriveMapper to map to OneDrive, particularly in RDSH sessions. It seems much more efficient and cost-effective than using sync clients and caches, especially for my virtual use cases.
One problem I have hinted at in previous articles about CloudDriveMapper (CDM from now onwards) is that it simply maps a network drive to your OneDrive, which is all well and good, but which doesn’t feel particularly like a “unified” experience for users who may utilize native OneDrive folders and/or the Sync Client. Now hopefully future versions of CDM will address this, but for now, how can we give a “unified” experience to our users when using the software to map their OneDrive data into their session?
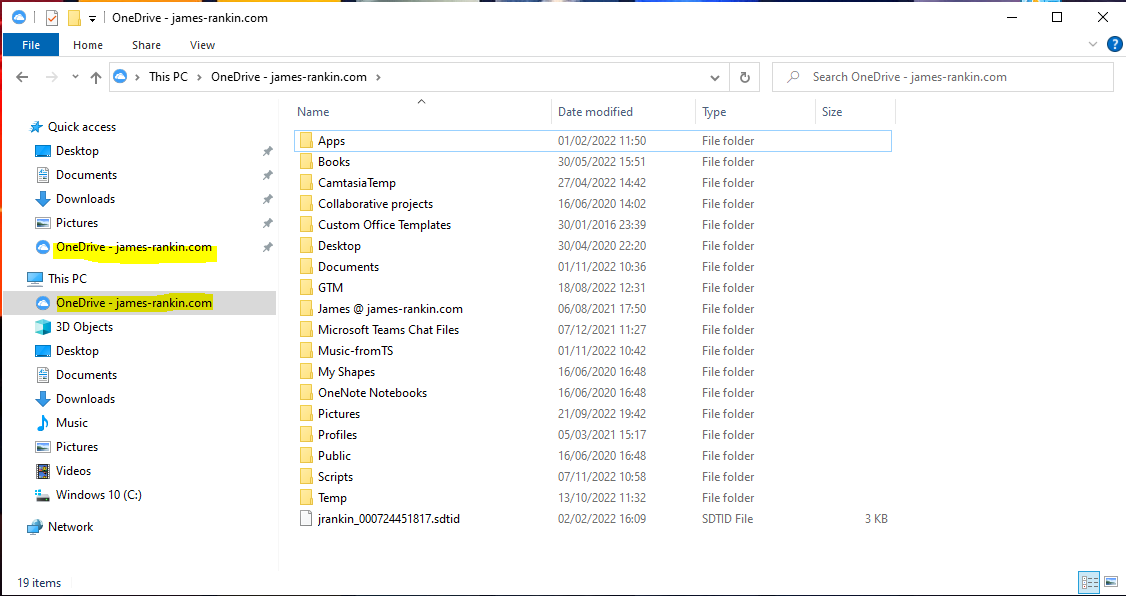
What we want is for the user to have a “proper” OneDrive folder (such as I talked about in this article by using WebDAV) that appears in both This PC and Quick Access. For most applications, one of these folders should appear in the default view when it comes to using the Save or Open dialogs, which means the user will feel that it is easy to access their OneDrive files.
Getting started
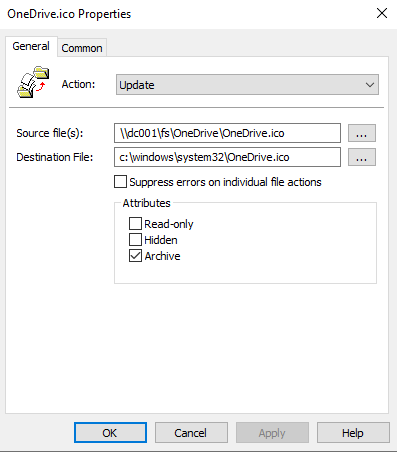
Firstly, we need to make sure we have a OneDrive icon in our image or deployed to our machines that we can use. OneDrive icons are easily available with a Google image search, so grab one, store it somewhere, and then organize some way of getting it onto your endpoints. I’ve used a Group Policy Preferences Files Action to copy it to c:\windows\system32 – pick your poison as required.
Next, make sure you completely uninstall the OneDrive Sync Client from these target devices – we will have no need of it and it will simply muddy the waters of the user experience.
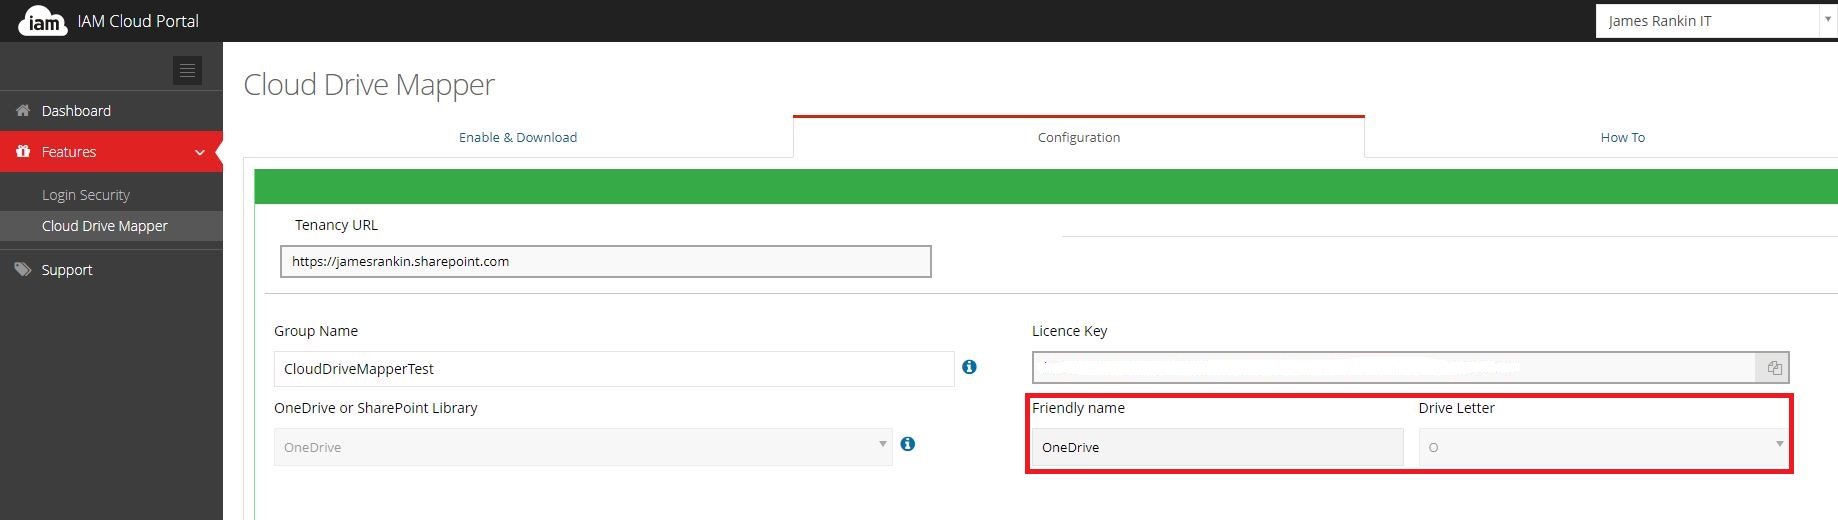
You also need to get CDM configured so that you know which drive you are going to map, as we are going to use this for authentication but hide it from the shell. In this instance, we are using the O: drive – change everything afterwards as appropriate if you are using a different one.
To hide the drive, you will need to become familiar with writing yourself a custom ADMX file to hide a unique drive combination. The standard GPOs (Prevent access to drives from My Computer and Hide these specified drives in My Computer) that we use in Windows environments only allow you to hide several specific combinations – shown below
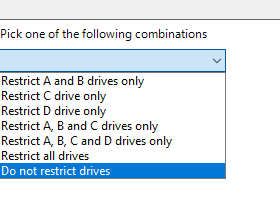
Obviously, if we want to hide a different drive combination (in this case we are going to hide O: only), you need to write some custom ADMX files to support this.
Luckily, Carl Webster has already done most of the hard work for us and written a blog where you can choose the right combination of drives and import them into downloadable ADMX and ADML files that you can import straight into Group Policy. Here is the article you need.
Find the combination of drive letters you require and get the numbers (for just the O: drive, as an example, the number is need is 16384). Then, download Webster’s example ADMX and ADML files, and then edit them carefully to insert your figure.
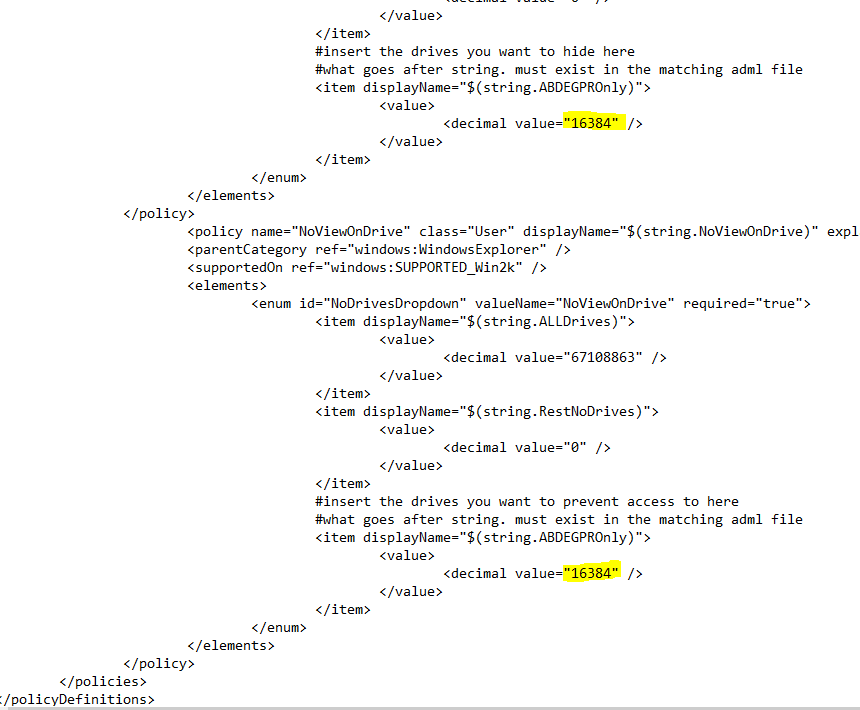
Note that if you decide to change the string Webster used (string.ABDEGPROnly) then you must also edit the corresponding ADML file to update this!
When you have saved the ADMX and ADML files, copy them to the policies store in your environment. If you have a central store simply copy the ADMX file to PolicyDefinitions and the ADML file to the en-us subfolder of PolicyDefinitions. You should then see them as additional settings available in the User Configuration | Admin Templates | Windows Components | File Explorer area of GPMC. They will appears as “Prevent access to drives from Citrix, RDS, Horizon or Parallels session’s My Computer” and “Hide specified drives in Citrix, RDS, Horizon or Parallels session’s My Computer”. Example shown below with the custom entry that you have defined:-
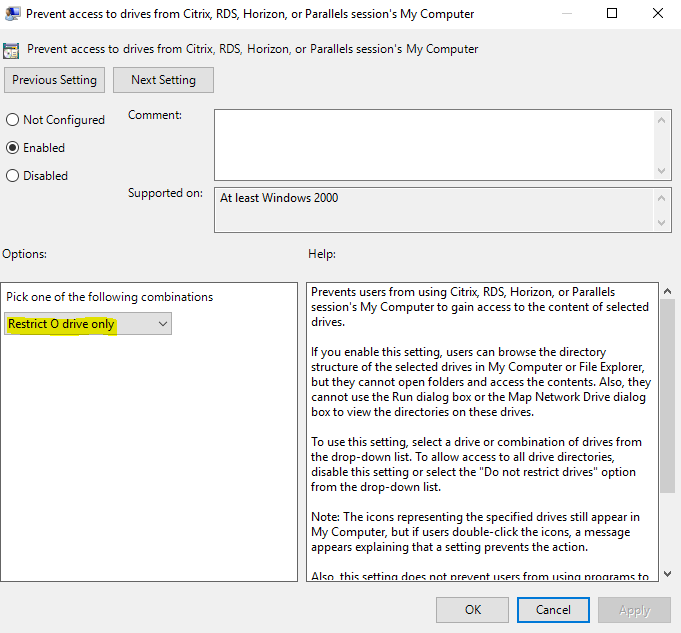
Enabling this setting will allow CDM to map the drive and provide authentication, but will hide the mapped drive itself from the shell (either cosmetically or completely, dependent on the GPO you use). Assign the GPO and let it propagate to your devices. Now, if they try and access the O: drive directly they will get this message
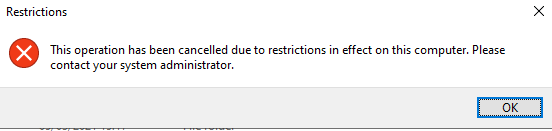
…but it can still be accessed by the system, which is exactly what we want.
Obviously, you also need CDM installed and licensed on your target endpoints! I have also started enabling the File Watcher option when doing the install.
Session activities
Now, we need to do a few things to get this running in the user’s session.
Firstly, and I discussed this in my previous article on OneDrive, we need to somehow capture the format of the UNC path that your user’s OneDrive folders point to. You should be able to look at a few of them and work it out pretty easily. In my case, the format is username_mydomain_com, but it depends on your Office365 tenant configuration to some degree. Some seem to follow email format, some follow UPN format, others have vanity URLs that can make things rather difficult. What we need to do is, during the user logon, capture the format of the required path and set the full path to the user’s OneDrive folder as a variable.
Here’s the example I was using, but as I said, you will need to make sure the path you are trying to map to is captured correctly, although the format should be the same for each user once you have identified it. The routine could be simple as below, or it might be a little more complicated – it depends on how your tenant is set up.
# Check if OneDriveUserPath variable already exists, if it does, exit

if (Test-Path env:\OneDriveUserPath) {

    exit
}

# Sets OneDrive path as a user environment variable

$OneDrivePathVar=( $ENV:USERNAME + '_mytenant_com' )

$FolderLocation="\\mytenant-my.sharepoint.com@SSL\DavWWWRoot\personal\$OneDrivePathVar\documents"

[Environment]::SetEnvironmentVariable("OneDriveUserPath", "$FolderLocation", 'User')

# Add flag so that the Scheduled Task creation will be triggered by this Registry item

New-Item -Path HKCU:\Software\OneDriveVariableSet
Notice that I am checking if the environment variable already exists (because if it already has been set, it will be in the user profile so we can simply exit). Additionally, the above way of setting the environment variable uses .Net in PowerShell, so if your users are running in Constrained Mode, this will fail (which might mean you are better off doing the environment variable in a batch script rather than PowerShell). Also, at the end I have written a flag because once the variable is set for the first time, I then need to call some post-logon tasks to set the folder I want.
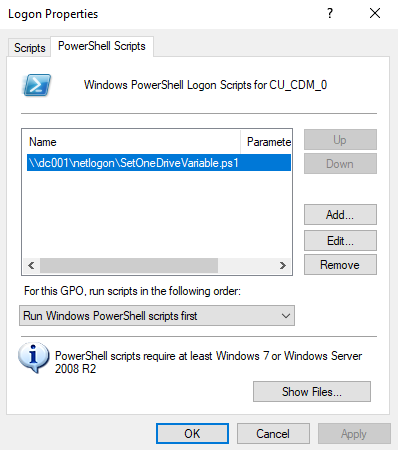
Save the script above, once you have edited it for your environment, into a network location and then create a logon script GPO to run it (yes, a f*cking logon script, which is why I am hoping the guys at CDM might come up with some way to make this more clever for us!)
Next, we need to create a Scheduled Task to run a script after the user has logged in. Firstly, we need to create the script. What this script does is check for the Registry path we set at the end of the logon script – if it exists, it will create all the Registry values that are needed to support an Explorer folder. Then, it will pause for two minutes (because, to create a Quick Access folder, we need to write a desktop.ini file to the user’s OneDrive, and to achieve that CDM needs to have run and been authenticated, hence we are giving the user time to respond to the one-time authentication prompt). After that, it will check for the existence of the mapped drive (in our case, the O: drive, so change as necessary) – if O: exists, it will then proceed with writing the values for the Quick Access folder. If the drive still hasn’t been mapped by then, it pauses for another 30 seconds and then tries again to write the Quick Access folder – if this fails, it will simply exit, rather than constantly retrying, because the user may have decided to ignore CDM completely. However, the Registry key that controls whether this whole routine runs will only be removed if CDM has successfully authenticated – which means if the user doesn’t authenticate, it will repeat this whole process at next logon until successful.
Here’s the script, there are values in there you will want to change – such as the variables at the start and the LocalizedResourceName that goes into the .ini file, and also the drive letter that Test-Path is checking for:-
# Adds the folder into Explorer

# Check if Registry exists, if it does, run creation routine

if (Test-Path HKCU:\Software\OneDriveVariableSet) {

# Editable values (change as required)

$FolderName="OneDrive - james-rankin.com"
$FolderLocation="$ENV:OneDriveUserPath"
$FolderHint="User's OneDrive documents"
$FolderIcon="C:\windows\system32\OneDrive.ico"

# Variables

$MYCLSID="{2EC6CA40-50BF-45AC-9B78-9F668B8AAA8C}"
$HKCU_CLSID="HKCU:\Software\Classes\CLSID\$MYCLSID"
$HKCU_WOW6432Node_CLSID="HKCU:\Software\WOW6432Node\Classes\CLSID\$MYCLSID"

# 32-bit routines

New-Item -Path $HKCU_CLSID -Force
Set-ItemProperty -Path $HKCU_CLSID -Name "(Default)" -Value $FolderName
Set-ItemProperty -Path $HKCU_CLSID -Name "InfoTip" -Value $FolderHint
# If you wish the shortcut to appear in "Network Locations" rather than "Folders", change the following value to 9 instead of 3
Set-ItemProperty -Path $HKCU_CLSID -Name "DescriptionID" -Value 3 -type dword
Set-ItemProperty -Path $HKCU_CLSID -Name "System.IsPinnedtoNameSpaceTree" -Value 1 -Type DWORD
Set-ItemProperty -Path $HKCU_CLSID -Name "SortOrderIndex" -Value 48 -Type DWORD

New-Item -Path $HKCU_CLSID\DefaultIcon
Set-ItemProperty -Path $HKCU_CLSID\DefaultIcon -Name "(Default)" -Value $FolderIcon

New-Item -Path $HKCU_CLSID\InProcServer32
Set-ItemProperty -Path $HKCU_CLSID\InProcServer32 -Name "(Default)" -Value "shdocvw.dll"
Set-ItemProperty -Path $HKCU_CLSID\InProcServer32 -Name "ThreadingModel" -Value "Both"

New-Item -Path $HKCU_CLSID\Instance
Set-ItemProperty -Path $HKCU_CLSID\Instance -Name "CLSID" -Value "{0afaced1-e828-11d1-9187-b532f1e9575d}"

New-Item -Path $HKCU_CLSID\Instance\InitPropertyBag
Set-ItemProperty -Path $HKCU_CLSID\Instance\InitPropertyBag -Name "Attributes" -Value 15 -Type DWORD
Set-ItemProperty -Path $HKCU_CLSID\Instance\InitPropertyBag -Name "Target" -Value $FolderLocation -Type ExpandString

New-Item -Path $HKCU_CLSID\ShellEx
New-Item -Path $HKCU_CLSID\ShellEx\PropertySheetHandlers
New-Item -Path "$HKCU_CLSID\ShellEx\PropertySheetHandlers\tab 1 general"
Set-ItemProperty -Path "$HKCU_CLSID\ShellEx\PropertySheetHandlers\tab 1 general" -Name "(Default)" -Value "{21b22460-3aea-1069-a2dc-08002b30309d}"
New-Item -Path "$HKCU_CLSID\ShellEx\PropertySheetHandlers\tab 2 customize"
Set-ItemProperty -Path "$HKCU_CLSID\ShellEx\PropertySheetHandlers\tab 2 customize" -Name "(Default)" -Value "{ef43ecfe-2ab9-4632-bf21-58909dd177f0}"
New-Item -Path "$HKCU_CLSID\ShellEx\PropertySheetHandlers\tab 3 sharing"
Set-ItemProperty -Path "$HKCU_CLSID\ShellEx\PropertySheetHandlers\tab 3 sharing" -Name "(Default)" -Value "{f81e9010-6ea4-11ce-a7ff-00aa003ca9f6}"
New-Item -Path "$HKCU_CLSID\ShellEx\PropertySheetHandlers\tab 4 security"
Set-ItemProperty -Path "$HKCU_CLSID\ShellEx\PropertySheetHandlers\tab 4 security" -Name "(Default)" -Value "{1f2e5c40-9550-11ce-99d2-00aa006e086c}"

New-Item -Path $HKCU_CLSID\ShellFolder
Set-ItemProperty -Path $HKCU_CLSID\ShellFolder -Name "Attributes" -Value 0xf080004d -type DWORD
Set-ItemProperty -Path $HKCU_CLSID\ShellFolder -Name "WantsFORPARSING" -Value ""
Set-ItemProperty -Path $HKCU_CLSID\ShellFolder -Name "HideAsDeletePerUser" -Value ""

# 64-bit routines

if ([Environment]::Is64BitOperatingSystem) {
    New-Item -Path $HKCU_WOW6432Node_CLSID -Force
    Set-ItemProperty -Path $HKCU_WOW6432Node_CLSID -Name "(Default)" -Value $FolderName
    Set-ItemProperty -Path $HKCU_WOW6432Node_CLSID -Name "InfoTip" -Value $FolderHint
	# If you wish the shortcut to appear in "Network Locations" rather than "Folders", change the following value to 9 instead of 3
    Set-ItemProperty -Path $HKCU_WOW6432Node_CLSID -Name "DescriptionID" -Value 3 -type dword
    Set-ItemProperty -Path $HKCU_WOW6432Node_CLSID -Name "System.IsPinnedtoNameSpaceTree" -Value 1 -Type DWORD
	Set-ItemProperty -Path $HKCU_WOW6432Node_CLSID -Name "SortOrderIndex" -Value 48 -Type DWORD

    New-Item -Path $HKCU_WOW6432Node_CLSID\DefaultIcon
    Set-ItemProperty -Path $HKCU_WOW6432Node_CLSID\DefaultIcon -Name "(Default)" -Value $FolderIcon

    New-Item -Path $HKCU_WOW6432Node_CLSID\InProcServer32
    Set-ItemProperty -Path $HKCU_WOW6432Node_CLSID\InProcServer32 -Name "(Default)" -Value "shdocvw.dll"
    Set-ItemProperty -Path $HKCU_WOW6432Node_CLSID\InProcServer32 -Name "ThreadingModel" -Value "Both"

    New-Item -Path $HKCU_WOW6432Node_CLSID\Instance
    Set-ItemProperty -Path $HKCU_WOW6432Node_CLSID\Instance -Name "CLSID" -Value "{0afaced1-e828-11d1-9187-b532f1e9575d}"

    New-Item -Path $HKCU_WOW6432Node_CLSID\Instance\InitPropertyBag
    Set-ItemProperty -Path $HKCU_WOW6432Node_CLSID\Instance\InitPropertyBag -Name "Attributes" -Value 15 -Type DWORD
    Set-ItemProperty -Path $HKCU_WOW6432Node_CLSID\Instance\InitPropertyBag -Name "Target" -Value $FolderLocation -Type ExpandString

    New-Item -Path $HKCU_WOW6432Node_CLSID\ShellEx
    New-Item -Path $HKCU_WOW6432Node_CLSID\ShellEx\PropertySheetHandlers
    New-Item -Path "$HKCU_WOW6432Node_CLSID\ShellEx\PropertySheetHandlers\tab 1 general"
    Set-ItemProperty -Path "$HKCU_WOW6432Node_CLSID\ShellEx\PropertySheetHandlers\tab 1 general" -Name "(Default)" -Value "{21b22460-3aea-1069-a2dc-08002b30309d}"
    New-Item -Path "$HKCU_WOW6432Node_CLSID\ShellEx\PropertySheetHandlers\tab 2 customize"
    Set-ItemProperty -Path "$HKCU_WOW6432Node_CLSID\ShellEx\PropertySheetHandlers\tab 2 customize" -Name "(Default)" -Value "{ef43ecfe-2ab9-4632-bf21-58909dd177f0}"
    New-Item -Path "$HKCU_WOW6432Node_CLSID\ShellEx\PropertySheetHandlers\tab 3 sharing"
    Set-ItemProperty -Path "$HKCU_WOW6432Node_CLSID\ShellEx\PropertySheetHandlers\tab 3 sharing" -Name "(Default)" -Value "{f81e9010-6ea4-11ce-a7ff-00aa003ca9f6}"
    New-Item -Path "$HKCU_WOW6432Node_CLSID\ShellEx\PropertySheetHandlers\tab 4 security"
    Set-ItemProperty -Path "$HKCU_WOW6432Node_CLSID\ShellEx\PropertySheetHandlers\tab 4 security" -Name "(Default)" -Value "{1f2e5c40-9550-11ce-99d2-00aa006e086c}"

    New-Item -Path $HKCU_WOW6432Node_CLSID\ShellFolder
    Set-ItemProperty -Path $HKCU_WOW6432Node_CLSID\ShellFolder -Name "Attributes" -Value 0xf080004d -type DWORD
    Set-ItemProperty -Path $HKCU_WOW6432Node_CLSID\ShellFolder -Name "WantsFORPARSING" -Value ""
    Set-ItemProperty -Path $HKCU_WOW6432Node_CLSID\ShellFolder -Name "HideAsDeletePerUser" -Value ""
}

# Add to explorer (user paths)

New-Item -Path HKCU:\Software\Microsoft\Windows\CurrentVersion\Explorer\MyComputer -ErrorAction SilentlyContinue
New-Item -Path HKCU:\Software\Microsoft\Windows\CurrentVersion\Explorer\MyComputer\NameSpace -ErrorAction SilentlyContinue
New-Item -Path HKCU:\Software\Microsoft\Windows\CurrentVersion\Explorer\MyComputer\NameSpace\$MYCLSID

# Restart explorer (user only)

Stop-Process -ProcessName explorer

# Give user two minutes to complete CDM authentication

start-sleep -Seconds 120

if (Test-Path O:) {

# Add to Quick Access list for user

$o = new-object -com shell.application
$DesktopIni = @"
[.ShellClassInfo]
LocalizedResourceName=OneDrive - james-rankin.com
IconResource=C:\windows\system32\OneDrive.ico,0
"@

Remove-Item -Path "$($FolderLocation)\desktop.ini" -Force
Add-Content "$($FolderLocation)\desktop.ini" -Value $DesktopIni
(Get-Item "$($FolderLocation)\desktop.ini" -Force).Attributes = 'Hidden, System, Archive'
(Get-Item $FolderLocation -Force).Attributes = 'ReadOnly, Directory'
$o.Namespace($ENV:OneDriveUserPath).Self.InvokeVerb("pintohome")


}else{
# Gives another 30 seconds for authentication to complete then tries to write Quick Access files again
start-sleep 30
$o = new-object -com shell.application
$DesktopIni = @"
[.ShellClassInfo]
LocalizedResourceName=OneDrive - james-rankin.com
IconResource=C:\windows\system32\OneDrive.ico,0
"@

Remove-Item -Path "$($FolderLocation)\desktop.ini" -Force
Add-Content "$($FolderLocation)\desktop.ini" -Value $DesktopIni
(Get-Item "$($FolderLocation)\desktop.ini" -Force).Attributes = 'Hidden, System, Archive'
(Get-Item $FolderLocation -Force).Attributes = 'ReadOnly, Directory'
$o.Namespace($ENV:OneDriveUserPath).Self.InvokeVerb("pintohome")
}

if (Test-Path O:) {
# Remove flag so that this routine will not be repeated at next logon, however if O: has still not been mapped then it will be run again

Remove-Item -Path HKCU:\Software\OneDriveVariableSet -Force
}
}
So, once you’ve saved this script somewhere with a sensible name that all sessions can access it from, we then need to create a GPP Scheduled Task which will run it after the user has logged in.
It needs to be a Computer Scheduled Task, not a User one, so go to Computer Config | Preferences | Control Panel Settings | Scheduled Tasks and choose New | Scheduled Task (at least Windows 7)
Set the options as below
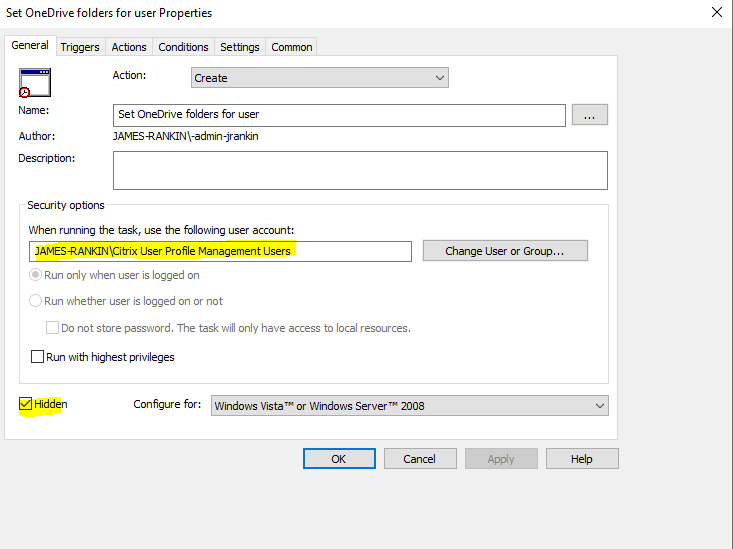
I’ve set a particular AD group as the “run” group because this means it only runs for members of that group.
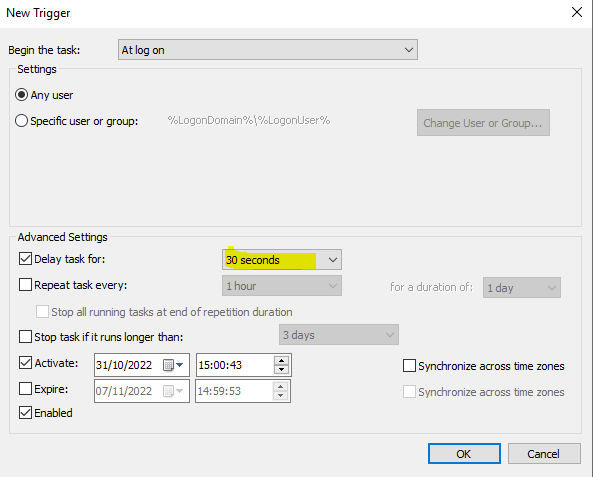
I’ve used cmd.exe as the trigger because I want to try and keep it as invisible as possible (other methods are available)

The actual full command referenced in the Action section is shown below
cmd.exe /c start /min "" powershell -WindowStyle Hidden -ExecutionPolicy Bypass -File "\\MYDC\netlogon\SetOneDriveFolder.ps1"Finally, the Scheduled Task needs to be set to run instances in parallel if there is already an instance running (for multi-user environments)
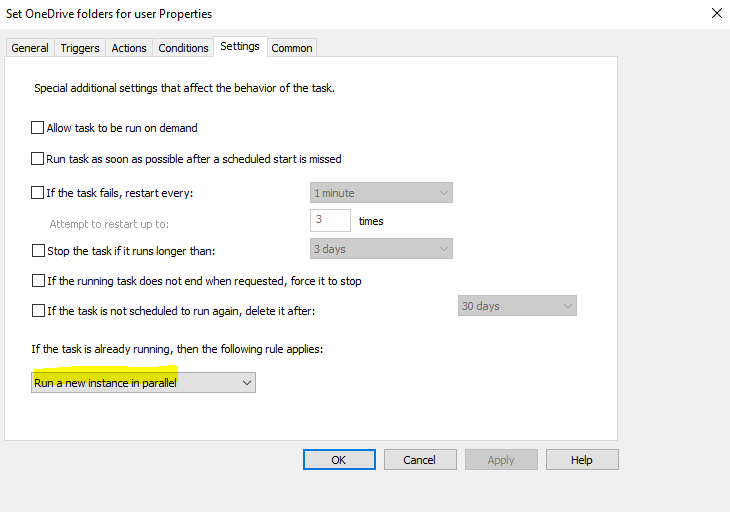
Once you’ve set this GPP up, let the policy propagate to the target machines, and you should now have a Scheduled Task on each one that runs thirty seconds after the user logon has finished.
If you have managed all of this, this should be the process followed:-
- User logs on for the first time
- Logon script runs to create environment variable pointing to their OneDrive folder path
- Registry key set to flag that this has been created
- User logon completes
- 30 seconds later, Scheduled Task starts
- Creates Registry values that put folder into Explorer and restarts Explorer process
- Waits for two minutes (user should be authenticating to CDM in this time)
- If CDM drive exists, creates desktop.ini file in OneDrive root with required parameters for title and icon (deletes any existing ones first)
- Runs routine to pin folder to Quick Access
- Deletes Registry key that flags this routine needs to run
- Exit
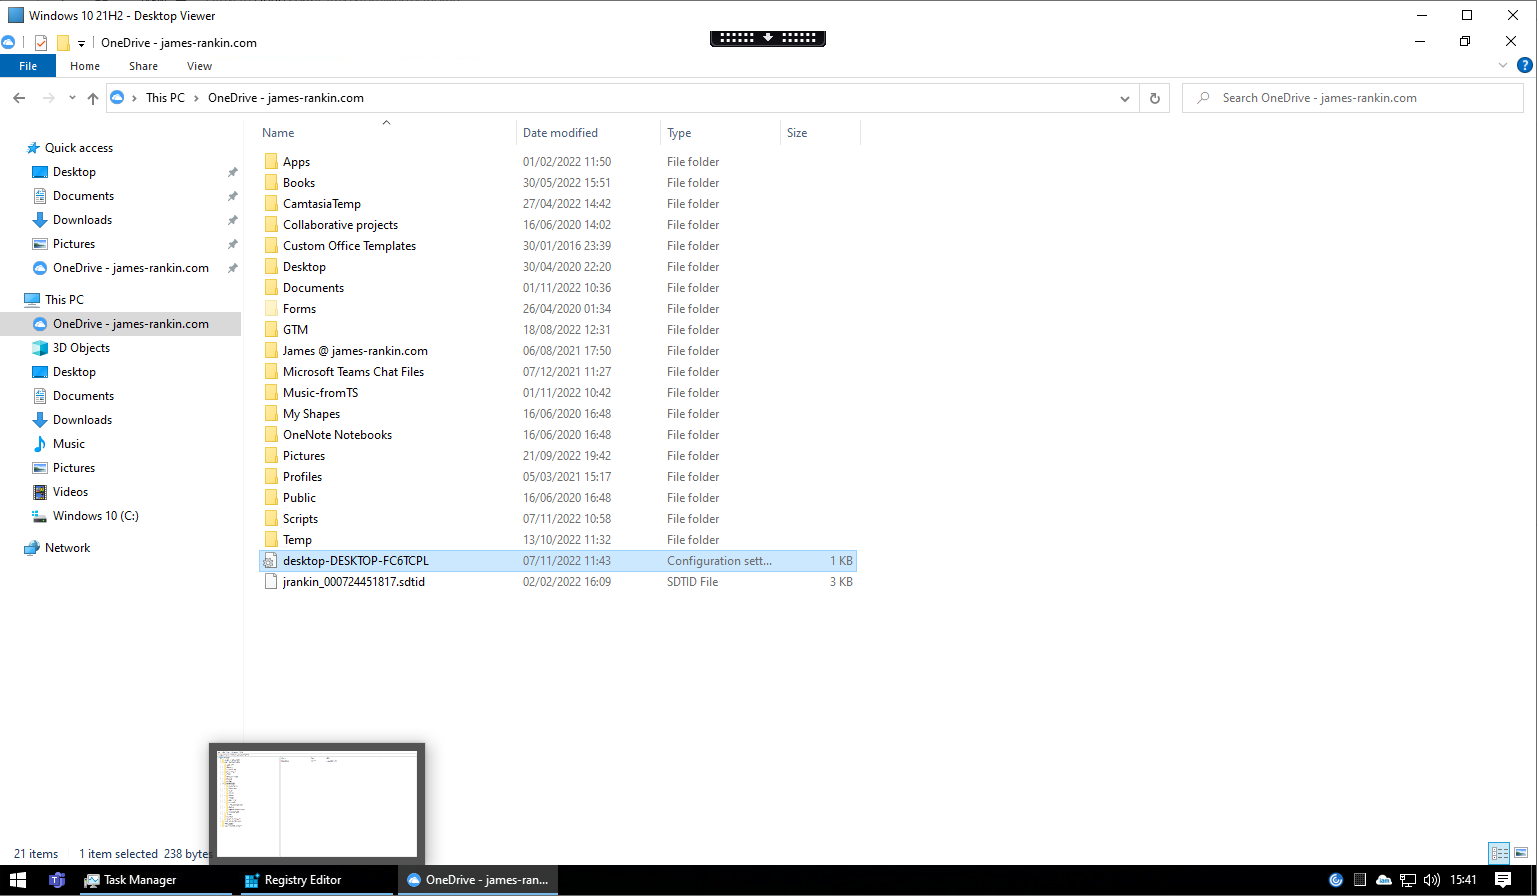
The upshot of all this should be that at first logon, and assuming they log in to CDM successfully, they will get the two “live” connections mapped from the shell into OneDrive direct as below. Obviously, you need to be persisting their session using some form of profile management in order to make sure the environment variables and Registry values are carried from session to session.
Also, you can faff with the timeouts (you may need shorter or longer dependent on your users and your backend configuration) and methods of calling the Scheduled Task to try and make it more slick – there are no doubt ways this can be made much better.
Like I said, hopefully CDM can produce some wizardry that makes it easier for a “native” experience within the product itself, but until they do, you can try to use these methods to make it look much more slick and integrated.
Thanks are due to my colleague Deepak Shamrao for pointing me in the right direction of the desktop.ini file and offering his PowerShell guidance.
![]()
Can this all be done with WEM or does it need GPO?
I see no reason why it can’t be done with WEM. I try to approach these from an agnostic standpoint but anything that can provide the required settings will suffice.