
I published an article discussing the use of network drives in Citrix environments back in November of 2018. I have opted to rewrite this as there are a few additions I’d like to make to the techniques used in here, some other questions I’d like to answer, and I might finally follow through on the promise I made at the time of the first article and record a video showing it in action 🙂 I will be removing the original article in a few weeks as most of the content from it is now merged into this piece.
Network drive mappings give me nothing but headaches. Seriously. I remember Mark Russinovich writing a long and very interesting blog article back in the day, entitled “The case of the veeeerrrry slow logons” (well worth a read). This was a fascinating deep-drive into Windows internals – like all Mark’s posts generally are – and one which gave a great rundown on how to use SysInternals tools for solving problems. However, I could have saved Mark the time and trouble it took to go through all this troubleshooting, because, in the end, “it was the drive mapping that did it”. Network drive mappings, in my experience, are nothing but problems that adversely affect logon times and other KPIs. A lot of issues that I run into in day-to-day operations are related to drive mappings and the odd ways in which they behave.
Why do we have network drive mappings?
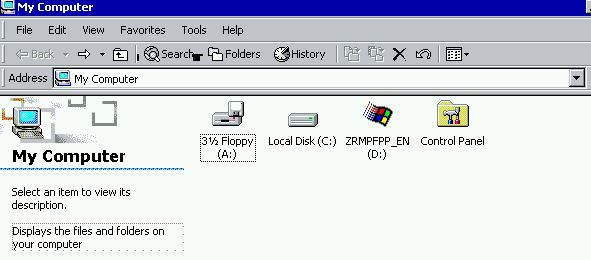
Network drive mappings are the ultimate hangover from the past. In essence, they’re just a shortcut to a networked storage area. But in the early days of Windows, we always used to provision these shortcuts as “drive mappings”, as if the networked storage area was a physical drive in the machine and not a remote mount point. The reason for this was pretty simple – in early versions of Windows we had “My Computer” (which has now been rebranded as “This PC”) as practically the only user entry point into the filesystem. Users (or admins) could have created shortcuts to replace these, but let’s not forget that widespread centralized management of the user environment wasn’t particularly common at this point in time. “System folders” like Documents, Pictures, etc. were only just starting to appear in the Windows OS, so the use of network drives was pretty much endemic.
Here we see a legacy Windows 2000 system showing that within My Computer, drives were usually the only available entry points
So this drove the adoption of mapped drives, to allow users easy access to network-attached storage areas (either shared or dedicated)
The “mapping” of the “drive” to a networked storage area allowed users to save their files to UNC paths where they would be covered by backups and able to be shared with others. Which was absolutely fine, given the operating systems of the time.
However, this principle has embedded itself into business processes so deeply that it has persisted way, way past its sell-by date. We now have multitudes of Windows special folders and “libraries” that can be redirected to UNC paths without ever needing to use a dedicated drive letter. We have loads of administrative tools and processes that can handle this redirection. We have EFSS (Enterprise File Share and Sync) tools like Microsoft OneDrive, Citrix Sharefile, DropBox, etc. that can also provide cloud-synchronized locations for data that store local copies as well, so that users can seamlessly switch devices and network locations. And yet still…..the spectre of the network drive hangs grimly on, with enterprises either unable or unwilling to try and wean their users away from this method of working.
Another reason often mooted by users when trying to prise their network drives from their fingers is that they appear in the Windows shell in particular locations. They don’t just appear under “This PC” in the “Network locations” section, but they also appear very prominently when you use an application’s Open or Save As dialog. Now my response to this is that Special Folders such as Documents, Sharepoint and OneDrive (for instance) also appear in both of these locations, but often, users want direct access to their networked locations through here as well. And this is what makes them difficult to move away from.
Microsoft’s stance on network drive mappings is that they’d recommend using them “to save remembering a complex network path”, but that sounds like a copout to me. A shortcut saves you remembering a complex network path – there’s no need to address it as a mapped drive.
Drive mapping examples
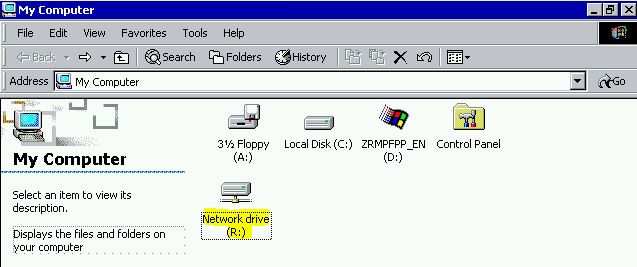
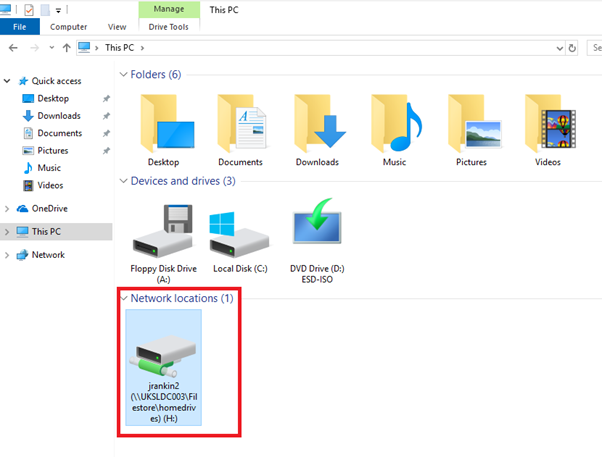
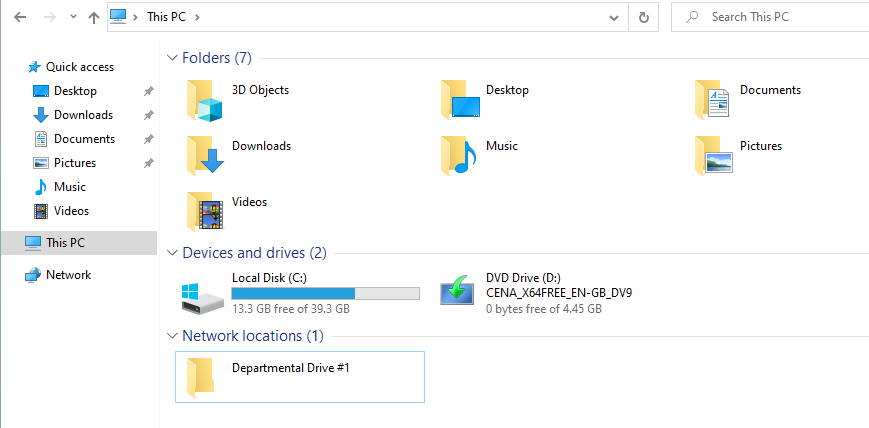
Here’s a user drive mapping (in this case, a user “home drive”) showing in the File Explorer window
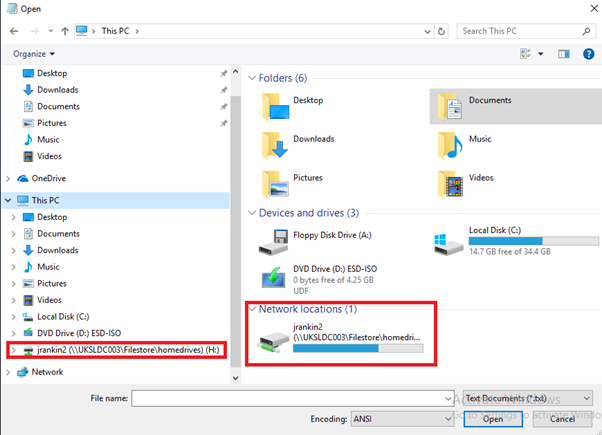
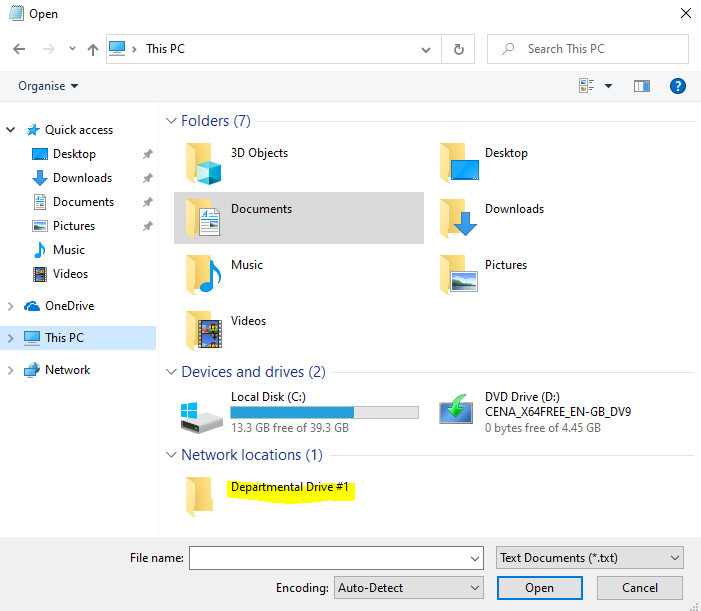
And here the same mapping is showing up in the Open dialog
You can also have multiple drive mappings so that users get access to various “departmental” drives where shared documents are stored. In some environments, it would be fair to say that people get completely carried away with this and have huge amounts of mapped drives. Here’s an image showing a bunch of departmental mappings

In some more forward-thinking enterprises, they have embraced collaboration and document management tools more readily than others, and you don’t tend to see as many drive mappings. However, you’d be hard-pressed to find an environment where they’re completely absent. To paraphrase Blain – “they’re dug in deeper than an Alabama tick”.
How are drives mapped?
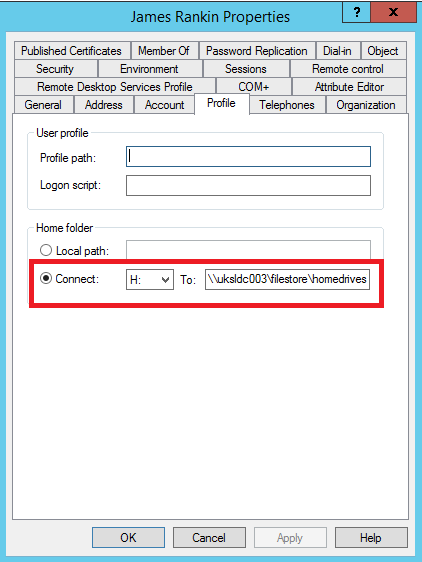
You can map a network drive in a number of ways. The Active Directory user object offers you a way to map a “home drive” for the user on a interactive or Remote Desktop Session Host level.

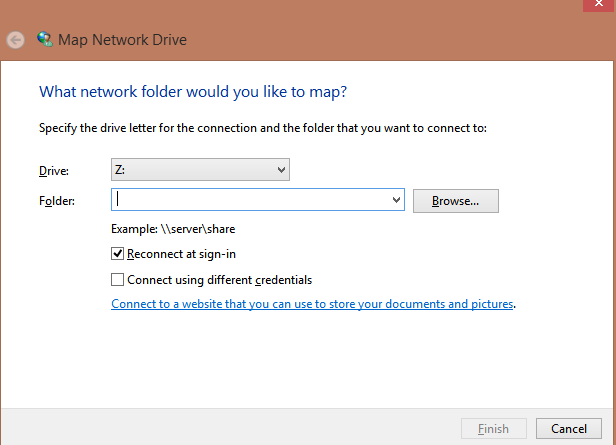
You can also use the Windows Explorer GUI to do it.

Or you can go old-school and map it from the Windows command line using the “net use” command, from PowerShell using the New-PSDrive cmdlet, from VBScript – in fact many different scripting languages have support, which means you will often see complex logon scripts with multiple context-dependent drive maps.

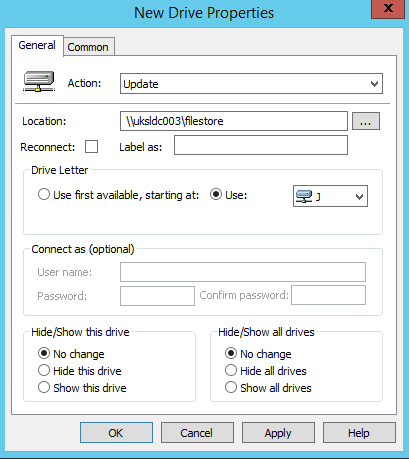
You will also see this functionality within other tools like Ivanti User Workspace Manager, Citrix Workspace Environment Management, Group Policy Preferences Drive Maps, etc., all which have the capability to create a mapped drive.
In Windows, all drives are assigned a “drive letter”, and commonly you see many different ones used, although A, B, C, D and E are often reserved for local or removable drives.
What problems do drive mappings cause?
Because they’re essentially a “drive” rather than just a shortcut, using drive mappings always causes some odd issues. Windows treats them a bit differently and this is where their long-in-the-tooth nature gets me vexed.
A “network drive mapping”, despite the fact that it is, really, to all intents and purposes, simply a slightly advanced shortcut, insists on actually contacting the remote location when it is mapped. So, if you’re mapping it as part of a logon script or something that runs at logon or even when an application is launched, if the location is unavailable, you’re looking at a long delay as it times out. The timeout varies, but is generally somewhere between 30 seconds and a couple of minutes. In extreme cases (and this is probably why I hate them so much), we’ve seen 15 MINUTE logon delays as GPP timed out trying to reach an inaccessible location. Now I know some people say “well maybe you should make sure your storage areas are always available” – like seriously? Shit happens people. If a network location is inaccessible, it shouldn’t actively kill off the user’s ability to log on – sure, they won’t be able to save there, but they should be able to do other work in the meantime.
If you have a problematic drive mapping, it’s not just logon that will be impacted – Windows insists on enumerating this area when running File Explorer too. If it’s down (and if it takes a long time to respond), it will affect the performance of the user interface as well.
Another problem is that because mapped drives use letters of the alphabet, there’s a limit to them. I’ve seen places where they’ve gone over twenty drive mappings and they’ve physically run out of letters to map (with the local and removable drives added too). Why would you paint yourself into a corner like this by insisting that everything resolves to a drive letter?
I also see lots of places where people have hard-coded drive letters into scripts, or even worse, actual applications. This drives me insane – how lazy have you got to be? Using simple UNC paths and environment variables would be fine. If you have anything with a reliance on a hard-coded drive like this – get it remediated as a matter of urgency.
After all, a “network drive mapping” is (like I keep banging on about) literally a UNC shortcut that appears in File Explorer dialogs. That’s all it is. Wouldn’t it be much easier just to avoid “drive mappings” and use shortcuts that don’t need to be validated as they’re created? That would allow us to get around all of these problems and consign them to the dustbin of history.
Solving our problems
Home drives
First of all, forget the concept of a “home drive”. Why do we still persist with this? All Windows users have a “home drive” – it’s called the damned Documents folder. And if you’re using stuff like OneDrive, ShareFile, DropBox or some other EFSS solution that does cool stuff like selective in-session sync between local and remote – WHY THE HELL ARE YOU STILL MAPPING A HOME DRIVE?
Home drives or RDSH home folders defined on the AD user object used to lock you into synchronous processing mode, but that no longer happens. However, I hate defining settings on the user object side because it’s just another area to check when things go wrong. What you should do is set a policy to simply map the user’s Documents folder to an EFSS folder like OneDrive, ShareFile, etc. and forget about it. If it’s OneDrive you use, then there are features such as OneDrive Files On Demand (on Server 2019 or later Windows 10 versions) and config items such as Storage Sense that avoid the issues of storage locally on the device getting eaten up.
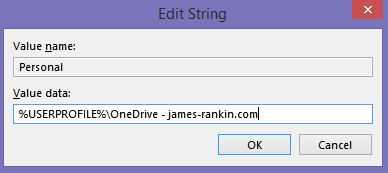
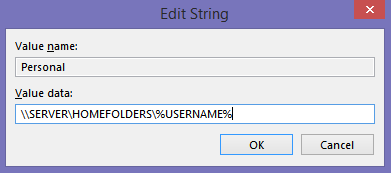
In an ideal world you should direct the Documents folder to an EFSS tool like I said, but if you don’t have that option, simply redirect it to a specified network share and have done with it. I wouldn’t even use the GPO Folder Redirection CSE for this – simply point the Registry value Personal from HKEY_CURRENT_USER\Software\Microsoft\Windows\CurrentVersion\Explorer\User Shell Folders to the specific share, using environment variables where necessary.
“What about laptop and mobile users?” Well, I’m talking about Citrix and RDSH primarily here, so any laptop users are generally going to be connecting to machines in the datacenter anyway to run these resources so not really an issue. However, for posterity, EFSS tech is designed pretty much with the needs of mobile users in mind (which is why it has a local copy and synchronizes with a cloud-based location), so again, that’s pretty much the only bit you need to give them a home drive.
Departmental shared drives
“But what about the departmental drives?” Firstly, aren’t you using some form of document management system yet, like SharePoint? If you are, then you should be using this to set up departmental folders and whatnot, along with all of the extra stuff you get in there like version control, rather than leaning back on drive mappings. You can do cool stuff with Office365, if you get it set up right, or even things like Google Docs or Teams or any one of the myriad collaboration tools springing up out there. Ideally, you should bin “departmental drives” in favour of better use of SharePoint or similar.
But to be fair – a lot of people hate SharePoint’s guts, and the concept of departmental drives on old-school SMB file server shares still works for them. And their users, to be fair. So if you’re in this mindset, then there are a couple of tricks I use (that you can also!) to create “shortcuts that appear in the File Explorer shell” the same way mapped drives do, without any of the issues.
Choosing a way
Firstly, you need to decided which way you want to skin this. We can make our new shortcuts appear in two different places:-
The “Folders” view in This PC (shown in red below) or the “Network locations” where mapped drives traditionally show in This PC (shown in blue below)
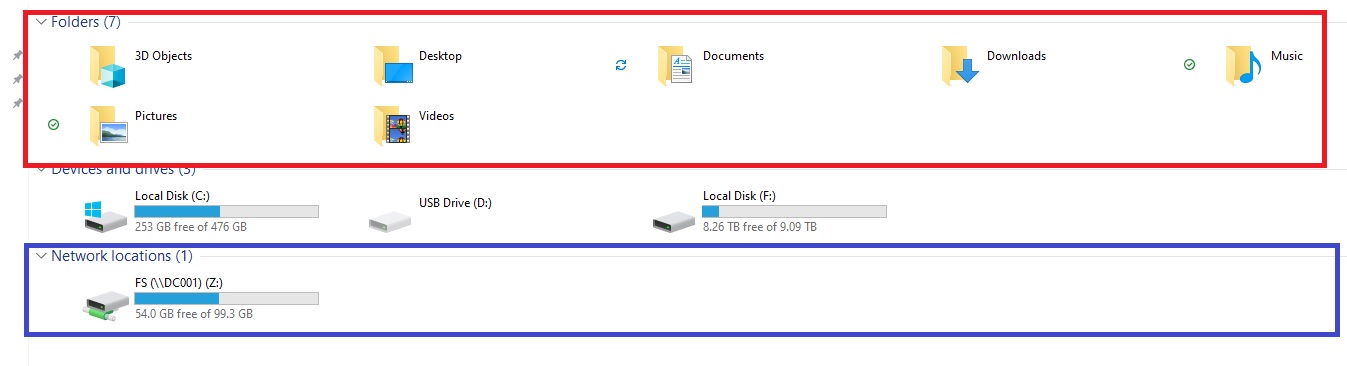
In the Open and Save As dialogs, these locations are both present, although the “Folders” view is always nearer to the top and more easily accessible. You can also customize the icon that is used when you present an entry point through the “Folders” view – if we store them in “Network locations”, a generic folder icon is used. However, creating items in the “Folders” view is much more time-consuming to do at scale because each entry needs a separate GUID. Pick whichever seems to make the most sense whilst considering both the user experience and the management perspective.
Adding your shortcuts into the Folders view
Firstly we will discuss how to add entries to the Folders view. Mainly, we are dealing with Registry manipulation here, so many tools would suffice to achieve this. You could use Group Policy Preferences, Citrix Workspace Environment Management, Ivanti User Workspace Management, even logon or startup scripts if you wanted – anything that can make the changes. As usual, I will discuss doing it through Group Policy Preferences as most people have access to that – please feel free to carve this method into other solutions as you require.
There are some pre-requisites for this method:-
- You need to know the UNC path where you want to send your shortcut
- You need to know the name you want to give the folder
- You need a description for the “hint” (the tooltip that will appear when the mouse is hovered over the folder)
- You need an icon for the folder (more on that in a second)
- You need a unique GUID to use
Firstly, the GUID. Each folder created in File Explorer needs a unique GUID. You can either invent one off the top of your head, or, more sensibly, just use this quick bit of PowerShell to generate yourself one and make a note of it.
[guid]::NewGuid().ToString("B").ToUpper()This will generate a unique GUID – just copy it and keep it somewhere

In this case the GUID has been generated as {EC6B21EB-5AAD-4D80-A2C1-D41206CA3A49}. However, the method we are going to use actually creates a GUID for you as part of the process, so if you are going to follow this article fully you don’t need to worry about a GUID ahead of commencing.
The icon is simple enough if you have your own custom .ico file. If you do have your own .ico file, bear in mind that it will need to be placed on the target devices and you will need to know the full path. However, in the absence of a customized icon what you can do is use one of the icon libraries or executables that ship with Windows. Most commonly used is shell32.dll – if the library or executable has more than one icon, you need to specify the number afterwards of the icon after the path. Finding which numbers refer to which icons can be tricky – this link seems the most accurate I can find for shell32.dll, others may be a case of trial and error (you can also use IconsExtract to try and track them down, but that also seems to be a bit inaccurate at times).

So if I had my own .ico file, I could just use the path c:\MyIcon\MyIcon.ico – if I, for instance, wanted to use one of the Windows library icons, I could use something like c:\windows\system32\shell32.dll,166 which would equate to this icon shown to the left.
The name, path and hint are all self-explanatory.
Armed with these, we now need to set about making a whole raft of Registry changes. So many, in fact, that I’d recommend using PowerShell to make the changes on a reference machine and then exporting them out for manipulation via Group Policy Preferences.
Change the below script so that it suits your environment (as I said, the script will actually automatically generate a GUID for you, so you don’t need to worry about that part). I pulled bits of this script from the internet years ago but can’t remember exactly where – so there’s probably someone on StackOverflow or SuperUser or another site like that is due some credit, my apologies. The first section is where you need to put your changes.
# Editable values (change as required)
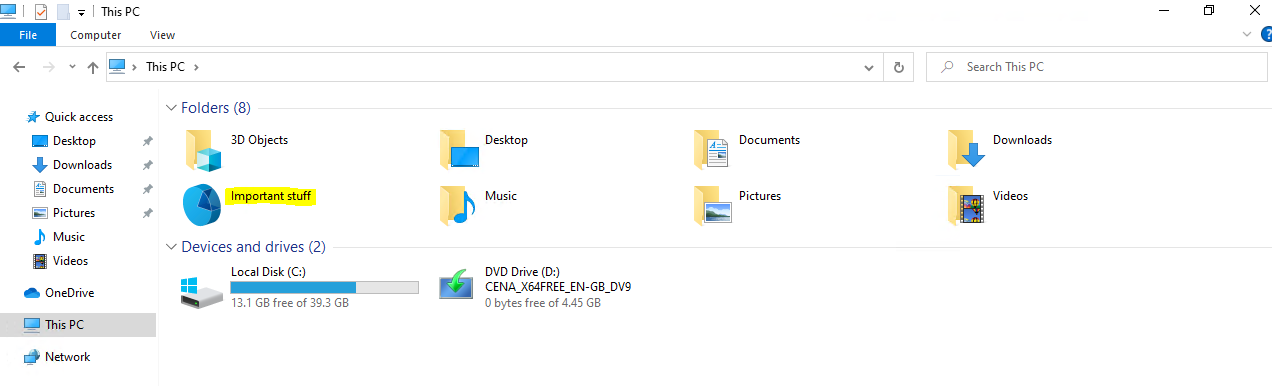
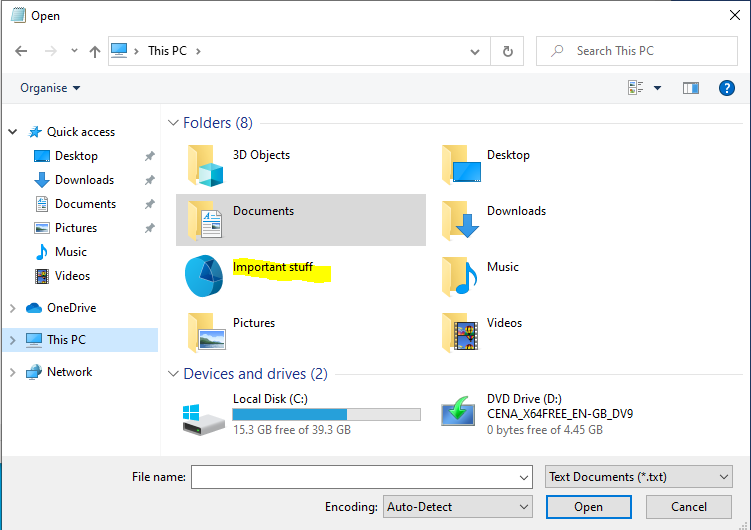
$FolderName="Important stuff"
$FolderLocation="\\SERVER\SHARE\PATH"
$FolderHint="Really important departmental drive"
$FolderIcon="C:\windows\system32\shell32.dll,166"
# Variables
$MYCLSID=$([guid]::NewGuid().ToString("B").ToUpper())
$HKCU_CLSID="HKCU:\Software\Classes\CLSID\$MYCLSID"
# Comment out line above, and uncomment line below, if you wish to run this for all users on a machine rather than the current user
# $HKCU_CLSID="HKLM:\Software\Classes\CLSID\$MYCLSID"
# 32-bit routines
New-Item -Path $HKCU_CLSID
Set-ItemProperty -Path $HKCU_CLSID -Name "(Default)" -Value $FolderName
Set-ItemProperty -Path $HKCU_CLSID -Name "InfoTip" -Value $FolderHint
Set-ItemProperty -Path $HKCU_CLSID -Name "DescriptionID" -Value 3 -type dword
Set-ItemProperty -Path $HKCU_CLSID -Name "System.IsPinnedtoNameSpaceTree" -Value 1 -Type DWORD
New-Item -Path $HKCU_CLSID\DefaultIcon
Set-ItemProperty -Path $HKCU_CLSID\DefaultIcon -Name "(Default)" -Value $FolderIcon
New-Item -Path $HKCU_CLSID\InProcServer32
Set-ItemProperty -Path $HKCU_CLSID\InProcServer32 -Name "(Default)" -Value "shdocvw.dll"
Set-ItemProperty -Path $HKCU_CLSID\InProcServer32 -Name "ThreadingModel" -Value "Both"
New-Item -Path $HKCU_CLSID\Instance
Set-ItemProperty -Path $HKCU_CLSID\Instance -Name "CLSID" -Value "{0afaced1-e828-11d1-9187-b532f1e9575d}"
New-Item -Path $HKCU_CLSID\Instance\InitPropertyBag
Set-ItemProperty -Path $HKCU_CLSID\Instance\InitPropertyBag -Name "Attributes" -Value 15 -Type DWORD
Set-ItemProperty -Path $HKCU_CLSID\Instance\InitPropertyBag -Name "Target" -Value $FolderLocation -Type ExpandString
New-Item -Path $HKCU_CLSID\ShellEx
New-Item -Path $HKCU_CLSID\ShellEx\PropertySheetHandlers
New-Item -Path "$HKCU_CLSID\ShellEx\PropertySheetHandlers\tab 1 general"
Set-ItemProperty -Path "$HKCU_CLSID\ShellEx\PropertySheetHandlers\tab 1 general" -Name "(Default)" -Value "{21b22460-3aea-1069-a2dc-08002b30309d}"
New-Item -Path "$HKCU_CLSID\ShellEx\PropertySheetHandlers\tab 2 customize"
Set-ItemProperty -Path "$HKCU_CLSID\ShellEx\PropertySheetHandlers\tab 2 customize" -Name "(Default)" -Value "{ef43ecfe-2ab9-4632-bf21-58909dd177f0}"
New-Item -Path "$HKCU_CLSID\ShellEx\PropertySheetHandlers\tab 3 sharing"
Set-ItemProperty -Path "$HKCU_CLSID\ShellEx\PropertySheetHandlers\tab 3 sharing" -Name "(Default)" -Value "{f81e9010-6ea4-11ce-a7ff-00aa003ca9f6}"
New-Item -Path "$HKCU_CLSID\ShellEx\PropertySheetHandlers\tab 4 security"
Set-ItemProperty -Path "$HKCU_CLSID\ShellEx\PropertySheetHandlers\tab 4 security" -Name "(Default)" -Value "{1f2e5c40-9550-11ce-99d2-00aa006e086c}"
New-Item -Path $HKCU_CLSID\ShellFolder
Set-ItemProperty -Path $HKCU_CLSID\ShellFolder -Name "Attributes" -Value 0xf080004d -type DWORD
Set-ItemProperty -Path $HKCU_CLSID\ShellFolder -Name "WantsFORPARSING" -Value ""
Set-ItemProperty -Path $HKCU_CLSID\ShellFolder -Name "HideAsDeletePerUser" -Value ""
# 64-bit routines
if ([Environment]::Is64BitOperatingSystem) {
$HKCU_WOW6432Node_CLSID="HKCU:\Software\Classes\WOW6432Node\CLSID\$MYCLSID"
New-Item -Path $HKCU_WOW6432Node_CLSID
Set-ItemProperty -Path $HKCU_WOW6432Node_CLSID -Name "(Default)" -Value $FolderName
Set-ItemProperty -Path $HKCU_WOW6432Node_CLSID -Name "InfoTip" -Value $FolderHint
Set-ItemProperty -Path $HKCU_WOW6432Node_CLSID -Name "DescriptionID" -Value 3 -type dword
Set-ItemProperty -Path $HKCU_WOW6432Node_CLSID -Name "System.IsPinnedtoNameSpaceTree" -Value 1 -Type DWORD
New-Item -Path $HKCU_WOW6432Node_CLSID\DefaultIcon
Set-ItemProperty -Path $HKCU_WOW6432Node_CLSID\DefaultIcon -Name "(Default)" -Value $FolderIcon
New-Item -Path $HKCU_WOW6432Node_CLSID\InProcServer32
Set-ItemProperty -Path $HKCU_WOW6432Node_CLSID\InProcServer32 -Name "(Default)" -Value "shdocvw.dll"
Set-ItemProperty -Path $HKCU_WOW6432Node_CLSID\InProcServer32 -Name "ThreadingModel" -Value "Both"
New-Item -Path $HKCU_WOW6432Node_CLSID\Instance
Set-ItemProperty -Path $HKCU_WOW6432Node_CLSID\Instance -Name "CLSID" -Value "{0afaced1-e828-11d1-9187-b532f1e9575d}"
New-Item -Path $HKCU_WOW6432Node_CLSID\Instance\InitPropertyBag
Set-ItemProperty -Path $HKCU_WOW6432Node_CLSID\Instance\InitPropertyBag -Name "Attributes" -Value 15 -Type DWORD
Set-ItemProperty -Path $HKCU_WOW6432Node_CLSID\Instance\InitPropertyBag -Name "Target" -Value $FolderLocation -Type ExpandString
New-Item -Path $HKCU_WOW6432Node_CLSID\ShellEx
New-Item -Path $HKCU_WOW6432Node_CLSID\ShellEx\PropertySheetHandlers
New-Item -Path "$HKCU_WOW6432Node_CLSID\ShellEx\PropertySheetHandlers\tab 1 general"
Set-ItemProperty -Path "$HKCU_WOW6432Node_CLSID\ShellEx\PropertySheetHandlers\tab 1 general" -Name "(Default)" -Value "{21b22460-3aea-1069-a2dc-08002b30309d}"
New-Item -Path "$HKCU_WOW6432Node_CLSID\ShellEx\PropertySheetHandlers\tab 2 customize"
Set-ItemProperty -Path "$HKCU_WOW6432Node_CLSID\ShellEx\PropertySheetHandlers\tab 2 customize" -Name "(Default)" -Value "{ef43ecfe-2ab9-4632-bf21-58909dd177f0}"
New-Item -Path "$HKCU_WOW6432Node_CLSID\ShellEx\PropertySheetHandlers\tab 3 sharing"
Set-ItemProperty -Path "$HKCU_WOW6432Node_CLSID\ShellEx\PropertySheetHandlers\tab 3 sharing" -Name "(Default)" -Value "{f81e9010-6ea4-11ce-a7ff-00aa003ca9f6}"
New-Item -Path "$HKCU_WOW6432Node_CLSID\ShellEx\PropertySheetHandlers\tab 4 security"
Set-ItemProperty -Path "$HKCU_WOW6432Node_CLSID\ShellEx\PropertySheetHandlers\tab 4 security" -Name "(Default)" -Value "{1f2e5c40-9550-11ce-99d2-00aa006e086c}"
New-Item -Path $HKCU_WOW6432Node_CLSID\ShellFolder
Set-ItemProperty -Path $HKCU_WOW6432Node_CLSID\ShellFolder -Name "Attributes" -Value 0xf080004d -type DWORD
Set-ItemProperty -Path $HKCU_WOW6432Node_CLSID\ShellFolder -Name "WantsFORPARSING" -Value ""
Set-ItemProperty -Path $HKCU_WOW6432Node_CLSID\ShellFolder -Name "HideAsDeletePerUser" -Value ""
}
# Add to explorer (user paths)
New-Item -Path HKCU:\Software\Microsoft\Windows\CurrentVersion\Explorer\MyComputer -ErrorAction SilentlyContinue
New-Item -Path HKCU:\Software\Microsoft\Windows\CurrentVersion\Explorer\MyComputer\NameSpace -ErrorAction SilentlyContinue
New-Item -Path HKCU:\Software\Microsoft\Windows\CurrentVersion\Explorer\MyComputer\NameSpace\$MYCLSID
# Add to explorer (machine paths) - comment out three lines above and uncomment three lines below to enable per-machine rather than per-user
# New-Item -Path HKLM:\Software\Microsoft\Windows\CurrentVersion\Explorer\MyComputer -ErrorAction SilentlyContinue
# New-Item -Path HKLM:\Software\Microsoft\Windows\CurrentVersion\Explorer\MyComputer\NameSpace -ErrorAction SilentlyContinue
# New-Item -Path HKLM:\Software\Microsoft\Windows\CurrentVersion\Explorer\MyComputer\NameSpace\$MYCLSID
# Restart explorer (user only)
Stop-Process -ProcessName explorerYou will notice in the script there are some commented sections if you wanted to run this in HKLM rather than HKCU, you can change these if you want to apply the settings to all users rather than specific ones. However as we normally provide access on a user basis, I’m imagining most of us would do this on an HKCU level and then target it through Group Policy.
Log on to a reference machine (making sure that the user you are using has access to PowerShell!) and run your script. You should see that you now have a new entry under This PC
When clicked on, this takes you to the network share you specified

All good so far. However, now we need to export out these Registry settings so we can add them to GPP.
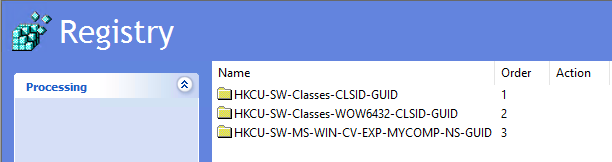
Firstly, find the GUID in the Registry. Easiest way to do this is by searching the Registry for the string you used for “Hint” and choosing “Match whole string only”. You should pretty quickly find a Registry entry containing the GUID (which in this case had been set to {277F4DB2-86C6-423D-83BA-4D21516648BC})
Now, we need to export the keys containing the GUID. These are
HKEY_CURRENT_USER\Software\Classes\CLSID\{GUID}
HKEY_CURRENT_USER\Software\Classes\WOW6432Node\CLSID\{GUID}
HKEY_CURRENT_USER\Software\Microsoft\Windows\CurrentVersion\Explorer\MyComputer\NameSpace\{GUID}
Export each of these as a .reg file using the Export function in Registry Editor and save them somewhere you can access them easily.
Now it’s time to convert these .reg files into .xml so Group Policy Preferences can read them. I’ve linked this tool before from my articles – the Runecasters REG2GPP tool, and it always works a treat. Choose the .reg file to upload, set the options (I use Replace and Run in logged-on user’s security context), then just click Convert and download XML and you will have three ready-made XML files when you’re finished.
Now let’s fire up GPMC and create some new items. The cool bit here is you can simply right-click the XML file you’ve created, choose Copy, and then Paste it directly into the User Configuration | Preferences | Windows Settings | Registry window (as long as you hit the white space, you will get a Paste option). Just remember that every time you paste an XML file the window drills down one level, so move back up to the Registry node before pasting the next one in or you will accidentally nest them (which isn’t good).
Now, if you want to apply a filter to these collections, you can use Item-Level Targeting from the root nodes of the imports (so right-click on the folders shown in the image above and choose the Item-Level Targeting option on it). All the settings contained in each collection will then be subject to the Item-Level Targeting filter.
So now, when a targeted user logs on, the Registry items are created and the UNC path that previously relied on being a “mapped drive” now shows up nicely in the “Folders” view under This PC. Result!

The new folder is also shown under the Open and Save As dialogs, which is again what we want
Now, if you wanted to replace lots of drive mappings with this method, it gets a bit fiddly. You could copy the collections from GPP and edit them, but given that there are so many entries, it is actually less time-consuming to simply edit the PowerShell, run it on a reference machine, export the Registry keys, convert them to XML, and paste them into GPP. The cleverer among you may be able to script it out somehow – I can’t be bothered 🙂
Adding your shortcuts into the Network Locations view
If you prefer your “new drive mappings” in the area where the “old drive mappings” appeared, then use this method instead.
There is a way to create “Network Shortcuts” in Windows, which simply sit in the folder %APPDATA%\Microsoft\Windows\Network Shortcuts. However, creating shortcuts in this folder on-the-fly isn’t satisfactory – they only appear under “Network Shortcuts”, and not in the Open and Save As dialogs, nor under File Explorer’s root This PC view. But with a bit of hacking around in Group Policy Preferences, you can achieve the desired result. You can also achieve this in Ivanti UWM, Citrix WEM, LiquidWare ProfileUnity or any one of the many UEM tools out there that can handle folders, shortcuts and ini file creation, as I alluded to previously.
For this method, there are a couple of things you need to know ahead of time:-
- the name you want to appear on your shortcut – e.g. Departmental Drive #1
- the path you want it to go to – e.g. \\SERVER\SHARE
Once armed with these, you first need to set up a User Configuration | Preferences | Windows Settings | Folder Action as below, replacing the names as appropriate
- Action – Update
- Path – %APPDATA%\Microsoft\Windows\Network Shortcuts\NAME OF YOUR PATH
- Attributes – Read-Only
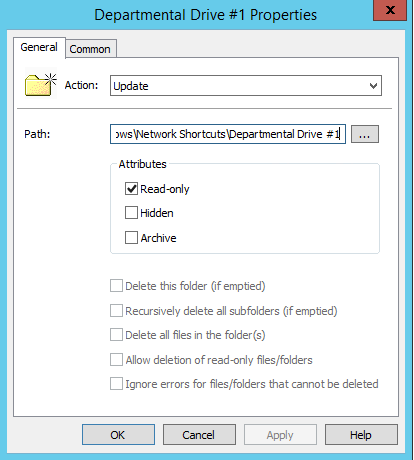
Basically, we are creating a Folder in the %APPDATA%\Microsoft\Windows\Network Shortcuts folder with the name you want to give the shortcut. Also, call the GPP Folder Action itself the same name as you wish to give the shortcut (this is the default behaviour), and set the attribute flag for Read-only as above. It is very important that you remember the read-only flag – without this, it will not work.

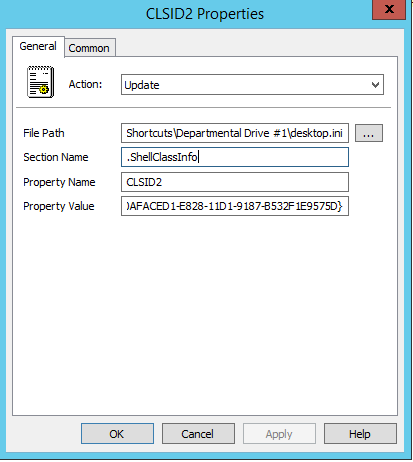
Next you need to use the User Configuration | Preferences | Windows Settings | Ini Files Action to create two .ini file updates (they will be two separate sections added to the same file). Both actions should be titled desktop.ini and they both need to point at the Folder you created above (so in this example, %APPDATA%\Microsoft\Windows\Network Shortcuts\Departmental Drive #1). The parameters of the first ini file should be
- Action – Update
- File Path – %APPDATA%\Microsoft\Windows\Network Shortcuts\Departmental Drive #1\desktop.ini
- Section Name – .ShellClassInfo
- Property Name – CLSID2
- Property Value – {0AFACED1-E828-11D1-9187-B532F1E9575D}
The next one has slightly different parameters
- Action – Update
- File Path – %APPDATA%\Microsoft\Windows\Network Shortcuts\Departmental Drive #1\desktop.ini
- Section Name – .ShellClassInfo
- Property Name – Flags
- Property Value – 2

Finally, you need to create a User Configuration | Preferences | Windows Settings | Shortcut Action, with the parameters below:-
- Action – Update
- Name – %APPDATA%\Microsoft\Windows\Network Shortcuts\Departmental Drive #1\target (basically the full path to your folder with a shortcut called target)
- Target type – File System Object
- Location – <Specify full path>
- Target path – \\SERVER\SHARE (path to the UNC share you want)
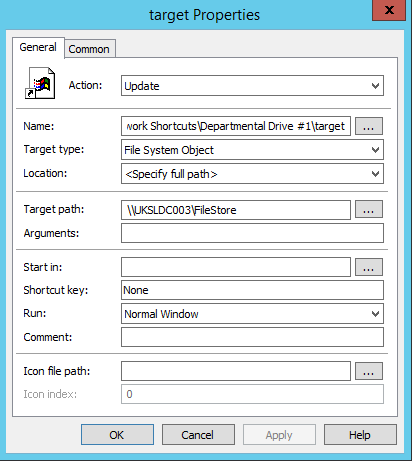
So basically recreate what I’ve done above exactly, swapping Departmental Drive #1 for the name you want to see on your shortcut, and \\UKSLDC003\FileStore with the path to your UNC share.
You can repeat this as many times as you want, so create all these files for each “mapping”. It’s easy to simply copy the existing ones and then rename the two variables (the name and the path). Just be careful not to duplicate any paths – each path must be unique for each “mapping”. You can also leverage Item-Level Targeting or Security Filtering (or whatever your UEM tool provides, if you’re not doing this in GPP) to deploy these on a per-group, per-user, or per-whatever basis.
So, let’s try firing it up for a test user with a couple of these new “shortcut mappings”. Here we can see what shows in File Explorer…
…and here is the same in the Open and Save As dialogs
As I said, the “Network locations” area is a bit less in-your-face than the “Folders” view – but that is where network drives traditionally appear, and obviously users are free to right-click any of the shortcuts created by these methods and choose “Pin to Quick Access” if they want them in an easier-to-find location. Obviously, if your users are used to heading for a drive letter, you can always adjust the name to actually look like a drive letter (as shown below) – although you can’t use a colon, sadly.

Summary
So there we have it – not one but two options for you to get rid of the spectre of the network drive mapping. There are some questions I always get asked or things I get told, however…
“But I can’t see the free space on the network drive this way!”
And? Do your admins rely on YOU PERSONALLY to tell them that file servers and shares are filling up? Or are you the admin and this is how you actually check for free space? I’m not having this as a genuine complaint – there should be other ways that free space and growth rates are being monitored on enterprise file storage.
“What about filesystem permissions?”
Not the focus of this article. Use Access Based Enumeration and NTFS and you should be good.
“Can we change the icon?”
Yep, that’s what the “Folders” method is all about.
“My users will never go for this!”
I think it is important for us as admins to try and adjust the way people work. We’ve done so many of the hard yards already with things like EFSS, document management systems, Teams, Slack and other collaboration tools – why do we still hang so grimly onto network drives? We’re steering them into cloud and SaaS and all sorts of other goodness – why can’t we get rid of these legacy mappings also? In many cases, it’s simply a resistance to change in general. But with tech like OneDrive and Known Folder Move and many other supporting features, it’s high time we broke away from legacy stuff such as folder redirection, mapped drives and roaming profiles. Embrace the future!
Personally, I think in Citrix sessions, particularly with the timeouts attached to launching, that you should avoid using network drives and adopt these ways instead. One thing I always do, from a Citrix perspective, is increase the HKLM\Software\Citrix\PortICA\AutoLogonTimeout value so that if you get a misbehaving, inaccessible drive that drags the logon, this value will ensure the Citrix session itself doesn’t time out (which can be disastrous, particularly on one-to-one instances).
My advice:-
- Check all your applications for hard-coding to drive letters and remediate them
- Don’t use home drives, use EFSS
- Remove network drive mappings and replace them with Special Folders or UNC paths using some of the methods here
Anyway – that’s me for now. I have to record my Citrix Converge session (register here!) over the weekend but I promise to get out Logon Series #3 and a video to accompany this article as soon as that is done. Ciao!
UPDATE – the video is now live for this article on my YouTube channel, and linked below
![]()
Great Extensive writeup. Very worthful information. Thanks a lot for all your efforts
i second that 🙂
This is some next level shit. Top work, man.
Thanks Ryan!
1) Can this work with “Network Locations” method ?
– the name you want to appear on your shortcut – e.g. G-Drive
– the path you want it to go to – e.g. \\SERVER\SHARE\%username%
Yes, it should take any characters (although colons don’t work), and if it is running in the user context it should be able to expand the USERNAME variable as well, yes.
is it possible to do the network location part in powershell ??
Should think so, all you are doing is creating a folder, some ini files with a certain content, and a shortcut.
Nice writeup James. How are you dealing with that in case if the path lenght is a problem. Even today for some tools or if applications not can use UNC shares?
Hmmm, interesting edge case. If applications cannot address a UNC path I’d say firstly fix the apps 🙂 Path length could maybe be gotten around using a reparse point or FSLogix redirection, but an app “needing” a drive path would be tricky.
Great article! Thank you for putting lot of efforts and explaining details…Video will be definitely worth watching….Cheers
Very good article, I have configured a lot of servers and I have never had a problem with network drives, we use them frequently at all of our customers. What I like about network drives is that it short the UNC path. I might change my approach the next time I set up a server for a client. The problem is that this approach is much more difficult to maintain for an MSP company, if I would work for only one company I would use this technique.
Great article! Thank you!
How would you integrate a Share Point Online library? Users want access through File Explorer.
And onedrive for business only creates problems.
Hmmm, interesting. I know you could map ftp sites and http sites through explorer – if you try doing this using an http path rather than a UNC path, does it still work?
https://twitter.com/ryandunbar2/status/1385576606232612864
not working how it suppose to !!!!!!!!!!!!!!
Using the method to create shortcuts to Folders view:
Is there a way to access this shortcut from command prompt?
Hmmm, you could probably do it using a shell:xxx command – you might have to provide the GUID