
It’s been a long time since I managed to do any blogging, hopefully this might change over the next few weeks or so (although, judging by my inbox, I’m not getting my hopes up too high). Anyway, let’s have a more detailed rundown of one of my favourite little tools out there – CloudDriveMapper.
If you read my article on managing OneDrive in EUC environments, you’re probably aware that I like to leverage CloudDriveMapper for OneDrive deployments. Primarily, I lean towards it when the environment has no real need for caching of their OneDrive data files locally. In these situations, users simply download the files as they require them from an “online” connection to their OneDrive folder, and when they save files, they are saved back to the cloud location directly. We quickly touched on CloudDriveMapper setup in that article, but we’re going to expand it a bit here.
Now obviously, you need to understand your user behaviours, because this approach wouldn’t be suitable for environments where users are downloading huge, bloated files like multi-GB ISOs to work with on a daily basis – they would experience bad performance and potentially affect other users on shared platforms. But for common-or-garden users where they don’t often download large files (it’s not a problem if they do it occasionally), adopting the CloudDriveMapper “online” approach is perfectly viable and performs more than passably.
It can also make sense to adopt this approach when users have very large OneDrive caches, or when the operating system doesn’t support features such as Storage Sense and Files On Demand that can mitigate the amount of cache storage required. CloudDriveMapper is very cheap – and in some situations I’ve seen it come out cheaper than the cost of cache storage, or even the users’ home drives.
So when commencing a OneDrive project, I guess it makes sense to take into account the size of users’ OneDrive data, the potential cache storage required, the size and nature of the files the users need on a daily basis, and the operating systems in use. If it turns out that caching isn’t a huge necessity, it may make more sense to explore the potential of an “online” connection.
However, you could simply provide the users access to the browser-based OneDrive or a direct WebDAV connection – which works absolutely fine, they just need to log in – but the reason I lean towards CloudDriveMapper (CDM, from now on) is that it allows the “online” connection but fully integrates it into Windows Explorer, so that the user can easily access, open and save documents without having to hop in and out of the browser session or establish a WebDAV link. In an “out-of-the-box” install, CDM simply maps a network drive to the user’s OneDrive folder, which is a perfectly usable and valid way of using it, but as well as this basic install, we are going to discuss how to set it up so that the user gets an experience very similar to that provided by the full OneDrive Sync Client, in which they access their files through a proper Windows special folder. The “snazzy” approach, if you will.
We will run through the “out of box” setup first, and then move on to the additional steps required to get the “Sync Client” experience.
Basic setup
Firstly, you need to install the WebClient service. If you’re on Windows 10 or 11, just make sure the “WebClient” service is started. If you’re running on Server 2016, 2019 or 2022, install the WebDAV Redirector with the following PowerShell
Install-WindowsFeature WebDAV-Redirector –RestartMake sure you also have *.sharepoint.com added to Trusted Sites (or, if you use a vanity URL, whatever it is)
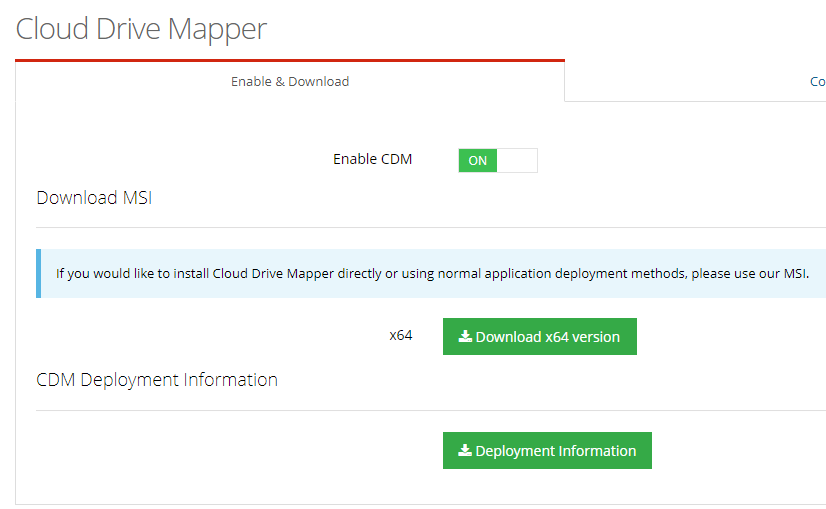
Next you need to log in to the CDM portal and configure how you want the drive mapping to behave (you will have received the logon details when you signed up for a trial account or purchased the full version). Firstly, enable the functionality and download the required MSI
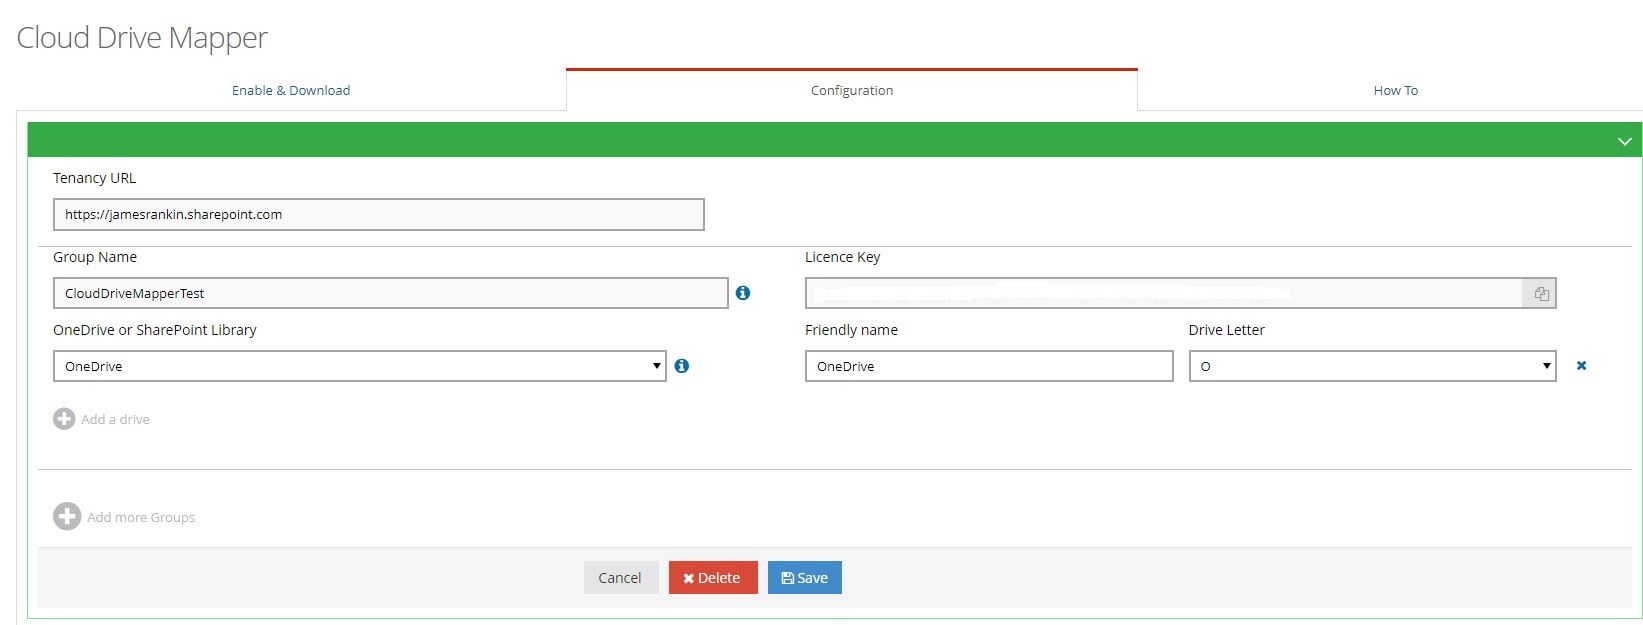
After that, switch to the Configuration tab and set up the details of the drive mapping, as well as copying your licence key (as you will need this for the install of the client). In this example, we’ve set up a basic OneDrive mapping to the O: drive.
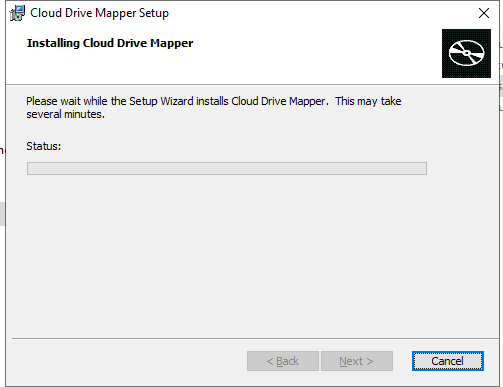
Next open up your golden image and install CDM (or deploy it out via your software management tool, the choice is yours). You need to specify the license key you copied in the step earlier, whether you do this in the golden image manually or via the command line is up to you.
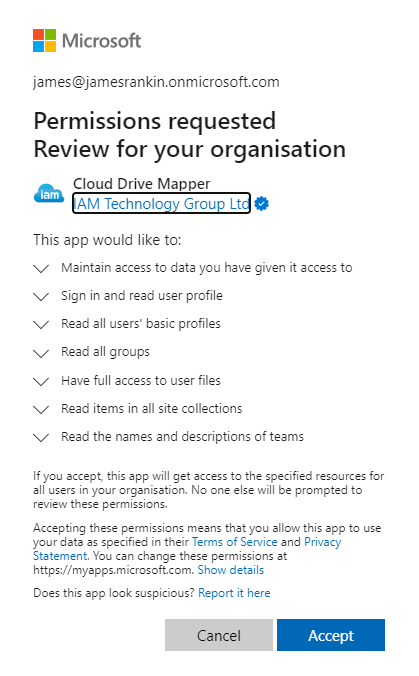
You then need to allow CDM to run with the required permissions as an Azure Enterprise App. You can either do this by running the software and logging in as a user with the access rights to add an Azure Enterprise App, or by simply following this link.
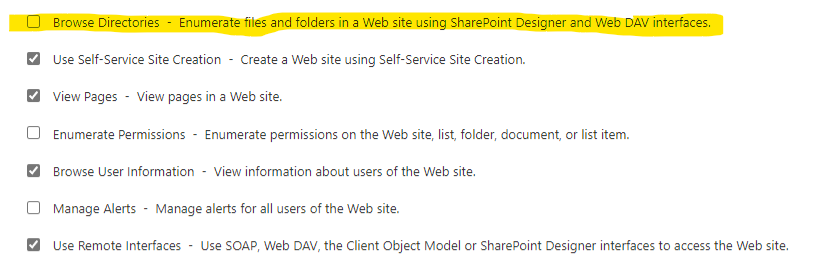
Also make sure that Sharepoint is configured with the “Browse directories” permission as below
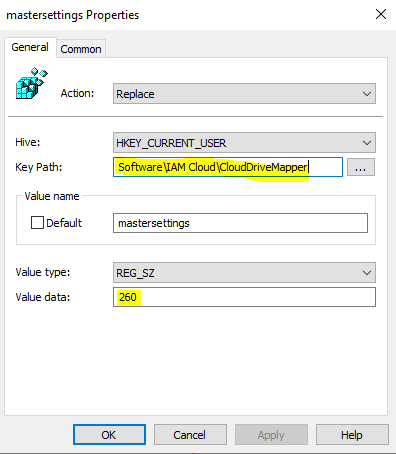
CDM has a bunch of configurable settings that you can tailor to your own needs, and they are handled by a Registry value called “mastersettings”. It’s a bitmask, so you select the options you want to enable, add them up, and apply the resultant value to the Registry at HKCU\Software\IAM Cloud\CloudDriveMapper. They’re all documented in this article. Mainly, the one that is mandatory is the “TurnOnWebView2” setting (which is 4), and if you’re on a multi-session environment, the “AllowMultipleInstances” setting (256), giving a total of 260 for multi-session or 4 for single-session. You can configure this easily enough through GPP.
Next you need to make sure CDM auto-starts when your users log in. You can do this for all users, or just for subsets of users (you may not want admin or service accounts, for instance, to run CDM). By default, CDM writes its auto-start entry to the Startup folder (%ALLUSERSPROFILE%\Microsoft\windows\Start Menu\Programs\Startup), but as this is only processed for desktop logins, in published app environments you will need to use a different method. This article discusses the best ways to auto-launch a process on Citrix or RDSH app environments. If you wish to scope an auto-launch to a particular subset of users, there are various ways you could achieve this – permissions, group-linked Registry items, etc. As long as the CDM process launches when your target users log in, you will be golden.
Conversely, if you’re running published apps on Citrix, you need to make sure CDM also closes gracefully when you log out. The LogoffCheckSysModules Registry value (deployed whichever way you see fit) will sort this out.
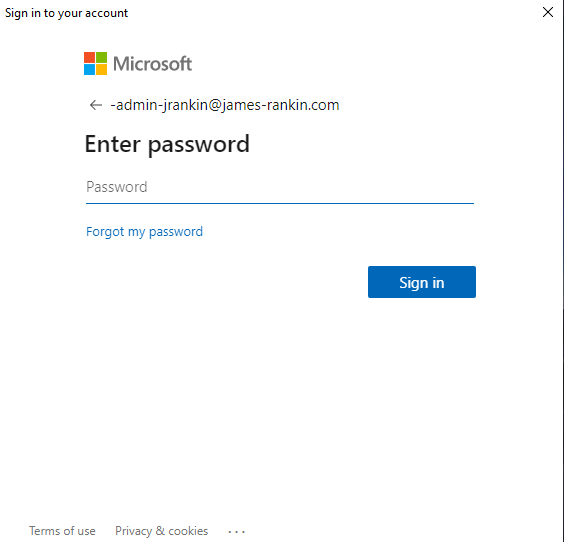
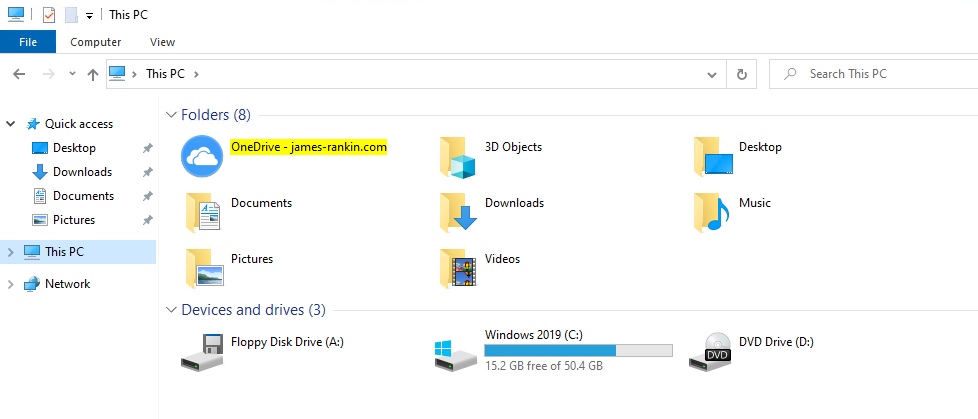
This is all you will need to do for the “basic” setup. In this configuration, the user will be prompted at first logon to sign in to Office365 (and if your clients are hybrid-joined to Azure AD, then this process will be much smoother)…
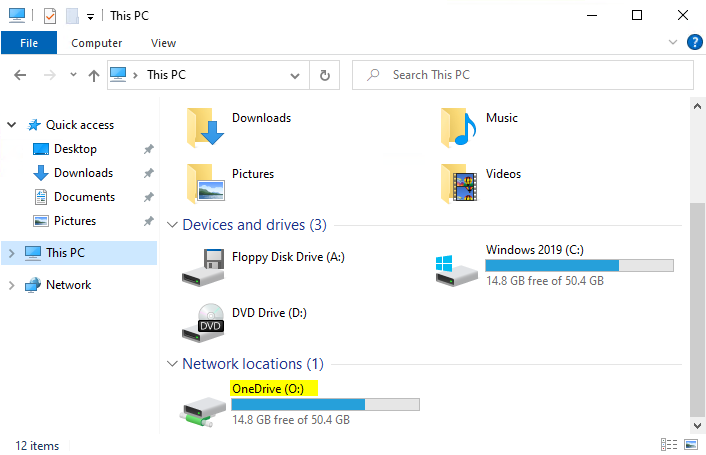
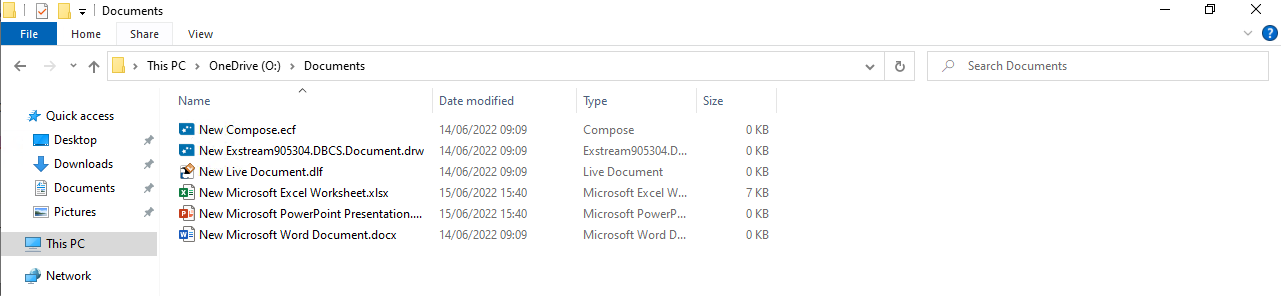
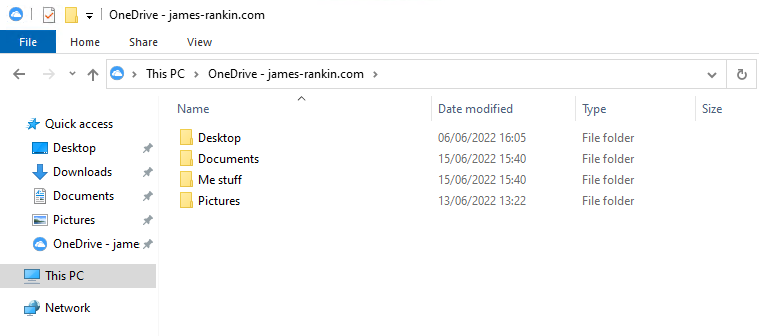
…and after that (and for all subsequent logons), they will have a network drive mapped that takes them directly to their OneDrive content as below.
Which obviously contains all of their content shown directly through Explorer
If this is good enough for you and your users, then you can stop here – CDM is working as intended.
“Sync client experience” setup
If, like me, you want the user experience to reflect what they normally see on the OneDrive Sync Client, then you need to take some additional steps.
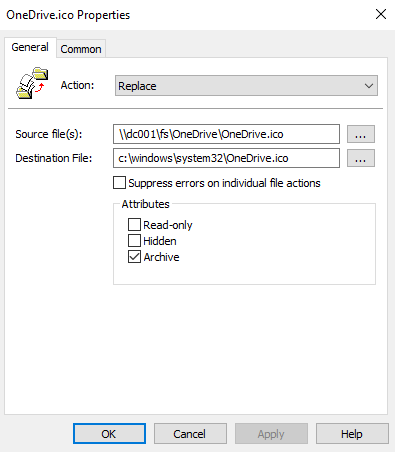
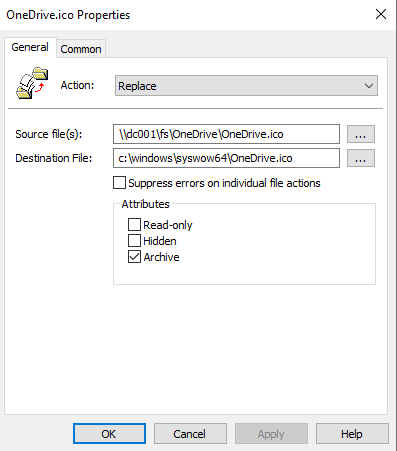
Firstly you need to get an icon to apply to the folder. Searching for a OneDrive icon is easy enough. Once you’ve obtained the .ico file, you need to copy it somewhere it can be used. I opt to use a Group Policy Preferences File item to copy the .ico file from a network share to the system32 and syswow64 folders on the local machine. You could also load it into your golden image.
Next, you need to actually hide the drive you are mapping. This is so we can use a Windows Explorer “special folder” instead of a mapped drive. In order to hide the drive, you will need to use Group Policy (you can’t use Group Policy Preferences with the “hide drive” option, as this requires GPP to actually map the drive, which it can’t do, because it isn’t a “traditional” UNC path).
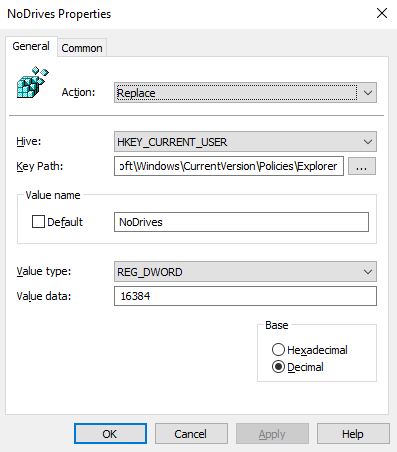
There are two GPOs that can hide mapped drives, “Hide these specified drives in My Computer” and “Prevent access to drives from My Computer”, both of which sit in User Config | Admin Templates | Windows Components | File Explorer. The first simply hides the drive from the “This PC” view, whereas the second prevents access to it completely. It’s up to you which one you use. However, as you many know, these GPOs only natively support hiding combinations of A, B, C and D drives. If you’ve used a custom letter (like the O: drive we are using), then you need to write a custom value to achieve this.
Carl Webster’s excellent article tells you the binary number for each drive letter you want to hide. Simply choose the drives you want to hide, and then add together all the binary numbers from the article and apply them to the policy settings. You can either use Webster’s customized ADMX files to handle this, or you can simply use Group Policy Preferences to apply the customized value to the Policies key. I’m opting to hide only the O: drive, so the binary value required is 16384.
For “Hide these specified drives in My Computer”, apply the value as a DWORD in the following key:-
HKCU\SOFTWARE\Microsoft\Windows\CurrentVersion\Policies\Explorer\NoDrives
For “Prevent access to drives from My Computer”, apply the value as a DWORD in the following key:-
HKCU\SOFTWARE\Microsoft\Windows\CurrentVersion\Policies\Explorer\NoViewOnDrive
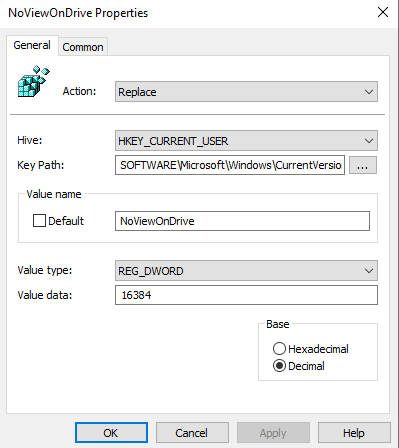
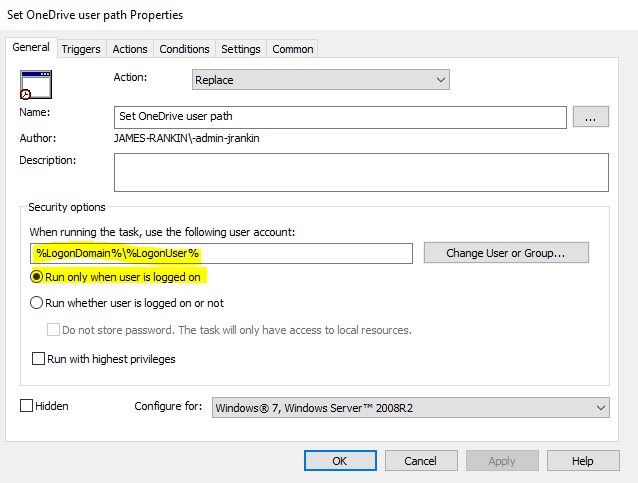
Also, make sure that the “Run in logged-on user’s security context” option is not checked
Once you’ve linked and applied these Registry values so that the drive is hidden to your requirement, you need to identify the format of your Sharepoint addresses.
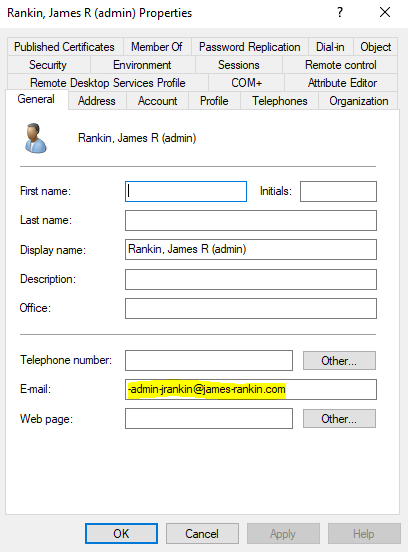
If you log in to your OneDrive through the web, have a look at the address bar and see what format the path is in. Here’s an example from my own tenant. Have a look at the highlighted section

This is basically my Office365 email address with the periods (.) and @ symbols replaced with underscores. Some tenants may have this slightly differently – the format may be the UPN instead, so username@domain.com with the same replacement applied (so it would show as username_domain_com). Whichever it is (it is usually the email address), we will need to pull this detail out of the user details and format it correctly. So for my tenant, we need to pull the email address from the AD user details, and parse it into the format that OneDrive uses.
Important – if you’re using the email format, make sure that your AD users have the email attribute correctly set!
We need to run a script either to pull the email and convert it to a Sharepoint address, or take the UPN and convert it to a Sharepoint address, before storing the full Sharepoint address as a variable. Now, the crucial part here is that the variable must not just be written but available for use in the session. If you set it via a logon script, it may not be available for use in the session until the user logs out and back in. The trick is getting the environment variable set after the user has logged in. We can do this by using a GPP Scheduled Task set to run at user logon, which runs late enough in the logon process to be accessible from the session.
Firstly, we need the script on the local machines. Copy the required script for your Sharepoint address format and make sure this script exists on the local machines (you can push it down via GPP Files, add it to the gold image, etc.)
This is the script for the commonest format (email). Change the $FolderLocation variable as required for your environment.
$searcher = [adsisearcher]"(samaccountname=$ENV:USERNAME)"
$email = $searcher.FindOne().Properties.mail
$intermediate = "$email".replace("@","_")
$OneDrivePathVar = "$intermediate".replace(".","_")
$FolderLocation="\\myaddress-my.sharepoint.com@SSL\DavWWWRoot\personal\$OneDrivePathVar\documents"
[Environment]::SetEnvironmentVariable("OneDriveUserPath", "$FolderLocation", 'User')
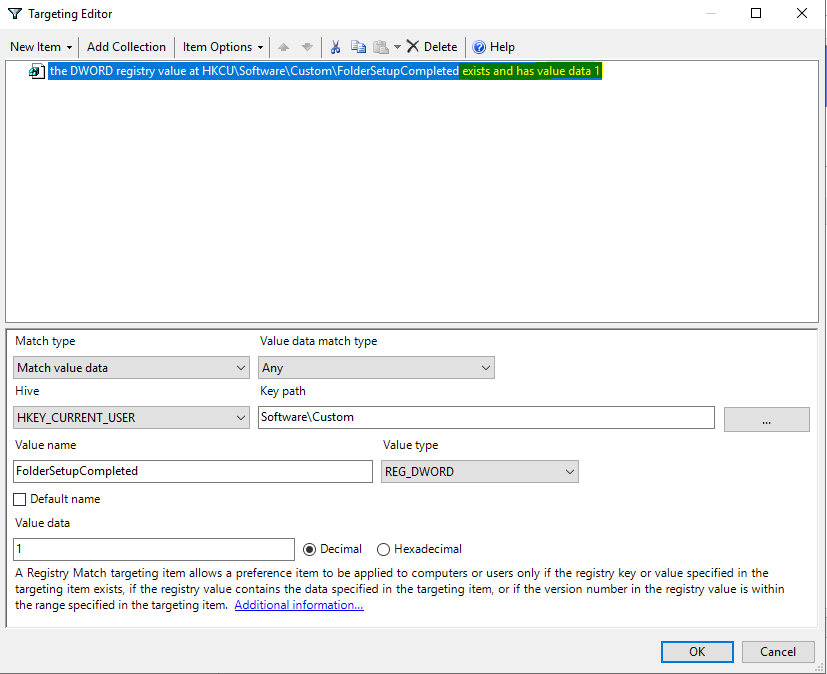
# Add flag so that this is not re-run constantly at logon (this is the Condition for the GPP Scheduled Task to be created)
New-Item -Path HKCU:\Software\Custom
Set-ItemProperty -Path HKCU:\Software\Custom -Name "FolderSetupCompleted" -Value 1 -type DWORDThe two lines at the end are there to ensure that this only runs at the user’s first logon. The Scheduled Task we set up will be dependent on the non-existence of this Registry value so will make sure it does not run repeatedly.
Next, this is the script for the less common format (UPN). Again, change the path variable as required for your environment.
@echo off

for /f "tokens=1,2 delims=@" %%a in ('whoami /upn') do set username=%%a& set domain=%%b
for /f "tokens=1,2 delims=." %%a in ('echo %domain%') do set domain1=%%a& set domain2=%%b
set OneDriveUserPath=\\myaddress-my.sharepoint.com@SSL\DavWWWRoot\personal\%username%_%domain1%_%domain2%\documents

:: Add flag so that this is not re-run constantly at logon (this is the Condition for the GPP Scheduled Task to be created)

reg add HKCU\Software\Custom /v FolderSetupCompleted /t REG_DWORD /d 1 /f > NUL
Once this is present on the target device, we need to configure a GPP Scheduled Task to run this script at the user logon, if the Registry flag is not present. Create a GPP with the following options selected:-
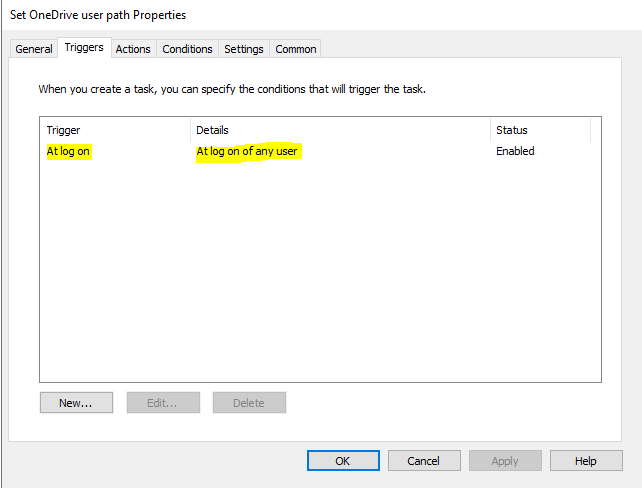
You can change “at log on of any user” to “specified user or group” if you wish to limit the script that sets the variable to a specific AD group.

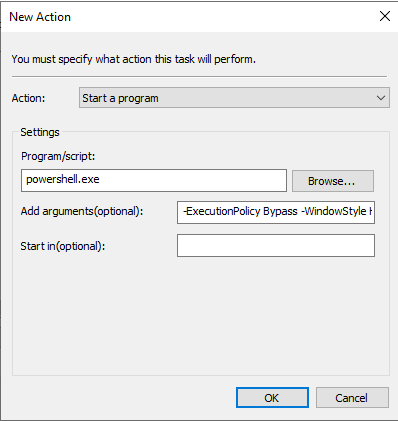
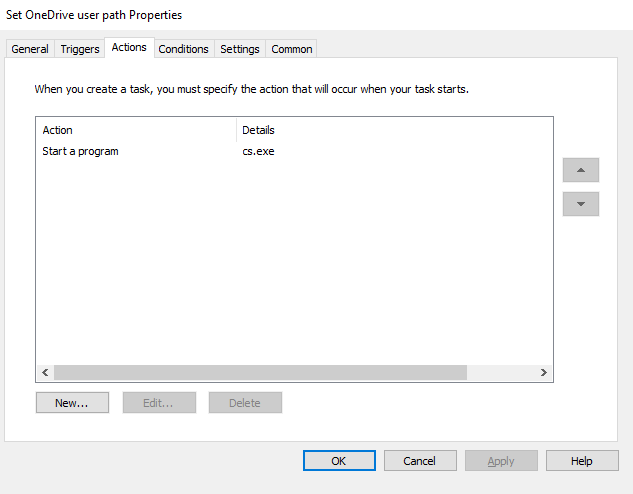
The action configured within the task is to run “powershell.exe” with arguments as follows:-
-ExecutionPolicy Bypass -WindowStyle Hidden -File c:\path\toyourscript\script.ps1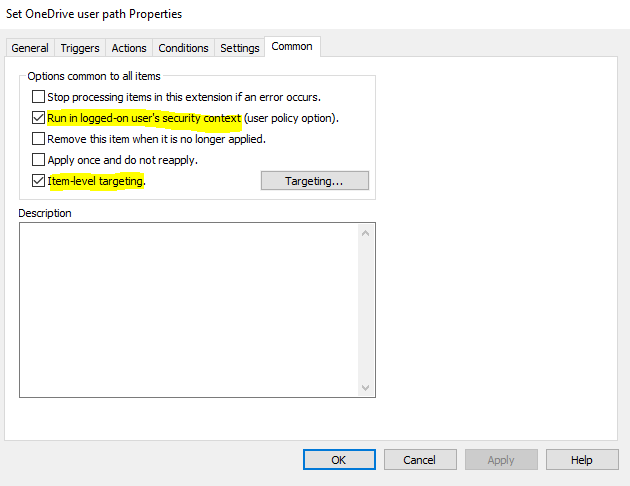
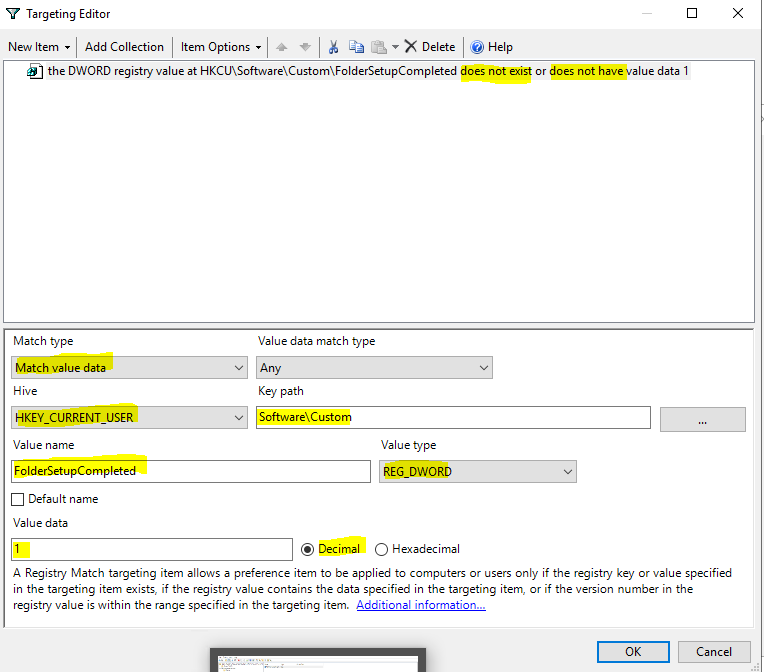
Make sure you get the Item-Level Targeting right. This is essential so the script doesn’t run at every user logon and simply runs once or if the user’s profile has been removed.
Once you have done this, configure a second GPP Scheduled Task, but this time, make it to delete the Scheduled Task with the same name as the one you just created, and configure the Item-Level Targeting so it runs if the Registry flag does exist.
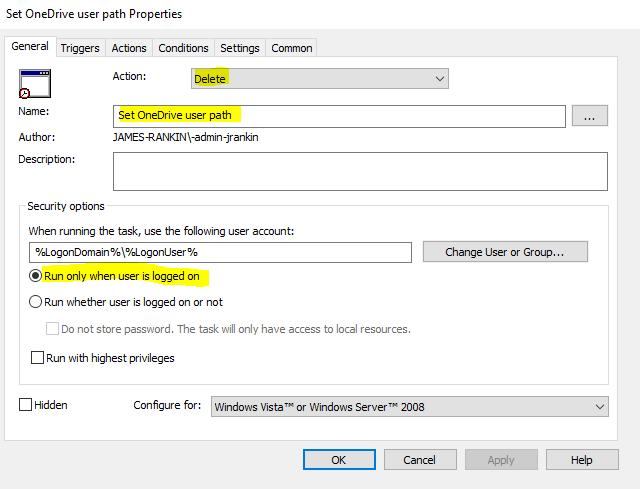
Even though it is a Delete setting, you can’t create a GPP Scheduled Task without an Action, so you will need to put one in (I just throw a fake one in as below)
As said previously, just make sure your Item-Level Targeting is now the opposite of what you configured for the first task, as shown below
Now, time for the awful part. In order to create our special Windows folder that uses the variable we are setting, and the icon we have created, we need to set some Registry keys in the user’s profile. A lot of them.
We need a GUID to represent our special folder, so you can generate one with the following PowerShell…
$MYCLSID=$([guid]::NewGuid().ToString("B").ToUpper())…or you can simply use the one I have pre-created in the example set of settings below. To set this huge bunch of Registry keys and values, I’ve opted to use GPP Registry – it’s probably the least painful way of doing it. There are a number of other ways around this you could choose, but I haven’t gone into these here.
The Registry values you need to set are listed below, but first, some notes.
As said before, you can either use the GUID specified below (which is {23E39467-FDD3-4E21-99C5-E69B901299D2}), or you can substitute one of your own. It makes no real difference which way you do this.
The values shown in bold are configurable for your environment, so change them as required.
The value for DescriptionID can be set to 3 or 9. 3 will show the new folder under Folders in This PC, 9 will show it in Network Locations. The choice is yours, but I prefer 3 as it easier for the user to find.
Values marked as [blank] should be left blank.
| Action | Hive | Key | Value | Type | Data |
| Create | HKCU | Software\Classes\CLSID\{23E39467-FDD3-4E21-99C5-E69B901299D2} | (Default) | REG_SZ | OneDrive – james-rankin.com |
| Create | HKCU | Software\Classes\CLSID\{23E39467-FDD3-4E21-99C5-E69B901299D2} | InfoTip | REG_SZ | User’s OneDrive documents |
| Create | HKCU | Software\Classes\CLSID\{23E39467-FDD3-4E21-99C5-E69B901299D2} | DescriptionID | REG_DWORD | 3 |
| Create | HKCU | Software\Classes\CLSID\{23E39467-FDD3-4E21-99C5-E69B901299D2} | System.IsPinnedtoNameSpaceTree | REG_DWORD | 1 |
| Create | HKCU | Software\Classes\CLSID\{23E39467-FDD3-4E21-99C5-E69B901299D2} | SortOrderIndex | REG_DWORD | 30 |
| Create | HKCU | Software\Classes\CLSID{23E39467-FDD3-4E21-99C5-E69B901299D2}\DefaultIcon | (Default) | REG_SZ | c:\windows\system32\OneDrive.ico |
| Create | HKCU | Software\Classes\CLSID\{23E39467-FDD3-4E21-99C5-E69B901299D2}\InProcServer32 | (Default) | REG_SZ | shdocvw.dll |
| Create | HKCU | Software\Classes\CLSID\{23E39467-FDD3-4E21-99C5-E69B901299D2}\InProcServer32 | ThreadingModel | REG_SZ | Both |
| Create | HKCU | Software\Classes\CLSID\{23E39467-FDD3-4E21-99C5-E69B901299D2}\Instance | CLSID | REG_SZ | {0afaced1-e828-11d1-9187-b532f1e9575d} |
| Create | HKCU | Software\Classes\CLSID\{23E39467-FDD3-4E21-99C5-E69B901299D2}\Instance\InitPropertyBag | Attributes | REG_DWORD | 0000000F |
| Create | HKCU | Software\Classes\CLSID\{23E39467-FDD3-4E21-99C5-E69B901299D2}\Instance\InitPropertyBag | Target | REG_EXPAND_SZ | %OneDriveUserPath% |
| Create | HKCU | Software\Classes\CLSID{23E39467-FDD3-4E21-99C5-E69B901299D2}\ShellEx\PropertySheetHandlers\tab 1 general | (Default) | REG_SZ | {21b22460-3aea-1069-a2dc-08002b30309d} |
| Create | HKCU | Software\Classes\CLSID\{23E39467-FDD3-4E21-99C5-E69B901299D2}\ShellEx\PropertySheetHandlers\tab 2 customize | (Default) | REG_SZ | {ef43ecfe-2ab9-4632-bf21-58909dd177f0} |
| Create | HKCU | Software\Classes\CLSID\{23E39467-FDD3-4E21-99C5-E69B901299D2}\ShellEx\PropertySheetHandlers\tab 3 sharing | (Default) | REG_SZ | {f81e9010-6ea4-11ce-a7ff-00aa003ca9f6} |
| Create | HKCU | Software\Classes\CLSID\{23E39467-FDD3-4E21-99C5-E69B901299D2}\ShellEx\PropertySheetHandlers\tab 4 security | (Default) | REG_SZ | {1f2e5c40-9550-11ce-99d2-00aa006e086c} |
| Create | HKCU | Software\Classes\CLSID\{23E39467-FDD3-4E21-99C5-E69B901299D2}\ShellFolder | Attributes | REG_DWORD | F080004D |
| Create | HKCU | Software\Classes\CLSID\{23E39467-FDD3-4E21-99C5-E69B901299D2}\ShellFolder | WantsFORPARSING | REG_SZ | [blank] |
| Create | HKCU | Software\Classes\CLSID\{23E39467-FDD3-4E21-99C5-E69B901299D2}\ShellFolder | HideAsDeletePerUser | REG_SZ | [blank] |
| Create | HKCU | Software\WOW6432Node\Classes\CLSID\{23E39467-FDD3-4E21-99C5-E69B901299D2} | (Default) | REG_SZ | OneDrive – james-rankin.com |
| Create | HKCU | Software\WOW6432Node\Classes\CLSID\{23E39467-FDD3-4E21-99C5-E69B901299D2} | InfoTip | REG_SZ | User’s OneDrive documents |
| Create | HKCU | Software\WOW6432Node\Classes\CLSID\{23E39467-FDD3-4E21-99C5-E69B901299D2} | DescriptionID | REG_DWORD | 3 |
| Create | HKCU | Software\WOW6432Node\Classes\CLSID\{23E39467-FDD3-4E21-99C5-E69B901299D2} | System.IsPinnedtoNameSpaceTree | REG_DWORD | 1 |
| Create | HKCU | Software\WOW6432Node\Classes\CLSID\{23E39467-FDD3-4E21-99C5-E69B901299D2} | SortOrderIndex | REG_DWORD | 30 |
| Create | HKCU | Software\WOW6432Node\Classes\CLSID\{23E39467-FDD3-4E21-99C5-E69B901299D2}\DefaultIcon | (Default) | REG_SZ | c:\windows\system32\OneDrive.ico |
| Create | HKCU | Software\WOW6432Node\Classes\CLSID\{23E39467-FDD3-4E21-99C5-E69B901299D2}\InProcServer32 | (Default) | REG_SZ | shdocvw.dll |
| Create | HKCU | Software\WOW6432Node\Classes\CLSID\{23E39467-FDD3-4E21-99C5-E69B901299D2}\InProcServer32 | ThreadingModel | REG_SZ | Both |
| Create | HKCU | Software\WOW6432Node\Classes\CLSID\{23E39467-FDD3-4E21-99C5-E69B901299D2}\Instance | CLSID | REG_SZ | {0afaced1-e828-11d1-9187-b532f1e9575d} |
| Create | HKCU | Software\WOW6432Node\Classes\CLSID\{23E39467-FDD3-4E21-99C5-E69B901299D2}\Instance\InitPropertyBag | Attributes | REG_DWORD | 0000000F |
| Create | HKCU | Software\WOW6432Node\Classes\CLSID\{23E39467-FDD3-4E21-99C5-E69B901299D2}\Instance\InitPropertyBag | Target | REG_EXPAND_SZ | %OneDriveUserPath% |
| Create | HKCU | Software\WOW6432Node\Classes\CLSID\{23E39467-FDD3-4E21-99C5-E69B901299D2}\ShellEx\PropertySheetHandlers\tab 1 general | (Default) | REG_SZ | {21b22460-3aea-1069-a2dc-08002b30309d} |
| Create | HKCU | Software\WOW6432Node\Classes\CLSID{23E39467-FDD3-4E21-99C5-E69B901299D2}\ShellEx\PropertySheetHandlers\tab 2 customize | (Default) | REG_SZ | {ef43ecfe-2ab9-4632-bf21-58909dd177f0} |
| Create | HKCU | Software\WOW6432Node\Classes\CLSID\{23E39467-FDD3-4E21-99C5-E69B901299D2}\ShellEx\PropertySheetHandlers\tab 3 sharing | (Default) | REG_SZ | {f81e9010-6ea4-11ce-a7ff-00aa003ca9f6} |
| Create | HKCU | Software\WOW6432Node\Classes\CLSID\{23E39467-FDD3-4E21-99C5-E69B901299D2}\ShellEx\PropertySheetHandlers\tab 4 security | (Default) | REG_SZ | {1f2e5c40-9550-11ce-99d2-00aa006e086c} |
| Create | HKCU | Software\WOW6432Node\Classes\CLSID\{23E39467-FDD3-4E21-99C5-E69B901299D2}\ShellFolder | Attributes | REG_DWORD | F080004D |
| Create | HKCU | Software\WOW6432Node\Classes\CLSID\{23E39467-FDD3-4E21-99C5-E69B901299D2}\ShellFolder | WantsFORPARSING | REG_SZ | [blank] |
| Create | HKCU | Software\WOW6432Node\Classes\CLSID\{23E39467-FDD3-4E21-99C5-E69B901299D2}\ShellFolder | HideAsDeletePerUser | REG_SZ | [blank] |
| Create | HKCU | Software\Microsoft\Windows\CurrentVersion\Explorer\MyComputer\NameSpace\{23E39467-FDD3-4E21-99C5-E69B901299D2} | [none – creating key only] | ||
Wow, that’s a lot of Registry manipulation! Once you’ve got this in place, and it is applying to your target users, then you should be able to log on, sign in to Office365 (first launch only) and see the “online” OneDrive folder in all of its (relative) glory.
Summary
CloudDriveMapper is a great tool for environments that have no need or desire for aggressive caching of OneDrive content. I use it pretty widely in my RDSH deployments and I find it very reliable and easy to handle, and if you combine it in this way to produce the “Sync Client” user experience, your users will find their virtual platforms similar enough to the physical and/or home experience that they are used to.
I’m going to make a big effort to get some regular content out over the next few weeks – I’ve been forced into my first taste of the horrors of Windows 11, so expect some movement on that front soon.
![]()
Just wanted to reply because a colleague of mine found a way to even display it just like the native onedrive client does using these registry keys. Works like a charm en provides an even more clean experience with CloudDriveMapper
[HKEY_CURRENT_USER\SOFTWARE\Microsoft\Windows\CurrentVersion\Explorer\Desktop\NameSpace\{04271989-C4D2-2AD6-9551-C4726970912a}]
@=”OnedriveName”
[HKEY_CURRENT_USER\SOFTWARE\Classes\CLSID\{04271989-C4D2-2AD6-9551-C4726970912A}]
@=”OneDriveName”
“System.IsPinnedToNameSpaceTree”=dword:00000001
“SortOrderIndex”=dword:00000042
[HKEY_CURRENT_USER\SOFTWARE\Classes\CLSID\{04271989-C4D2-2AD6-9551-C4726970912A}\DefaultIcon]
@=”Onedriveiconfile”
[HKEY_CURRENT_USER\SOFTWARE\Classes\CLSID\{04271989-C4D2-2AD6-9551-C4726970912A}\InProcServer32]
@=hex(2):25,00,73,00,79,00,73,00,74,00,65,00,6d,00,72,00,6f,00,6f,00,74,00,25,00,5c,00,73,00,79,00,73,00,74,00,65,00,6d,00,33,00,32,00,5c,00,73,00,68,00,65,00,6c,00,6c,00,33,00,32,00,2e,00,64,00,6c,00,6c,00,00,00
[HKEY_CURRENT_USER\SOFTWARE\Classes\CLSID\{04271989-C4D2-2AD6-9551-C4726970912A}\Instance]
“CLSID”=”{0E5AAE11-A475-4c5b-AB00-C66DE400274E}”
[HKEY_CURRENT_USER\SOFTWARE\Classes\CLSID\{04271989-C4D2-2AD6-9551-C4726970912A}\Instance\InitPropertyBag]
“Attributes”=dword:00000011
“TargetFolderPath”=”%onedriveuserpath%”
[HKEY_CURRENT_USER\SOFTWARE\Classes\CLSID\{04271989-C4D2-2AD6-9551-C4726970912A}\ShellFolder]
“FolderValueFlags”=dword:00000028
“Attributes”=dword:f080004d
Some of those are the same Registry values I am setting, let me test and see how it fares.
The regkeys Davey is talking about, I wrapped around a PowerShell script and uploaded to github, have a look: https://github.com/RoyEssers/ExplorerShell
We are in the process of reviewing and testing cdm. What we see are issues with known folders that have already been set in another language. When we deploy cdm we have no way of finding the already set paths to the known folders like desktop and Pictures. Some users have Dutch settings, some English, Spanish etc. Do you know how to bypass this?
Hi Frank
Unfortunately I’ve never come across a language issue. Do you mean that the name of the folder sometimes shows in different languages? Is that related to the .ini file or does it depend on the system locale? It might be an idea to log it with CDM support, they are normally quite good at responding.
The issue is that users connect to onedrive using the onedrive sync app, system locale determines the name of the known folders: Desktop becomes Bureaublad in Dutch e.g. When we install cdm in Citrix Virtual apps we have no way of knowing what the known folders name is. If we leave it default a new Desktop folder will be created, If we choose Dutch, a previously English user will get a Bureaublad folder.
I will checkin with support on this one, thank you